Geist Watchdog 15 Quick Start User Manual
Page 4
4
Watchdog 15/100 quick-setup pack-in sheet, rev150213A
http://www.geistglobal.com/support
Once the correct e-mail server settings have been entered, click
Save Changes
, then click
Send Test Email
to
have the unit send a test message. If you do not receive the test message within a couple of minutes, refresh the
web page, and see if there is an error message displayed next to
Email Status
. Generally, if there was a problem
sending the e-mail,
Email Status
will display an error message which points to the source of the problem. The
most common issues are using the wrong login credentials (username and password), forgetting to check the
Use
SSL
box when the server requires encrypted connections, or a network problem which prevented the unit from
being able to reach the e-mail server at all. Note that, as described with the NTP time settings above, the Network
settings must be correct; if the
Gateway
and
DNS Servers
settings are not set properly, the unit will not be able
to reach the SMTP mail server, and will not be able to send e-mails.
If the
Email Status
message still says “OK” after you refresh the page, then the unit did successfully log in to the
e-mail server and send the test message. If you did not receive the message, check your spam folder to see if it
was accidentally marked as spam.
Once you have gotten the unit to send a test e-mail, you can also test its ability to send actual alarms by setting a
temperature alarm on the Alarms page, then warming the sensor to trip the alarm.
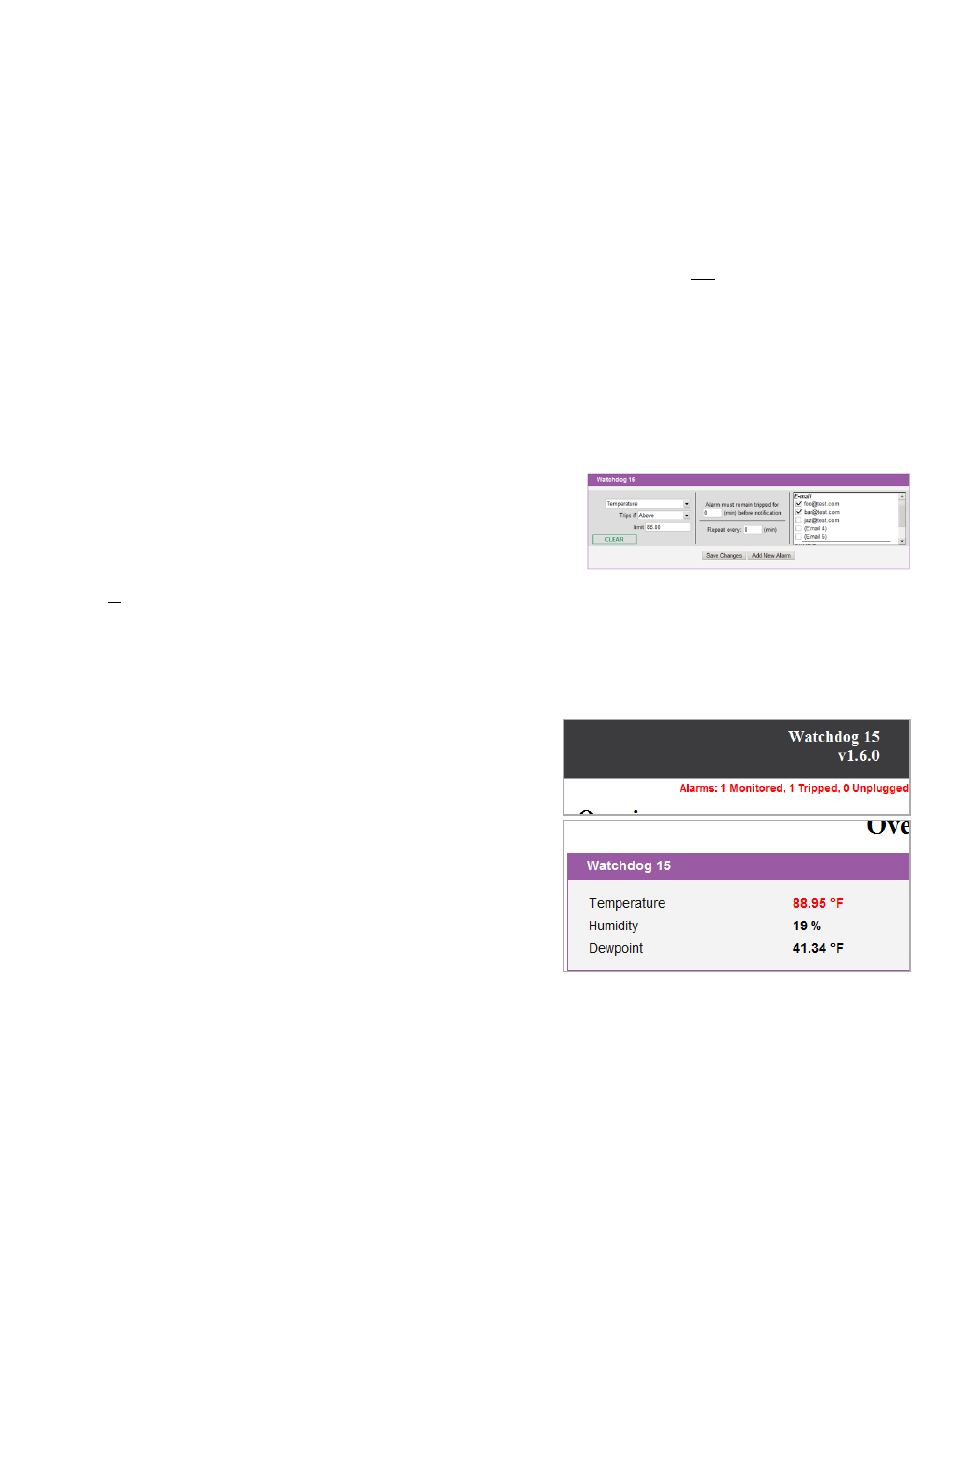
First, go to the Overview page, and take note of the current temperature.
Next, go to the Alarms page, click
Add New Alarm
, then use the
drop-down boxes to select the “
Temperature
” reading, set
Trips if
to
“
Above
”, then set
limit
to a couple of degrees higher than the current
temperature. On the right-hand side, set a checkbox on at least one
of the
addresses in the list – and be sure that the actual e-mail
address is shown next to the checkbox; if the checkbox simply reads “(Email 1)”, “(Email 2)”, etc., then that
checkbox doesn’t have a valid
Destination
e-mail address programmed into it on the Config page yet, and putting
a check in that box won’t send any messages.
For now, leave the
Alarm must remain tripped for [ ](min) before notification
and
Repeat every: [ ] (min)
settings at “
0
”, and click
Save Changes
.
To trip the alarm, return to the Overview page so that you can see
the current temperature, then simply warm the unit’s sensor by a
few degrees by blowing warm air at it. When the temperature
exceeds the threshold limit, the status messages in the upper-right
corner of the web page should change to show “1 Tripped” alarm,
and the temperature reading itself should turn red. (Some browsers
may require you to manually refresh the web page to see this.) If
the unit’s e-mail server settings are properly configured, within a
few moments you should also receive an e-mail which says
“Watchdog 15: Tripped” in the subject line, and shows both the
alarm threshold and the current temperature in the message body.
Allow the sensor to cool off again, and when the temperature drops a full degree below the threshold limit you
set, the “Tripped” message should disappear from the web page, the current-temperature reading will turn black
again, and you should receive an e-mail with a subject line of “Watchdog 15: Cleared”.
If you have successfully managed to perform the above steps, then... congratulations! The unit is now correctly
set up for your network and SMTP service, and is ready to use. More complete information about all of the unit’s
functions and capabilities can be found in the appropriate User’s Manual for your particular unit. Clicking the
Help
tab on the unit’s web page will open a new browser window to the “Support” area of our web site; the manual
can be downloaded as a PDF file from there.
If you have not been able to complete the above steps successfully, the full User’s Manual can be found by going
to
www.geistglobal.com
and looking under “Support”, then look for the “Instruction Manuals” link under the
“Monitor” category. If the information provided in the User’s Manual does not help in overcoming whatever
difficulties you may be having, technical support is available by sending an e-mail to
, and we will be glad to assist you.