Installation instructions, Clean up caddy use requirements, Unpack the clean up caddy parts – Gladiator GAWU12CCTG Clean-Up Caddy User Manual
Page 2: Assemble clean up caddy, Mount the clean up caddy to the wall, Warranty
2
INSTALLATION INSTRUCTIONS
Clean Up Caddy Use Requirements
■
Intended to be installed on Gladiator
®
Garageworks GearWall
®
panels or GearTrack
®
channels.
■
Maximum weight limit is 25 lbs (11.4 kg)
Unpack the Clean Up Caddy Parts
Remove the caddy parts and fasteners, and dispose of/recycle all
packaging materials.
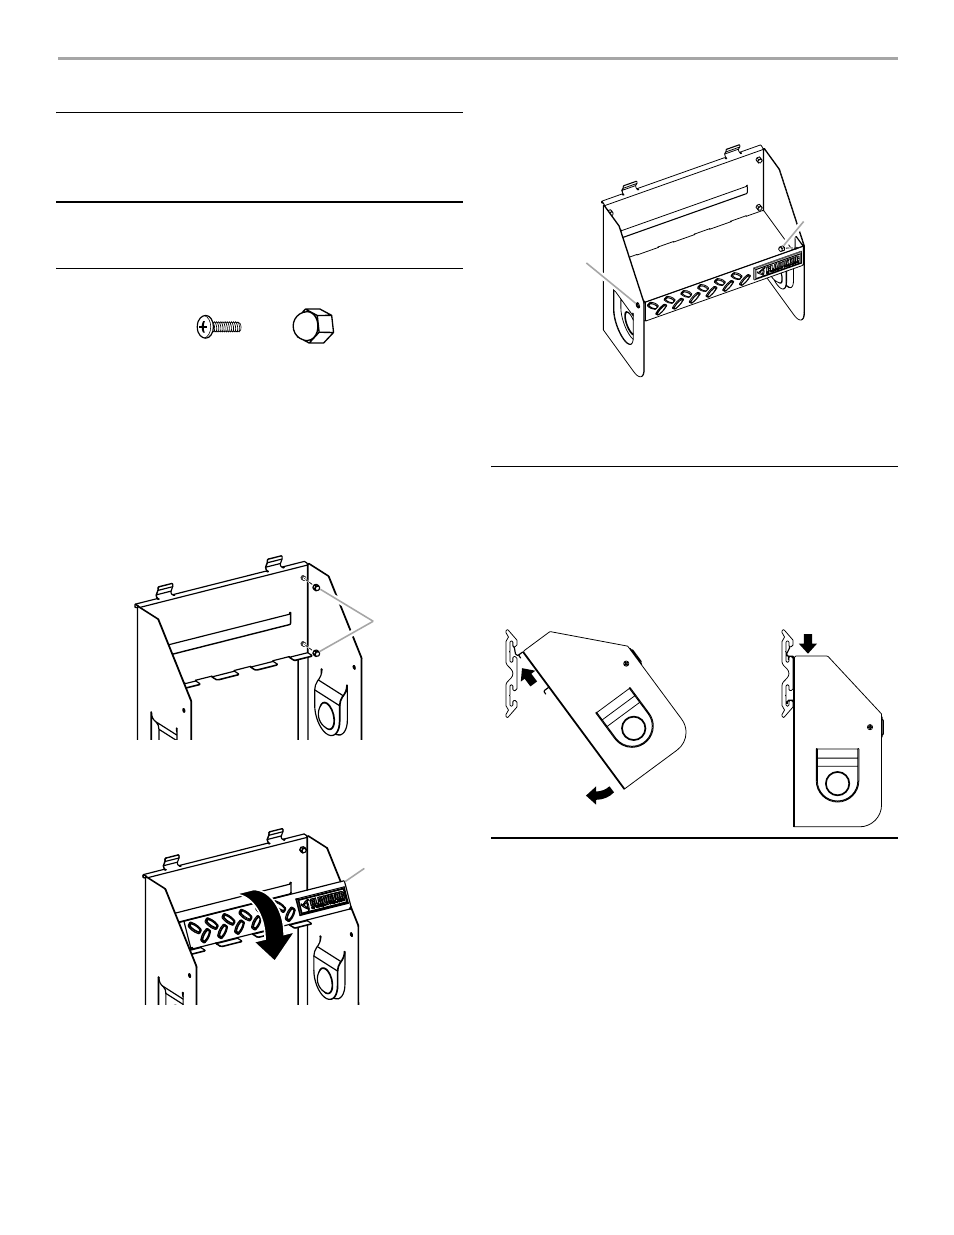
Assemble Clean Up Caddy
Gather the required tools before starting assembly.
Tools Needed:
1.
Insert the threaded studs at the top of each side piece into the
two holes in each side of the caddy back.
NOTE: Make sure the bracket rim on the caddy back is to the
outside of the side pieces.
2.
Using two acorn nuts (F10) per side, attach the sides to the back.
Completely tighten with a
³⁄₈" nut driver.
3.
Attach the caddy shelf (with the name badge facing up) by
interlocking the shelf tabs with the tabs on the back.
NOTE: The tabs on the caddy back fit underneath the tabs on
the caddy shelf.
4.
Using the two Phillips-head screws (F3b) and two acorn
nuts (F10) fasten the caddy shelf to the sides.
5.
Holding each screw in place with a screwdriver, completely
tighten the acorn nut with the nut driver.
Mount the Clean Up Caddy to the Wall
IMPORTANT: Be sure the GearWall
®
panels or GearTrack
®
channels
are installed with mounting screws in every slot and at every stud
location with a maximum of 24" (60.96 cm) horizontally between
screws.
1.
Engage the bracket rims located on the back of the caddy into
the slots in the GearWall
®
panel or GearTrack
®
channel by lifting
up, pushing toward the wall and lowering the rims into the slots.
2.
Inspect the caddy from the side to ensure the bracket rims are
fully engaged in the slots as shown.
Warranty
For warranty information:
In U.S.A. call 1-866-342-4089 or visit our website at
www.Gladiator GW.com
In Canada call 1-800-807-6777 or visit our website at
www.gladiatorgarageworks.ca
F3b
F10
F3b Phillips-head screw (2)
F10 Acorn nut (6)
■
³⁄₈" Nut driver
■
Phillips screwdriver
A. Acorn nuts (F10)
A. Bottom piece
A
A
A. Phillips-head screw (F3b)
B. Acorn nut (F10)
A
B