Install legs and back panel – Gladiator GAWB0xMTZG Adjustable Height 4/6/8 ft. Maple Workbench User Manual
Page 4
4
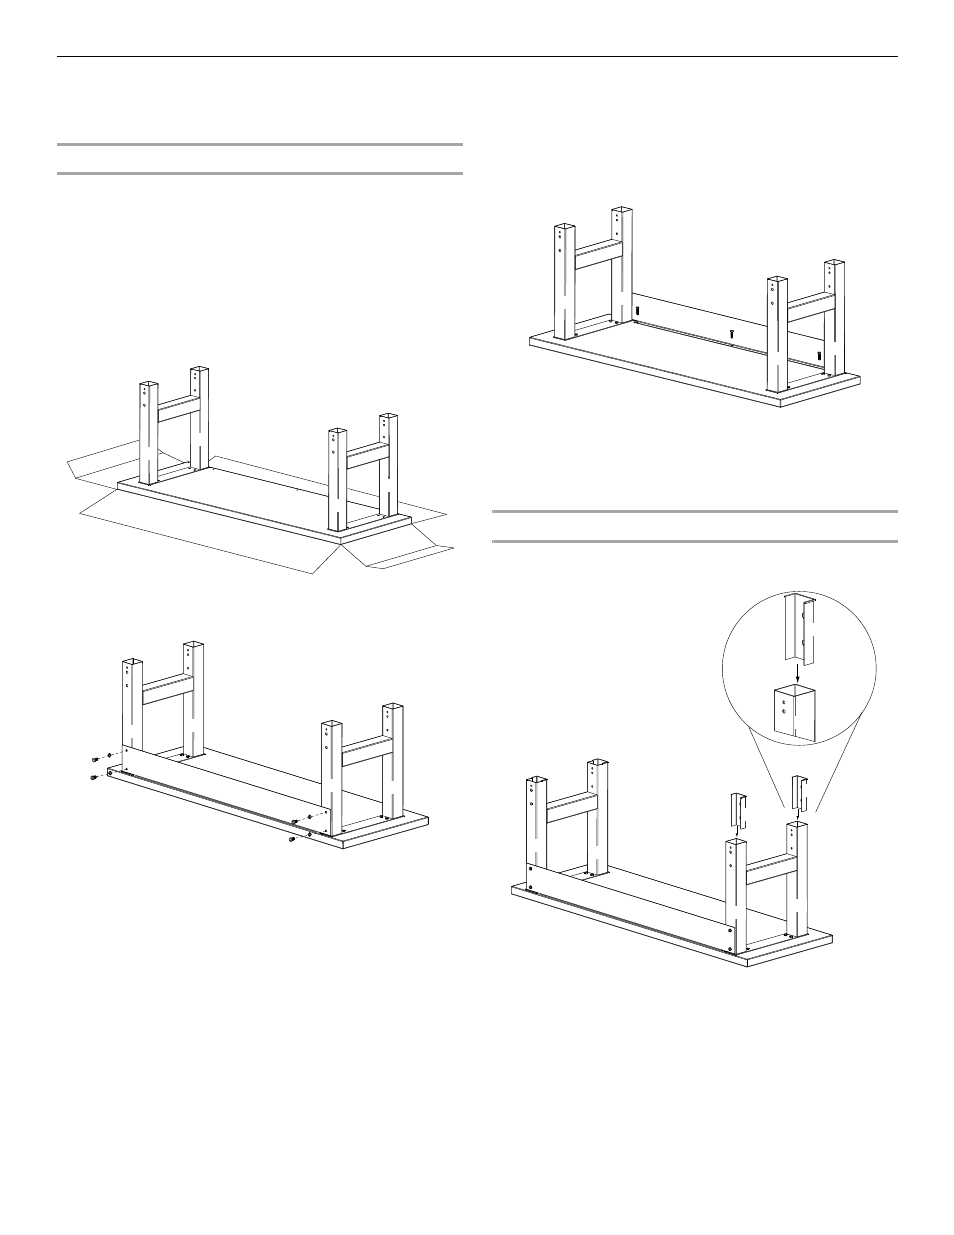
Install Legs and Back Panel
NOTE: Assemble and adjust this workbench upside down according
to the illustrations. Be sure that the workbench top is flat on the floor
and the legs are in the air.
Outer Leg and Back Panel Installation
1.
Place each set of outer legs (P1) on the workbench underside
and match the holes.
2.
Attach the legs (P1) to the workbench top (P4) using the 8 screws
(F16). Make sure that the screws are inserted straight into the
holes. Install the screws using a
⁹⁄₁₆" socket wrench, but do not
tighten screws completely.
NOTES:
■
Tightening the screws (F16) at an angle can place excessive
stress on the screws, which may cause the screws to fail.
■
The holes in the legs are oval to allow space for minor
adjustments as the workbench is assembled.
3.
Attach the back panel (P3) to the outer legs using the 4 bolts
(F14) and lock washers (F20) provided. Do not tighten the bolts
completely at this time.
4.
Attach the back panel (P3) to the workbench top (P4) using the
remaining screws (F16). Make sure that the screws are inserted
straight into the holes. Tighten the screws using a
⁹⁄₁₆" socket
wrench.
NOTE: Tightening the screws (F16) at an angle can place
excessive stress on the screws, which may cause the screws to
fail.
5.
Using a
⁷⁄₁₆" wrench, tighten the bolts attaching the back panel
(P3) to the outer legs (P1) completely.
NOTE: Do not overtighten the bolts and screws.
6.
Tighten all remaining bolts and screws.
NOTE: Do not overtighten the bolts and screws.
Inner Leg Installation
1.
Insert one of the plastic spacers (P5) into the outer leg (P1) as
shown.
P4
P1
P1
P1
P1
P1
P1
P1
P1
P4
P3
P1
P1
P1
P1
P3
P4
P4
P3
P1
P1
P1
P1
P1
P5
P5
P5