JIMS Box 3 1208-1353 (all models of 120, 131, or 135 Alpha, Beta and EVO Mount Engines (Including Kits) User Manual
Page 11
555 Dawson Drive, Camarillo, CA 93012 Phone 805-482-6913 • Fax 805-482-7422
10
Rev I
9-12
No.1208-1353
A Division of Thiessen Products, INC
IIn
ns
st
tr
ru
uc
ct
tiio
on
n S
Sh
he
ee
et
t F
Fo
or
r B
Bo
ox
x 3
3 1
12
20
0”
”,, 1
13
31
1”
”,, o
or
r 1
13
35
5”
”
E
En
ng
giin
ne
e A
As
ss
se
em
mb
bl
liie
es
s O
Or
r E
En
ng
giin
ne
e R
Ra
ac
ce
e K
Kiit
ts
s
STEP 9: Carburetor & Manifold - Installation
Follow the manufactures instructions from your choice of fuel system you have chosen. See JIMS
Sales Dept. for either carburetor,or fuel injection, recommended for your engine.
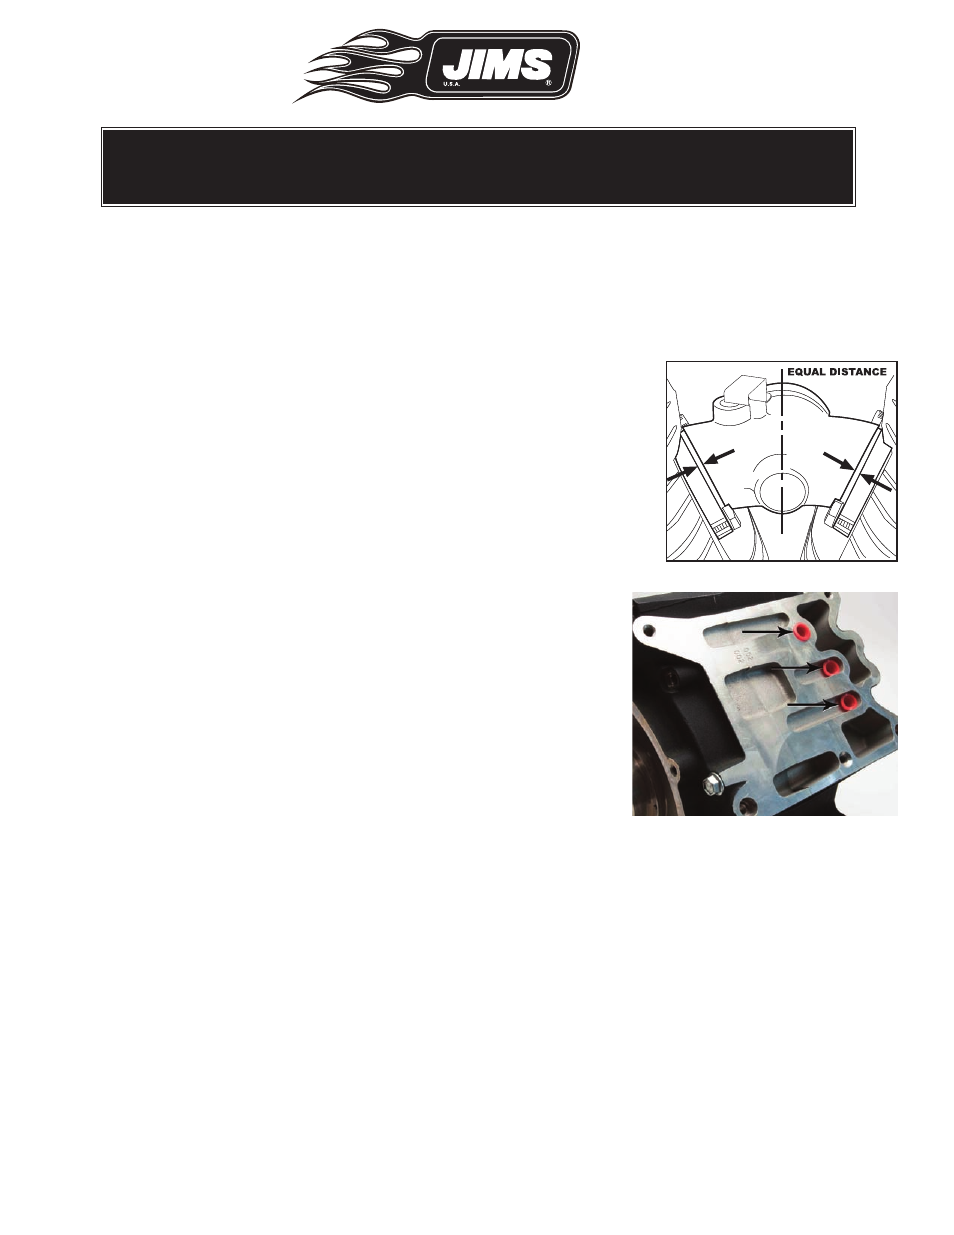
Note: Center the intake manifold in-between the two intake flange mounts (see page2 of box
2 instructions for Part No. info) during installation. See Fig. 9
STEP 10: Installing a TWIN CAM EVO Engine in Chassis
Caution: Remove or powder coating,or paint from the motor mount
pads on frame.
Note: If installing in an FXST (Softail), bolt down the rear engine
mounts first. The rear engine case mounting holes have been opti-
mized so the installation of the rear bolts can be performed with the
cylinders on the assembled engine.
• Install Jim’s EVO mount engine per Harley – Davidson’s
service manual for the year and model you will be working with.
• After torquing the rear engine bolts, check the clearance
(gap) between the front engine mount and the frame.
• Shim front engine mount to within .010 of an inch with shim
stock.
• Install your stock EVO top engine mount, per Harley –
Davidson’s service manual for the year and model you will
be working with.
STEP 11: EVO Mount TWIN CAM Recommended Rear En-
gine Mount Hardware:
• H/D, Part No. 3528 rear motor mount bolt 3/8"-16 x 3-1/4"
used on 1991-98 FL, FXR, FXD, and 99 FXR.
• H/D, Part No.3512 rear motor mount bolt 3/8"-24 x 3-1/4" used on 1991-99 FXST.
• H/D, Part No. 6019 washer rear motor mount 3/8" x 29/32”x 1/16” 1991-96 FXST and
1991-98 FL, FXR, FXD, & 99 FXR.
Important Note: For 2006 to present Dyna's, or 2007 to present FL's Remove the three red
shipping plugs as shown in Fig.10 before attaching the transmission. If you neg-
lect to remove these, you will not have oil pressure and may damage the engine
when you start up.
STEP 12: Installing Primaries, and Clutch
Follow installation instructions for inner and outer primary, clutch assembly, sprockets, primary
chain, adjustment and alignment, per Harley-Davidson’s service manual for the year and model
you will be working with.
Clutch Recommendation: The high torque output of the JIMS 120, 131, or 135 Race Kit engine
requires increased clutch torque capacity. The JIMS performance clutch No.8382 is one exam-
ple.
Fig. 9 - Proper manifold alignment
Fig. 10 - Remove three red plugs.