Kanguru Mobile Workspace v100 Quick Start User Manual
Kanguru mobile workspace v100, Quick start guide, Secure. anytime. anywhere
Kanguru Mobile Workspace v100
Windows to Go USB3.0 Flash Drive
Quick Start Guide
Secure. Anytime. Anywhere.
TM
04.13.15 v1.0 © 2015 Kanguru Solutions
Legal terms and conditions available at www.kanguru.com.
Please review and agree before use. Thank you.
6. THE WINDOWS TO GO SETUP WIZARD
Windows 8/8.1 Enterprise has a built in Setup Wizard
for provisioning Windows to Go devices. This is the
recommended method for provisioning individual
Windows To Go drives.
1. Connect the Kanguru Mobile Workspace v100 to a
PC running Windows 8/8.1 Enterprise via a USB
port. Connecting through a USB3.0 port is highly
recommended.
2. Insert your Windows installation DVD, or mount
your Windows installation ISO file. This is so you
can use the ‘Sources\install.wim’ file from the
DVD or mounted ISO file to create the Windows
To Go workspace.
Note: The .wim can be customized and configured using
DISM. Refer to Microsoft’s DISM if a .wim file does
not exist.
3. Open a Windows search (keyboard shortcut Win +
S) and search for ‘Windows To Go”.
4. Click on the Windows To Go application.
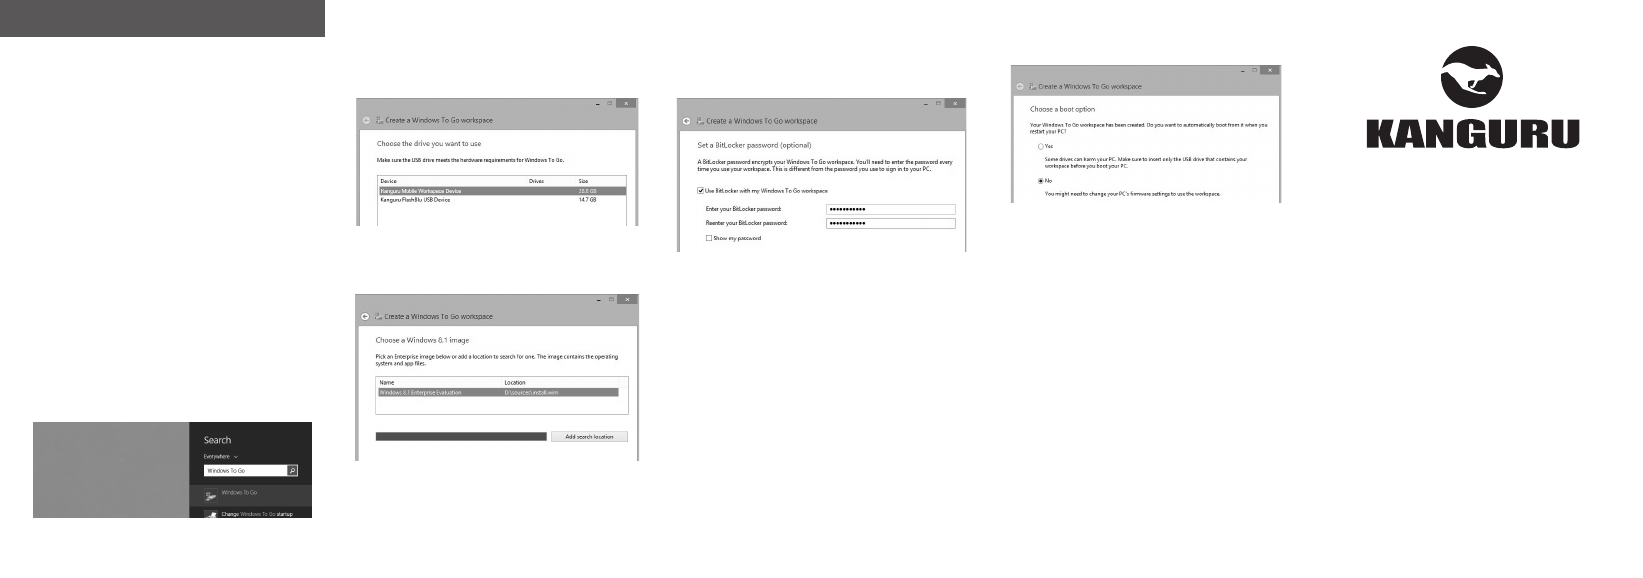
5. The Windows To Go setup wizard appears. Select
the ‘Kanguru Mobile Workspace v100 Device’ and
then click on Next.
6. Select the Windows install.wim file from step 2
and then click on Next.
Note: If for any reason Windows didn’t find the .wim
file, then click on the Add search location button to
manually select the DVD or mounted ISO from step 2.
7. Enable or disable BitLocker encryption depending
on whether you would like to use a BitLocker
password on your Windows To Go workspace.
• Do Not Use BitLocker - Leave the “Use BitLocker
with my Windows To Go workspace” box
unchecked. Click on Skip. If you are planning to
use a USB-Duplicator to create multiple Windows
To Go drives, DO NOT enable BitLocker prior to
duplication.
• Use BitLocker - Check the “Use BitLocker
with my Windows To Go workspace” box, type
a password you want for BitLocker, and click on
Next. By default, BitLocker passwords must be at
least 8 characters long.
8. Click on Create. Your Windows To Go workspace
will now start being created on the drive.
Warning! Creating the Windows To Go workspace will
also format the drive.
9. When finished, select a boot option:
• Yes : This Windows 8 Enterprise PC (host) will
always try to boot from any bootable USB flash
drives connected during bootup.
• No : In order to boot from your Windows To Go
device, you will have to manually choose to boot
from a USB flash drive through the boot menu.
10. To finish setting up Windows To Go click on Save
and restart.
11. When you have booted from the Windows To
Go USB flash drive for the first time, check the I
accept the license terms box, and click on Next.
12. When finished, make sure that you have internet
access. You may need to setup the network
connection from the host PC for your Windows
To Go workspace before you have internet access.
Congratulations! Your Windows To Go device has
been successfully provisioned.