La Crosse Technology WS-7015 User Manual
Page 7
9.
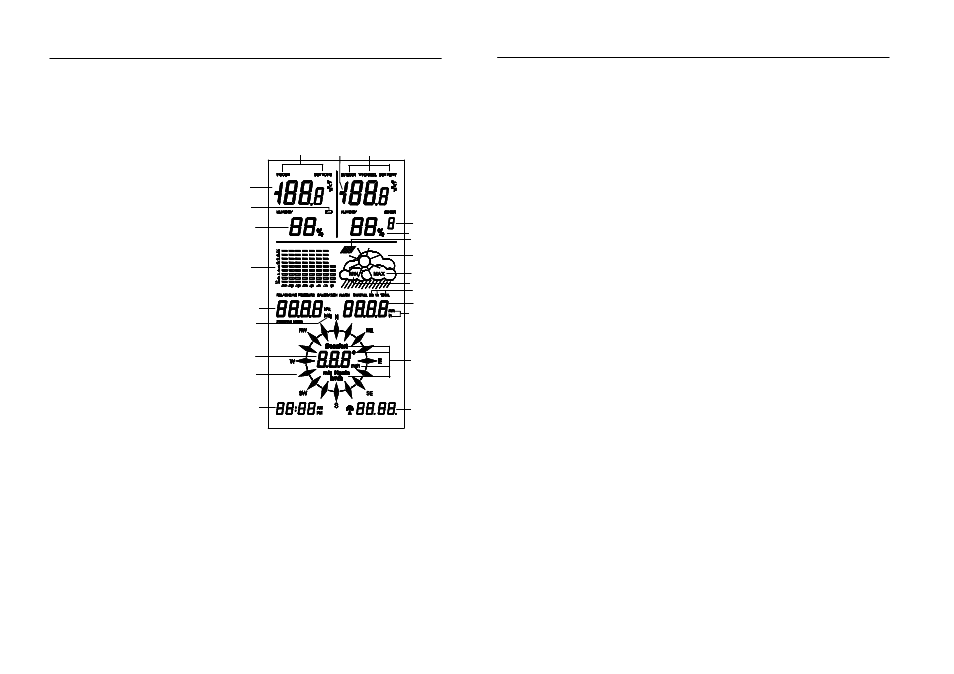
Display Overview
Note!
Unlike the real display the following illustration shows every display combination
possible in order to give a description of their appearance.
1. Temperature Indoor Sensor and
Indoor/Outdoor Sensor
respectively in degree Fahenreit
or Celsius
2. Current Indoor Measurement:
Temperature or Perceived
Temperature or Dew Point
3. Humidity Indoor Sensor and
Indoor/Outdoor Sensor
respectively
4. Temperature of selected
Temperature/Humidity Sensor
5. Current Outdoor Measurement:
Temperature or Perceived
Temperature or Dew Point
6. Identification Number of selected
Outdoor Sensor
7. Humidity of selected Outdoor
Sensor
8. Low Battery Indicator
9. Display of Air Pressure
10. Display of Air Pressure Unit:
inHg or hPa
11. Display of Rain Volume Unit:
in or mm
12. Display of Rain Volume
12. Display of Time Period of Rain
Volume: Total or last 24 Hours or
last Hour
14. Display of Air Pressure Tendency
15. Display of Air Pressure History of last 24 Hours
16. Icons for Weather Forecast
17. Display for Poll of Minimum Values
18. Display for Poll of Maximum Values
19. Display of Date of the Day
20. Display of Time
21. Display of Wind Strength Unity: mph, Knots or km/h or m/s or Beaufort
22. Display of Wind Strength or Wind Direction (in 5° Steps)
23. Compass, Display in 22.5° Steps with Display of Deviation Range at Changing Winds
10. Operation
After the installation of the Remote Sensors and the following setup of the Base Unit (test
mode of the Base Unit should generally be terminated after the test mode of the last
sensor) the transmitted and computed data will show on their respective display sections
on the LCD. If this is not the case please observe the notes on debugging on Pages 46-
47.
Note!
Please note that data can only be displayed if there is a respective sensor installed.
E.g. without a Rain Volume Sensor there will be no display of rain volume.
Since all relevant data is simultaneously displayed in the first place, operation will
essentially be limited to simple selection of further sensors or further weather data
by repeated pressing of the respective function keys.
Item "Operation“ solely pertains to operation in Normal Mode with the large key imprints
being applicable.
Programmable functions are thoroughly covered in Item "Programming Mode“ with the
small key imprints being applicable.
Indoor
In normal operating mode the indoor display in the upper left of the LCD displays the
temperature and humidity at the location of the Indoor Sensor.
By once pressing the "Indoor" key the Dew Point will be displayed. The Dew Point is
that point in temperature at which condensation of humidity begins and the so called
"Dewing“ takes place, i.e. the humidity is condensing and will precipitate in liquid form. So
the dew point for e.g. air with a water-vapour content of 17.4 g/m
3
lies at a temperature of
68ºF (20°C). If the dew point for water-vapor drops below 32ºF (0°C), the precipitation will
take place as snow or hard-frost.The dew point depends upon the concurrence of a
certain air pressure, temperature and humidity at the same time.
One more pressing of the "Indoor" key will lead back to the normal temperature display.
Wind
Pressing of the "Wind" key leads to the Change of Units for the Display of Wind
Strength respectively and the change from the display of the wind strength to a Digital
Display of Wind Direction in 5° steps within the compass (digital display field). The
order of changes and displays will be as follows:
-
Wind Strength in mph
-
Wind Strength in knots
-
Wind Strength in m/s
-
Wind Strength in km/h
-
Wind Strength in Beaufort
-
Display of Wind Direction in place of Wind Strength
4
2
1
6
8
3
15
9
10
22
23
20
19
21
11
7
14
16
18
17
13
12
5