La Crosse Technology WS-8147U-IT User Manual
Page 3
9
Note: the time will be displayed with an additional “PM” for the time from 12:00 noon until
11:59.
1.
The hour digits will start flashing on LCD1.
2.
Set the desired hours by pressing and releasing the + key followed by pressing the SET
key.
3.
Now the minute digits will start flashing.
4.
Set the desired minutes by pressing and releasing the + key. If the + key is held, the units
will increase by 5.
5.
Press and release the SET key to move to the “Year Setting”.
Note:
The unit will still try to receive the signal every day despite it being manually set. When it does
receive the signal, it will change the manually set time into the received time. During reception
attempts the WWVB tower icon will flash. If reception has been unsuccessful, then the WWVB
tower icon will not appear but reception will still be attempted the following hour.
WWVB time reception takes place from 12:00 am through 6:00 am each day (attempts WWVB
reception every full hour within this time frame). When the time signal is received for example at
1:00 am, the radio-controlled clock will not attempt to receive the WWVB signal for the
remaining hours until 6:00 am. Therefore, the next signal attempt will take place between 12:00
am and 6:00 am the next day. The other times WWVB reception takes place, are upon setup
and after manual time set exiting mode. Reception is generally not possible during daylight
hours due to the interference of the sun.
YEAR
The year can be selected sequentially from 2001 to 2029 and will then start over again (default
setting 2009). The year will only appear in the manual setting mode.
1.
The year digits will start flashing on LCD2. Select the desired year by use of the + key.
2.
Press and release the SET key to switch to the “Month Setting”.
MONTH
1.
The month digits on LCD2 will start flashing. Set the desired month by use of the + key.
2.
Press and release the SET key to move to the mode “Date Setting”.
10
DATE
1.
The digits for the date will start flashing on LCD2 (Default setting 1). Set the desired date
by use of the + key.
Note: The date can only be set in conjunction with the selected month. For example, it is
not possible to set the date 30 if the month of February is selected.
2.
Press and release the SET key to move to “Weekday setting”.
WEEKDAY
1.
The weekday symbols will be displayed on LCD2 in the pre-set language and flashing.
Set the desired weekday by use of the + key.
2.
Press and release the SET key to enter the mode “º12/24 hour Time Display Setting”.
12/24 HOUR TIME
1. The
“12h” or “24h” will start flashing in LCD1 (Default setting 12h). Select the desired
time display mode by use of the + key.
2.
Press and release the SET key to enter the “ºC/ºF Temperature Setting“.
°C/°F
1. The
characters
“°F” or “°C” will start flashing on LCD2 (Default setting °F). By use of the
+ key select “°C” for temperature display in degrees Celsius or “°F” for degrees
Fahrenheit.
2.
Press and release the SET key to exit the setting mode and switch back to the normal
display mode.
EXIT THE MANUAL SET MODE
To return to the normal display mode from anywhere in manual setting mode simply press
the SNZ key anytime.
If no keys are pressed for at least 15 seconds in setting mode, the radio-controlled clock
will automatically switch back to normal display mode.
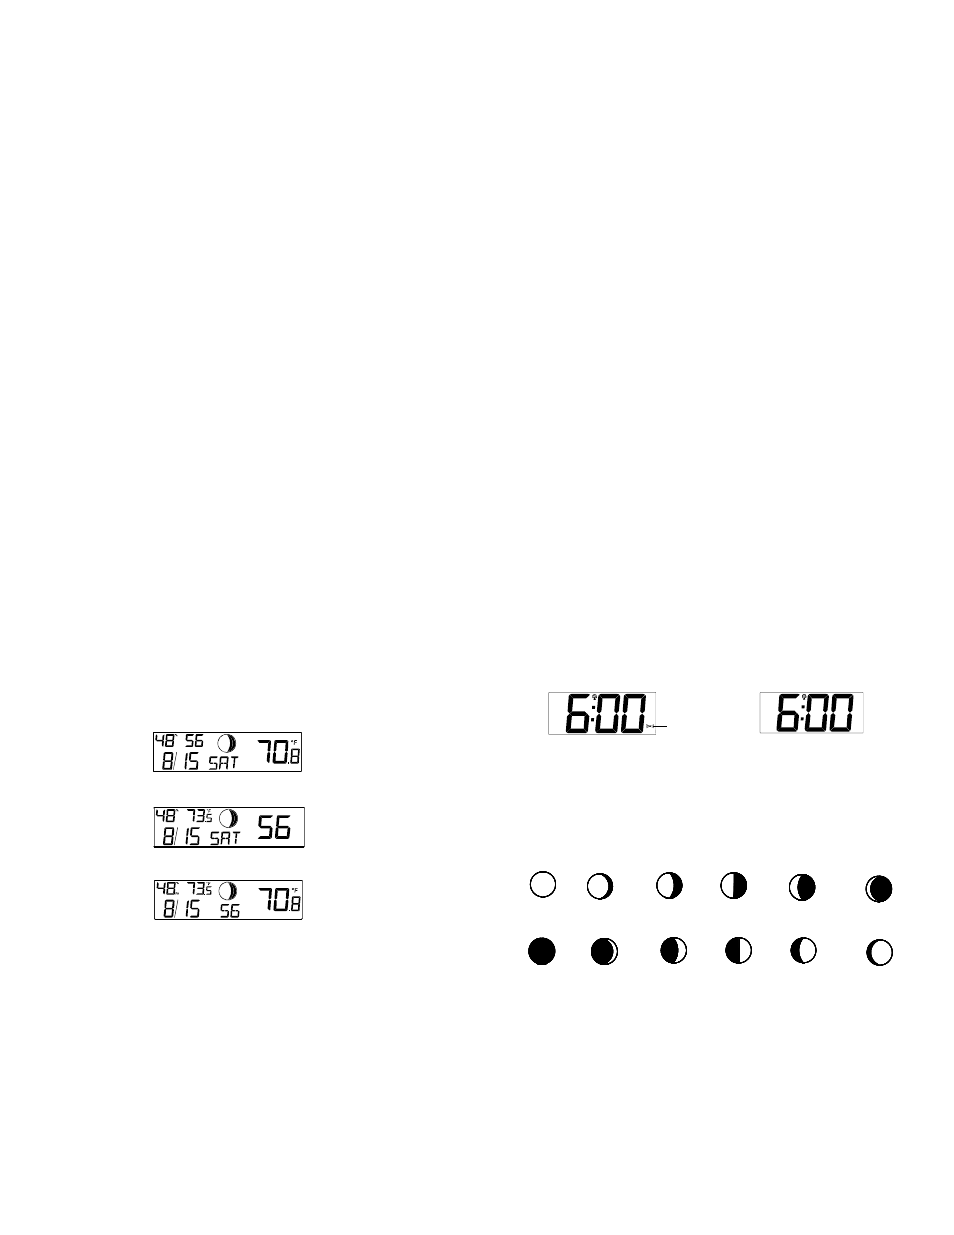
CHANGING THE DISPLAY MODE (Seconds, indoor, outdoor)
There are 4 possible display modes to view the seconds, indoor, and outdoor temperature.
11
The indoor humidity/ indoor temperature/ month & date/ weekday/ / outdoor temperature/ are
the default.
To change the display:
1.
Press the + key. The display should now show the indoor humidity/ seconds/ Month&
date/ Weekday/ outdoor temperature.
2.
Press the + key a second time and the display will now show the indoor humidity/ indoor
temperature/ month&date/ weekday/ seconds.
3.
Press the + key a third time and the display will now show the indoor humidity/ indoor
temperature/ month&date/ seconds/ outdoor temperature
4.
Press the + key a fourth time and the display will return to the normal display.
ALARM SETTING
To enter into the alarm setting mode:
1. Hold
the
ALM key for 4 seconds. The hour digits start flashing.
2.
Press and release the + key to set the hour.
3.
Press and release the ALM key to set the minutes. The minute digits start flashing.
4.
Press and release the + key to set the minutes.
5.
Press and release again the ALM key to exit the Alarm setting mode or wait for 15
seconds automatic timeout.
12
TO DEACTIVATE THE ALARM:
The alarm will be automatically ON when the alarm time is set. To deactivate the alarm (OFF),
press and release once the ALM key in normal mode display. The alarm icon will disappear, the
alarm is now off.
SNOOZE SETTING
The snooze can only be activated during alarm time for a snooze duration of 10 minutes by
pressing the SNZ key on the back of the clock.
MOON PHASES SYMBOLS
The Moon Phases and their corresponding dates appear in LCD 2. There are 12 visible Moon
Phases that will show in the LCD 2.
New Small Large First Small Large
Moon Waxing Waxing Quarter Waxing Waxing
Crescent Crescent Gibbous Gibbous
Full Large Small Last Large Small
Moon Waning Waning Quarter Waning Waning
Gibbous Gibbous Crescent Crescent
Note: The Moon Phases can only be shown accordingly to calendar setting (2001-2029). The
Moon Phases will not follow the actual moon cycle before or after this period.
Alarm icon (((
))) (ON)