Mrir1 – Legrand MRIR1 User Manual
Page 2
In
st
a
ll
a
ti
o
n
In
st
ru
ct
io
n
s
SPECIFICATIONS
Input Voltage .................................... 12VDC, 50mA minimum
AC-DC adaptor ...............................................120VAC, 60Hz
Programming Remote ........ CR2025 battery 3.0V 170mAH
IR Frequency .................................................................36KHz
Control Inputs:
Internal IR receiver
3.5mm jack for connection to an optional
external IR sensor or IR repeater system
Output ................................................ TopDog RF commands
DESCRIPTION
The MRIR1 providess Top Dog™ wireless network
connectivity via commonly available IR learning remotes.
Miro house and room scenes are invoked based on IR codes
transmitted from the included Programming Remote or
a user supplied learning remote (e.g., Philips Pronto, or
those by other manufacturers such as Universal Remote,
RTI etc.). This allows the preferred IR remote to integrate
with the Miro wireless network to execute house and room
scenes and also control audio video components.
The MRIR1 interface module is designed with an integrated
36Khz IR receiver located at an opening placed at the top of
the device. The MRIR1 also has a 3.5mm mini stereo jack
allowing direct connection to existing Xantech IR receivers.
Additional receiver options may be available from Xantech
or other vendors. This product has been tested the MRIR1
with Xantech Dinky Link model 480B-30.
The included infrared Programming Remote is lightweight
and about the size of a credit card. It can be configured to
send either House or Room scenes by pressing the desired
Mode button. See IR Programming Remote Configuration.
Top Dog™ Wireless Communication
Wireless devices use radio signals to communicate with
each other to control lighting and other types of electric
loads in selected areas. These wireless devices use the
900MHz band for high-speed control communication. Using
“frequency-agile” Top Dog™ technology, these wireless
devices avoid interference with other 900MHz devices, such
as cordless phones and baby monitors.
POWER FAIL MEMORY
After a power failure, all wireless devices automatically
return to the state that they were in immediately prior
to loss of power. All configuration and scene control
information is preserved.
APPLICATION ASSISTANCE
The MRIR1 functions as part of a network that may contain
a variety of wireless devices. Instructions for installation,
binding operations, and use are included with the relevant
wireless devices. Application support information and
installation guides are available online.
ENVIRONMENT AND ORIENTATION
Do not locate the MRIR1 close to any device that may
cause radio frequency interference or behind large metal
objects that can block radio reception. Avoid TV sets,
computers, refrigerators, microwave ovens, range hoods,
safes, etc. The infrared receiver must also have a clear line
of sight view of the areas where the IR remote control will
be operated. Avoid fluorescent light fixtures, direct sunlight,
frosted or tinted glass obstructions.
INSTALLATION
A screw slot on the base of the MRIR1 interface is provided
for wall mounting. Alternatively, the base of the unit is
equipped with rubber feet for shelf-top operation.
1. Complete the physical installation and binding of
all other wireless devices in the network. Use an
appropriate scene controller or hand held scene
remote to set up the scenes that will be executed based
on the decoded IR transmissions.
2. Plug the MRIR1’s power supply into a convenient
120VAC outlet, and connect the power cord to the
power supply jack on the MRIR1.
3. The status LED lights yellow, indicating that the unit
is ready for configuration. See SET HOUSE ID in this
manual.
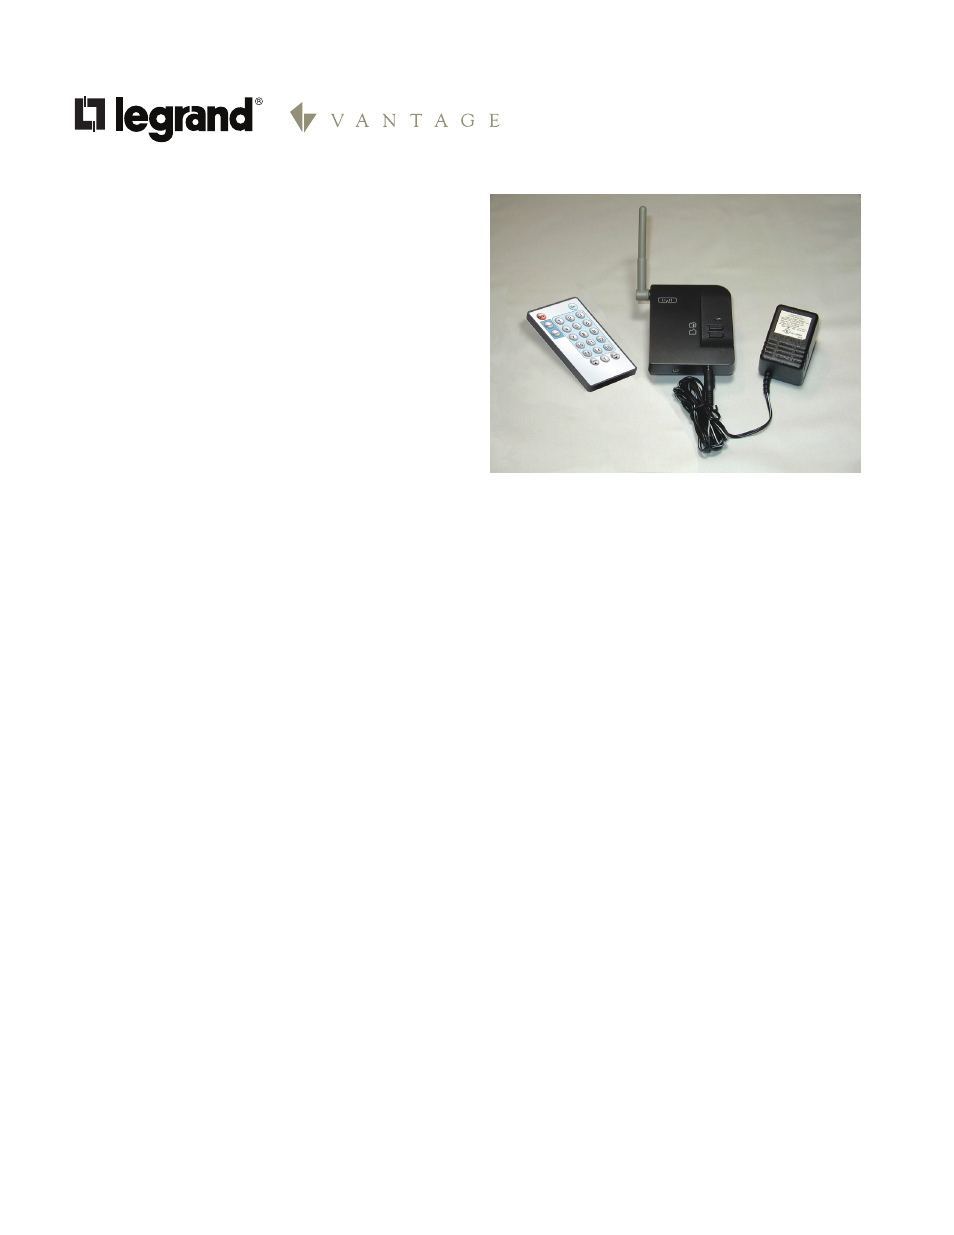
IR Programming Remote, MRIR1 interface, power supply
MRIR1
Infrared Remote Control Interface
with Programming Remote