Binding the mrir1 interface, The ir programming remote – Legrand MRIR1 User Manual
Page 3
1
2
3
On
4
OFF
5
6
7
8
9
10
11
12
13
14
15
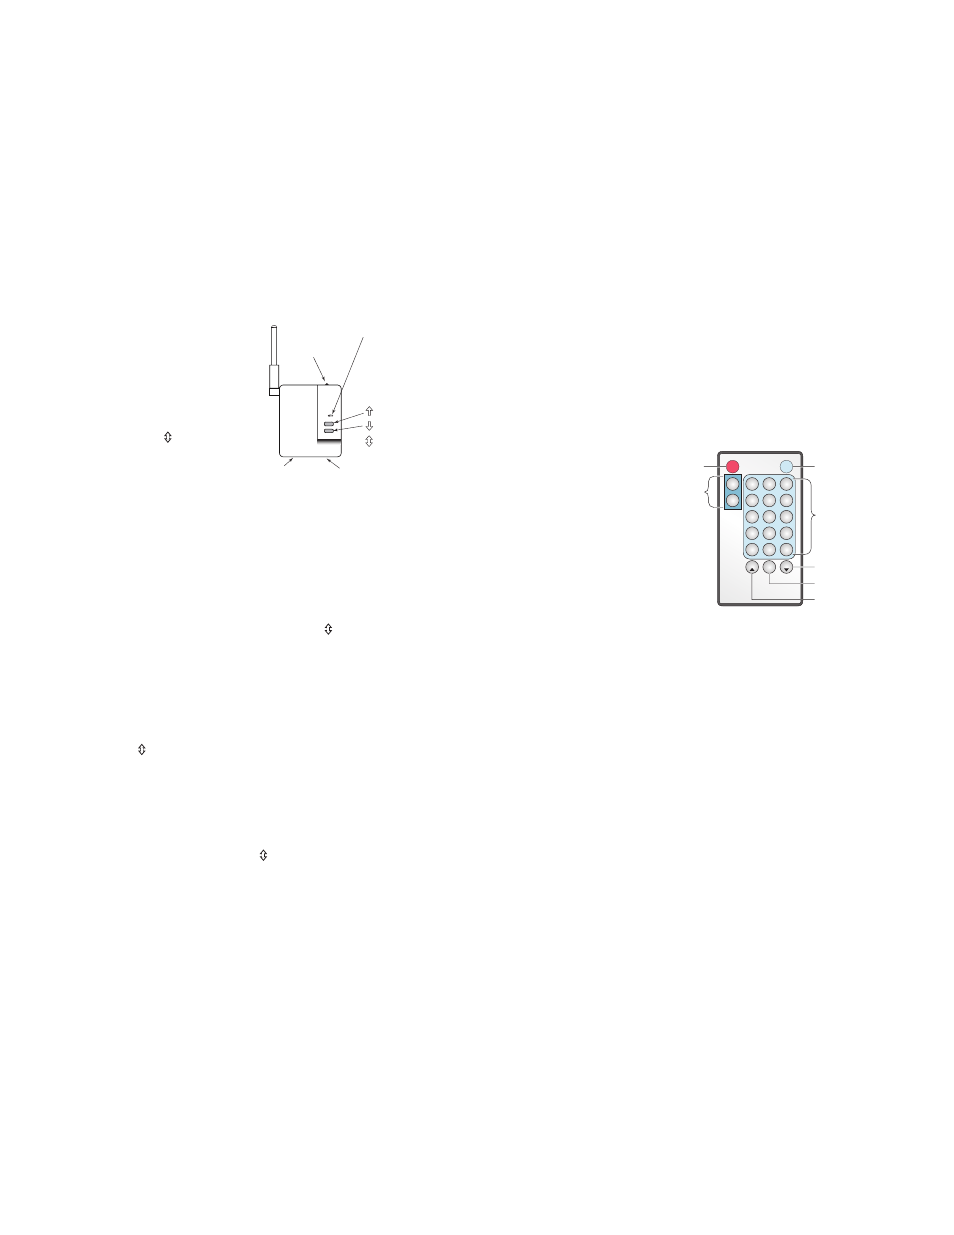
Fade
Panic
Fade
House
Room
On
Off
Mode:
House
or
Room
Scene
Number
Buttons
Fade Down
Panic
Fade Up
BINDING THE MRIR1 INTERFACE
Set House ID and Room Binding
1. Go to a previously configured Room Scene Controller
in the room where the MRIR1 is to operate. Start a
Room Binding by pressing the UP/DN buttons on the
controller. If the MRIR1 doesn’t need to be bound to
a room (it will only be used to execute house scenes)
you can start the binding from any device in the
house, confirm that the house binding is successful,
then skip to step 3.
The MRIR1 house binding is successful when it’s
LED starts blinking green.
2. To include the
MRIR1 in the room
where the binding
was initiated, go
to the MRIR1 and
simultaneously
press and
hold it’s
buttons while the
house binding is
still active (LEDs
on all devices in
the house are blinking).
The MRIR1 room binding is successful and it is
included in the room when it’s LED starts blinking
yellow (amber).
3. When binding is complete, terminate the
binding from the device that started the binding
(simultaneously hold and hold the buttons until
the unit stops blinking).
Setup of the MRIR1 is complete.
Changing House/Room ID
To change the House ID, reset the MRIR1 to its factory
default state (“0” for House and Room ID). Press and
hold the buttons for 10 seconds, until the LED turns
solid yellow (amber). When the unit returns to defaults, it
can accept a new House ID.
To change the Room ID (when the House ID is correct),
initiate a Room Binding from a device with the
desired Room ID. Include the MRIR1 into the Room by
simultaneously pressing it’s buttons to include or
exclude it. When the MRIR1 is included it’s LED blinks
yellow (amber). When excluding the MRIR1 from a room
the Room ID is cleared leaving the device with no Room
ID.
When a House ID has been assigned but the Room ID is
at the factory default of “0” then in the normal operating
mode the MRIR1 will show a Red LED error condition
indicating that the unit is not yet bound to a specific
room.
THE IR PROGRAMMING REMOTE
The Programming Remote supplied with the MRIR1 uses
the Legrand CAD IR data protocol. This protocol is built
into the MRIR1 interface, which translates the codes
from the IR remote to Top Dog commands for wireless
transmission to the Miro network.
You can use the Programming Remote to directly
control the MRIR1, or you can use the Programming
Remote to teach a “learning remote” the codes. Refer
to the instructions supplied with the learning remote
for programming and protocol information. For more
information about remotes, go to www.RemoteCentral.
com.
Teaching Mode Procedures
To teach a learning remote using the Programming
Remote you must set the Programming Remote to the
desired Mode. This toggles the IR codes sent by the
buttons between Room and House scenes.
1. Press and release
the desired Mode
button to send
Miro Room or
House On/Off or
scene commands.
Depending on the
Mode selected
some of the
buttons in the
scene area may
become inactive,
for example there
are only 10 House
scenes. Therefore,
in House mode
scene buttons 11-15 are inactive.
2. Place the learning remote and the Programming
Remote about 6 to 12 inches apart, with the IR
transmit/receive lenses aimed at each other.
3. Put the learning remote in Learn mode (according to
the instructions provided with the remote).
4. Press a button on the learning remote that you want
to teach a function or scene then press the button on
the Programming Remote that invokes the desired
function or scene. Repeat as necessary until the
remote is fully programmed.
5. Terminate the Learn mode on the learning remote
then test operation of the system using the learning
remote.
Status LED
Green
Yellow (amber)
Red
Pushbuttons
Top
Bottom
Press both
simultaneously
Internal
IR Receiver
Jack for
External IR Receiver
Power Supply Jack