Tools necessary for installation, Uncrating, Cabinet preparation – Maytag MDB6000AWA Installation User Manual
Page 2: Custom panels available, Support accessories
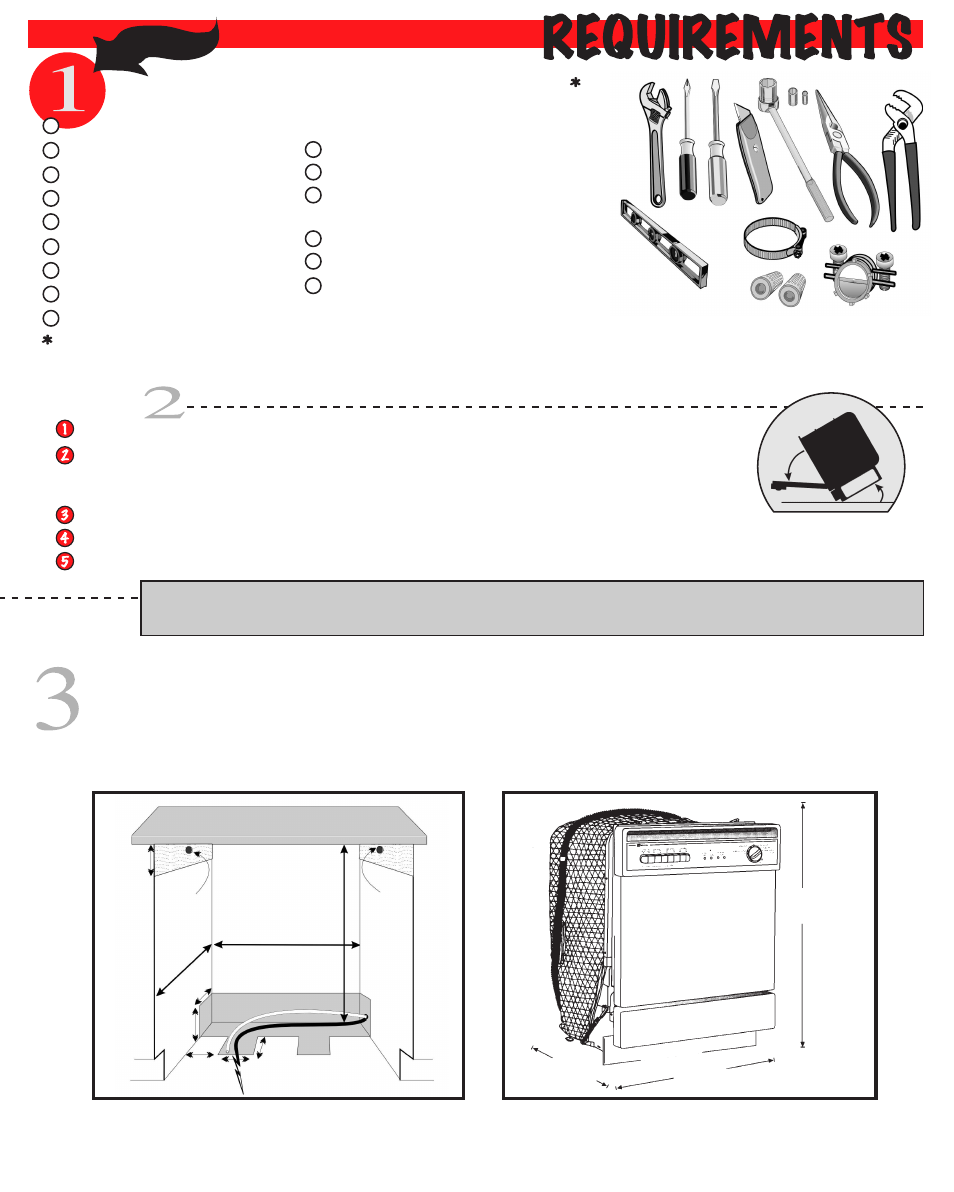
TIP: Pre-measure cabinet height to that of the dishwasher. Dishwasher should be 1/4" lower than that of the cabinet opening.
It's easier to adjust the dishwasher outside the cabinet than inside.
UNCRATING
UNCRATING
Prepare cabinet as needed. Electrical and water facilities should enter cabinet opening on the floor, or through the back or side walls,
as shown in the shaded portion of the drawing. Preferred drain outlet is shown in the upper portion of the cabinet in drawing below.
Care should be taken to route plumbing away from the motor and blower (if equipped). DO NOT make connections until dishwasher
is in position. Care should be taken to make sure cabinet holes for power cord and hoses have no sharp edges.
CABINET PREPARATION
CABINET PREPARATION
Dishwashers come with pre-installed panels. Custom panels are available: stainless steel and
trims kits for wood panels. See your authorized selling dealer for a complete list of products
available.
CUSTOM PANELS AVAILABLE
TOOLS NECESSARY FOR INSTALLATION
TOOLS NECESSARY FOR INSTALLATION
SUPPORT ACCESSORIES:
3/4" UL Approved Strain Relief
(provided)
2 Appropriate Sized Wire Nuts
3/8" Male (N.P.T.) Compression Elbow
or Flare Elbow
Thread Sealing Tape or Pipe Thread Compound
Appropriate Sized Hose Clamp
2 Wood Mounting Screws
(provided)
Water Hook-Up Kits Available:
(Water line, water valve fitting, Teflon
™
tape, tee valve fitting)
5’ Braided Stainless Steel
Part #19950153
5’ Copper
Part #19950152
Available through an authorized Maytag Parts Retailer
Remove access and toe panels before beginning installation.
Remove bolts from the crate base brackets, using 5/16" socket with ratchet. Remove crate base and
discard base and packaging. Until dishwasher is permanently installed, beware of opening the
door as the unit may tip for ward.
Open the door and remove accessor y package from silver ware basket.
Remove any extra packing material from outside and inside the dishwasher. This would include plug in water valve inlet.
Loosen front leg bolts with a crescent wrench. Adjust rear leg bolts in same manner.
cabinet opening
24”
34-35”
24”
3”
5”
7”
3” 5”
8”
Preferred
Drain Area
Keep back free
of drain, water &
electrical supply
Preferred
Drain Area
Sta
rt Here
CUTTING KNIFE
RATCHET
3/16", 1/4", 5/16" SOCKETS
PHILLIPS SCREWDRIVER
STANDARD SCREWDRIVER
WIRE CUTTERS
CRESCENT WRENCH
ADJUSTABLE PLIERS
LEVEL
NOTE: Make sure you have everything
necessary for proper installation before
going to step 2.
dishwasher dimensions
Door Panel
Access Panel
Toe Panel
23 7/8
22 3/4"
33 3/4" (Min.)
35 1/4" (Max.)
(Not included: Tools required for preparing
the cabinet opening).