Mark wall/install wall brackets, Parts list, 3 foot shelves – Metro Professional's Choice Wall Mounted Shelves User Manual
Page 2
A
B
C
E
F
G
H
D
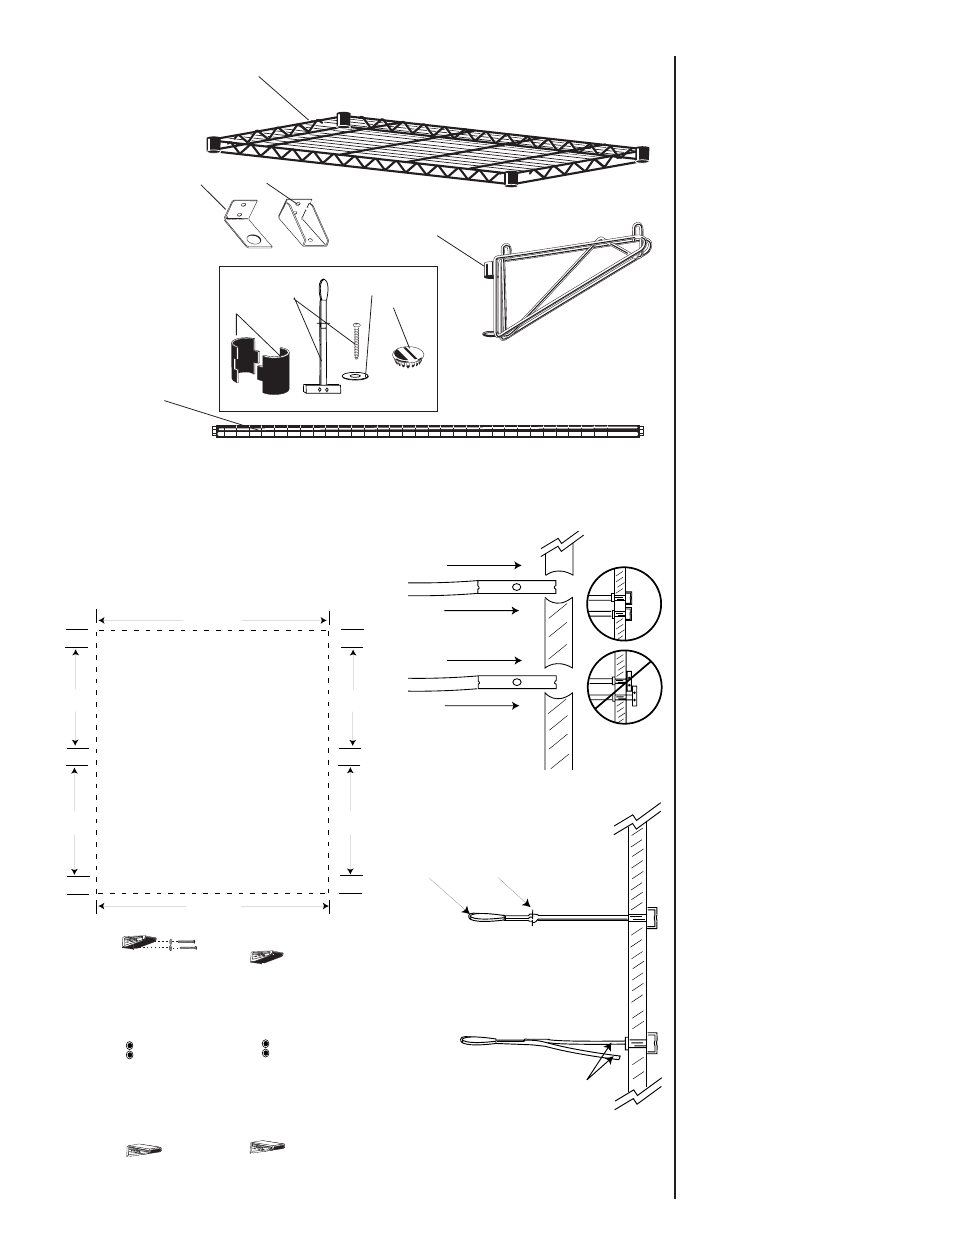
A.
Shelf (2)
B.
Center support bracket
(2)
C.
Wall bracket (4)
D.
Shelf support (4)
E.
Post (2)
Hardware:
F.
Split sleeve
(8 pairs)
G.
TOGGLER
®
brand toggle
bolt—wall anchor and 2"
bolt- (12 each)
H.
Washers (12)
I.
Hole plug (8)
MARK WALL/INSTALL WALL BRACKETS
3 FOOT SHELVES
X
X
34
⁷⁄₁₆
"
X
X
⁷⁄₈
"
⁷⁄₈
"
X
X
X
X
⁷⁄₈
"
⁷⁄₈
"
16
16
X
X
X
X
⁷⁄₈
"
⁷⁄₈
"
16
¹⁄₄
"
16
¹⁄₄
"
34
⁷⁄₁₆
"
1. Mark wall and drill
holes.
Mark wall with an “x” at
each point indicated in the
drawing. NOTE: If using
provided hardware, be
sure to avoid stud loca-
tions. Please note:
Measurements are from
center-to-center of each “x”
mark. Drill all marked loca-
tions using a 1/2" drill bit.
2. Install anchors.
Bend metal part of toggle
bolt sideways (a) and insert
through each 1/2" drilled
hole. Use care not to break
plastic while pushing
through hole. Once
through, be sure metal
part is sideways, NOT up
and down and flush
against back of wall.
Push the plastic tab all the
way forward (b) until flush
against wall. Break off
plastic legs (c).
3. Install wall brackets.
Each post requires two wall
brackets (and a center sup-
port bracket—installed at a
later time). The wall brack-
ets use the two top and two
bottom markings made in
step #1 above. Install all wall
brackets so the flat side is
up with supplied 2" bolts and
washers.
TOGGLER®
Toggle Bolt
3/16-24
TOGGLER®
Toggle Bolt
3/16-24
1
2
X
X
X
X
X
X
X
X
X
X
X
X
3
_
2
& PUSH THIS FORWARD
BREAK THESE OFF
HOLD THIS
A.
B.
C.
I
PARTS LIST