2–names and functions of parts, 7front panel (la-81, Rear panel (la-81 – Teac LA-80MKII User Manual
Page 7
TASCAM LA-80/81MKII
7
Front panel (LA-81
MK
II)
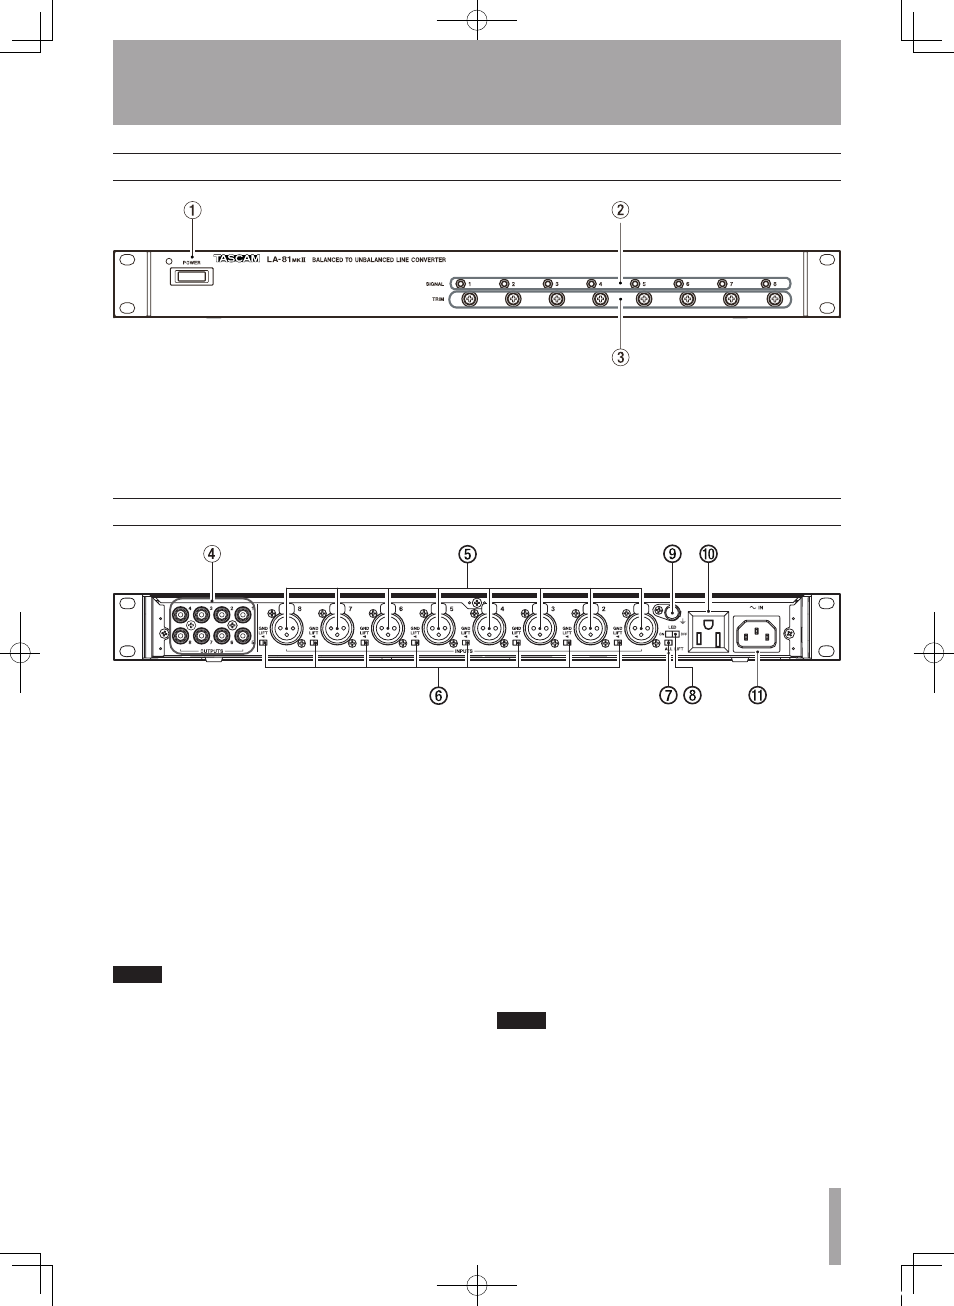
1
POWER switch and LED
Turns power ON and OFF.
2
LED indicators
Indicate the presence of input signals.
3
TRIM (BALANCED TO UNBALANCED) 1–8
These semi-fixed trim controls allow output signal
levels to be adjusted in a range of ±12 dB.
2–Names and Functions of Parts
Rear panel (LA-81
MK
II)
4
OUTPUTS 1–8
RCA pin jack type output connectors with nominal
output levels of -10 dBV (0.3 V).
5
INPUTS 1–8
XLR type input connectors with nominal input
levels of +4 dBu (1.23 V) or -20 dBu (0.0775 V).
6
GND LIFT switches
In a studio or other place where multiple units are
connected, a ground loop can occur through the
wiring, and this loop can cause a hum or other
noise. If this occurs, engage
GND LIFT
switches to
cut ground loops from the (balanced)
INPUTS
5.
NOTE
The GND LIFT switches do not cut the ground for the
OUTPUTS
4
.
7
ALL LIFT switch
When other equipment is mounted in the same
metal rack, for example, a ground loop can occur
through the panel or chassis, and this loop can
cause a hum or other noise. If this occurs, engage
the
ALL LIFT
switch to cut the loop.
8
Level indicator LED switch
If this switch is ON, LEDs light when input signals
are present. If this switch is OFF, the LEDs do not
light regardless of the presence of input signals.
9
GND connector
When multiple pieces of equipment are connected,
use this to make the chassis of each piece of
equipment have the same electrical potential
0
Power outlet (see NOTE below)
Use this three-prong outlet, which is not affected
by the power switch, to connect AC equipment
with a maximum power consumption of 400 W
(or 3A). This connector is convenient when using
multiple LA-80/81
MK
II units. The specifications
are displayed on the top of the unit.
NOTE
The EUR model does not have this power outlet, so the
panel here is blank.
q
AC IN connector
Connect the included power cord.
E_LA-80-81mkII_RevC.indd 7
08.12.19 1:07:25 PM