Teac ViewNet Audio User Manual
Teac Audio
ViewNet Audio Quick Reference Guide
ViewNet Audio Quick Reference Guide
1
4
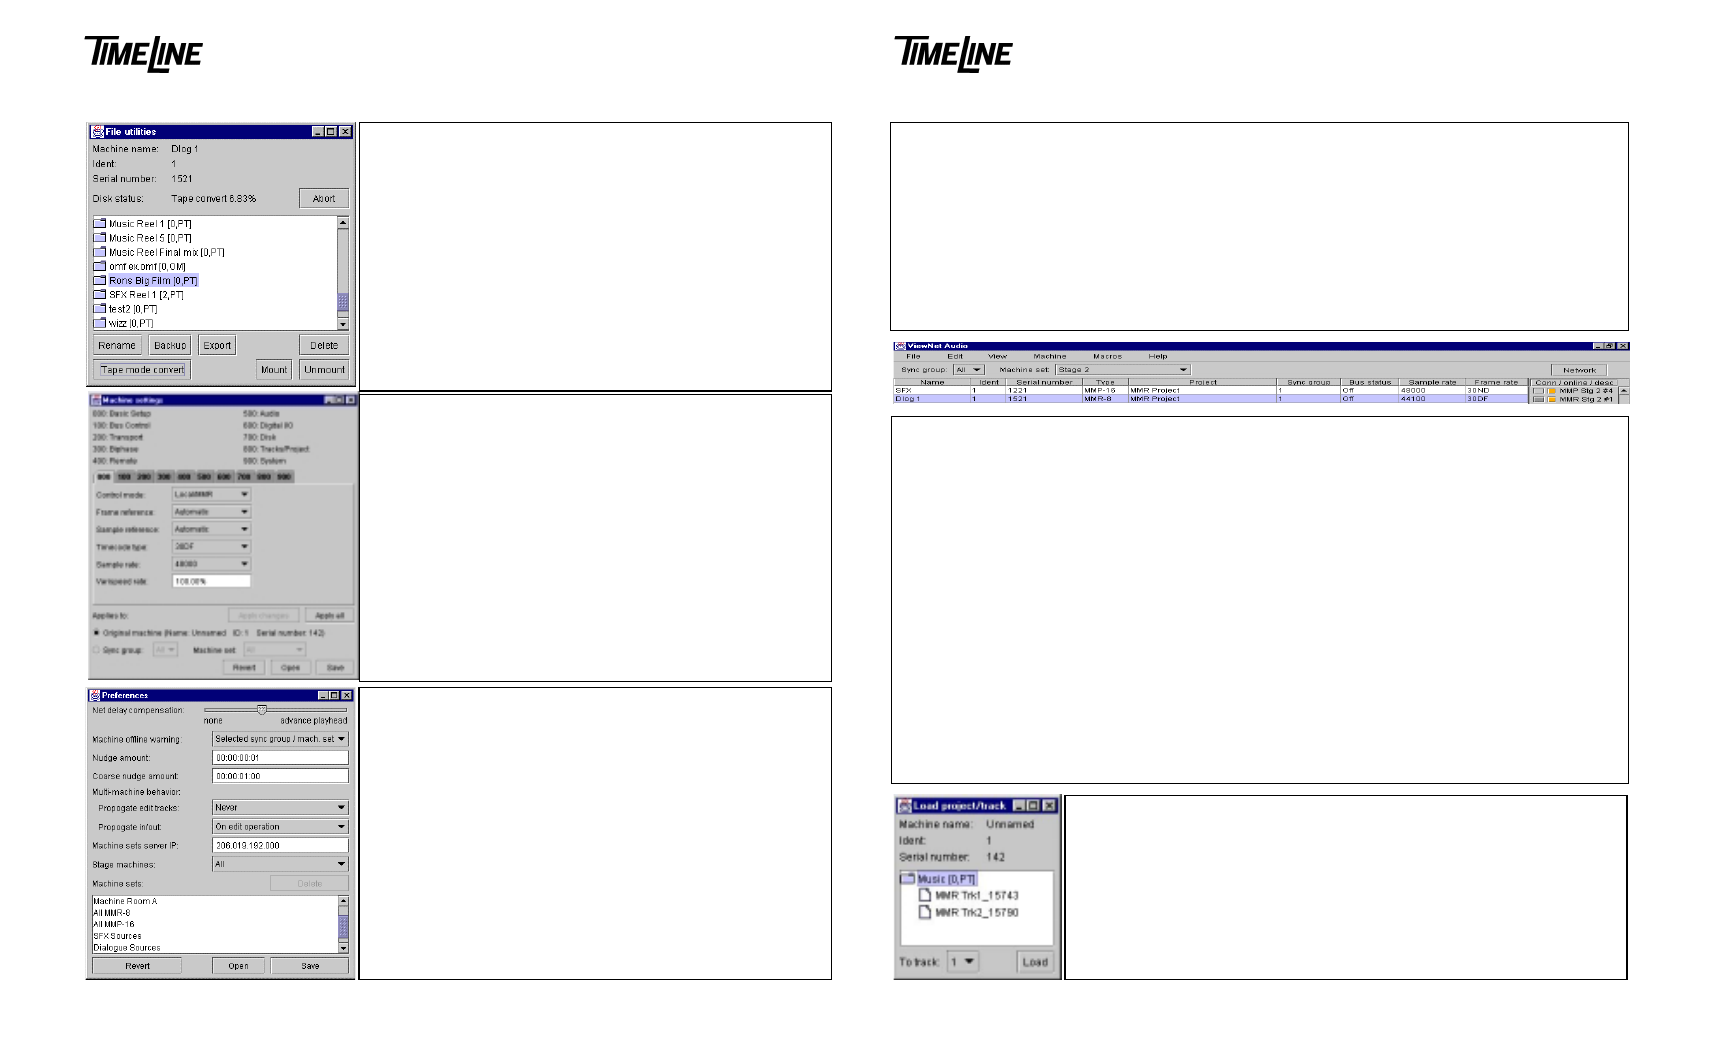
Load project/track
•
Open from File Menu or folder icon in Project View screen
•
List shows all available Projects by name in alpha-numeric order
•
[SCSI ID, format] after Proj name (no SCSI ID shown for WaveFrame)
•
Double click Project folder to see tracks
•
Click to select Project or track for loading
•
Choose MM track destination from drop down list
•
Click Load button to load
Setting up ViewNet
•
Install the ViewNet Network Interface Card in the MM unit
•
Install Version 4.0 or higher MM software, set the MM IP address (Setup Menu 950), reboot MM
•
Install the ViewNet Audio application on host computer from CD-ROM
•
Set up TCP/IP networking on computer with installed NIC (see computer manual for details)
•
Connect the computer and MM unit via 100BaseT Ethernet cable – use hub for multiple units
!
Use Cat 5UTP Ethernet patch cable with Ethernet 10/100 hub
!
Use Ethernet crossover cable if directly connecting 1 computer and 1 MM unit
•
Run the ViewNet application
Network Screen
•
ViewNet Audio always opens first to Network screen
•
Shows all machines from selected Sync Group/Machine Set currently operating and connected
•
Columns list important settings and parameters for each machine
•
Parameter Settings can only be changed through Machine Settings window (Machine menu)
•
To select machine, click anywhere on settings information row, use shift or control for multiple
•
Click Network button when in Project View to return to the Network screen
•
System Status Panel at right shows active connection/online status/ short description
•
Click Conn box to open Project View screen for machine
!
Gray shows last machine with active connection
!
Blue shows machines with currently active connection
•
Click Online box to toggle online status
!
Black shows offline
!
Orange shows online
!
Green shows unit has transport sync locked to external source
!
Red shows machine transport sync locked to external source and machine in record
•
Select machines then choose “Define Set…” from File menu to name Machine Set
•
Use Machine Information window (Machine menu) to enter description and machine name
File Utilities
•
Open From File Menu
•
Lists all available Projects by name, shows [SCSI ID, format]
•
Double click Project folder to view tracks
•
Click to select Project or track then click any process button
•
Choose Backup, Rename, Export, TapeMode Convert, Delete
•
Select target disk, name, etc. from dialogue
!
Rename changes name of Project (not tracks)
!
Backup makes copy (usually to another disk)
!
Export allows file format change, new name
!
TapeMode Convert makes TapeMode copy of Project
!
Delete only erases Project EDL
•
Use Cleanup from Machine Settings 700 bank to delete media
Preferences
•
Open Preferences from File Menu
•
Net Delay Compensation to adjust playhead / sound sync
•
Machine Offline Warning preference settings
•
Nudge amount setting
•
Coarse Nudge amount setting
•
Multi-Machine mode behavior settings
!
Propagate Edit track settings
!
Propagate In/Out mark settings
•
Machine Sets Server IP address
•
Stage Machines pre-filter
•
List of all Machine sets with option to Delete selected
•
Open, Save user Preferences to disk
•
Revert to default ViewNet system Preferences
Machine Settings
•
Select machine in Network Screen, open from Machine Menu
•
Allows for setting all MM Setup menu parameters
•
Click on Tabs to view Setup menu banks
•
Select choice under “Applies to” at bottom for:
!
Named machine, Sync group, Machine group
•
Click “Apply changes” to update only changed settings
•
Click “Apply all” to send all settings
Settings Banks:
000 Basic Setup 400 Remote 800 Tracks/Project
100 Bus Control 500 Audio 900 System
200 Transport 600 Digital I/O
300 Biphase 700 Disk