Teac US-125M Quick Start User Manual
Us-125m
D01163600A
US-125M
USB Mixing Audio Interface
Thank you for your purchase of the TASCAM US-125M USB Mixing Audio Interface.
This compact USB audio interface is ideal for easily mixing sounds from a variety of sources such as a
computer, a gaming device, a guitar, synthesizer or other instrument as well as a microphone, which
could be used for narration. This mix can then be used for live broadcasting over the Internet or in
a computer-based digital recording system. Moreover, when not using this mixer as a USB audio
interface, you can use it as a stand-alone analog mixer by powering it with an adaptor. (The TASCAM
PS-P515U AC adaptor, which is sold separately, meets the specifications of this unit.) Ordinarily, this unit
can be operated using only USB power, so you can use it together with a notebook computer to make
an extremely compact audio mixing and recording system.
This document provides examples of basic operation of the mixer. For details, please download the
Owner’s Manual from the TASCAM website (http://tascam.com/) and refer to it.
IMPORTANT SAFETY PRECAUTIONS
Declaration of Conformity
Model Number:
US-125M
Trade Name:
TASCAM
Responsible party:
TEAC AMERICA, INC.
Address:
7733 Telegraph Road, Montebello,
California, U.S. A.
Telephone number:
1-323-726-0303
This device complies with Part 15 of the FCC Rules. Operation is subject to the following two conditions: (1) this
device may not cause harmful interference, and (2) this device must accept any interference received, including
interference that may cause undesired operation.
THIS CLASS B DIGITAL APPARATUS COMPLIES WITH CANADIAN ICES-003.
CET APPAREIL NUMÉRIQUE DE LA CLASSE B EST CONFORME À LA NORME NMB-003 DU CANADA.
FOR U.S.A.
TO THE USER
This equipment has been tested and found to comply with the limits for a Class B digital device,
pursuant to Part 15 of the FCC Rules. These limits are designed to provide reasonable protection
against harmful interference in a residential installation. This equipment generates, uses, and can
radiate radio frequency energy and, if not installed and used in accordance with the instruction
manual, may cause harmful interference to radio communications. However, there is no guarantee
that interference will not occur in a particular installation. If this equipment does cause harmful
interference to radio or television reception, which can be determined by turning the equipment
off and on, the user is encouraged to try to correct the interference by one or more of the following
measures.
a) Reorient or relocate the receiving antenna.
b) Increase the separation between the equipment and receiver.
c) Connect the equipment into an outlet on a circuit different from that to which the receiver is
connected.
d) Consult the dealer or an experienced radio/TV technician for help.
CAUTION
Changes or modifications to this equipment not expressly approved by TEAC CORPORATION for
compliance could void the user's authority to operate this equipment.
IMPORTANT SAFETY INSTRUCTIONS
1 Read these instructions.
2 Keep these instructions.
3 Heed all warnings.
4 Follow all instructions.
5 Do not use this apparatus near water.
6 Clean only with dry cloth.
7 Do not block any ventilation openings. Install in accordance with the manufacturer's instructions.
8 Do not install near any heat sources such as radiators, heat registers, stoves, or other apparatus
(including amplifiers) that produce heat.
9 Do not defeat the safety purpose of the polarized or grounding-type plug. A polarized plug has two
blades with one wider than the other. A grounding type plug has two blades and a third grounding
prong. The wide blade or the third prong are provided for your safety. If the provided plug does not
fit into your outlet, consult an electrician for replacement of the obsolete outlet.
10 Protect the power cord from being walked on or pinched particularly at plugs, convenience
receptacles, and the point where they exit from the apparatus.
11 Only use attachments/accessories specified by the manufacturer.
12 Use only with the cart, stand, tripod, bracket, or table specified by the manufacturer,
or sold with the apparatus. When a cart is used, use caution when moving the cart/
apparatus combination to avoid injury from tip-over.
13 Unplug this apparatus during lightning storms or when unused for long periods of time.
14 Refer all servicing to qualified service personnel. Servicing is required when the apparatus has been
damaged in any way, such as power-supply cord or plug is damaged, liquid has been spilled or
objects have fallen into the apparatus, the apparatus has been exposed to rain or moisture, does not
operate normally, or has been dropped.
Do not expose this apparatus to drips or splashes.
•
Do not place any objects filled with liquids, such as vases, on the apparatus.
•
Do not install this apparatus in a confined space such as a book case or similar unit.
•
The apparatus draws nominal non-operating power from the AC outlet with its POWER or STANDBY/
•
ON switch not in the ON position.
The apparatus should be located close enough to the AC outlet so that you can easily grasp the
•
power cord plug at any time.
The mains plug is used as the disconnect device, the disconnect device shall remain readily operable.
•
If the product uses batteries (including a battery pack or installed batteries), they should not be
•
exposed to sunshine, fire or excessive heat.
CAUTION for products that use replaceable lithium batteries: there is danger of explosion if a battery
•
is replaced with an incorrect type of battery. Replace only with the same or equivalent type.
Caution should be taken when using earphones or headphones with the product because excessive
•
sound pressure (volume) from earphones or headphones can cause hearing loss.
Other cautions
Do not install in the following types of places. Doing so could cause malfunctions.
•
Places with significant vibrations or that are otherwise unstable
•
Near windows or other places exposed to direct sunlight
•
Near heaters or other extremely hot places
•
Extremely cold places
•
Places with bad ventilation or high humidity
•
Very dusty locations
•
Avoid installing this unit on top of any heat-generating electrical device such as a power amplifier.
•
Do not place any object on the unit.
•
If the unit is moved from a cold to a warm place, or used after a sudden temperature change, there is
•
a danger of condensation. To prevent this, or if this occurs, let the unit sit for one or two hours at the
new room temperature before using.
SAFETY INFORMATION
For European Customers
8
Disposal of electrical and electronic equipment
(a) All electrical and electronic equipment should be disposed of separately from the municipal waste
stream via designated collection facilities appointed by the government or the local authorities.
(b) By disposing of the electrical and electronic equipment correctly, you will help save valuable
resources and prevent any potential negative effects on human health and the environment.
(c) Improper disposal of waste equipment can have serious effects on the environment and human
health as a result of the presence of hazardous substances in electrical and electronic equipment.
(d) The crossed out wheeled dust bin symbol indicates that electrical and electronic equipment
must be collected and disposed of separately from household waste.
(e) The return and collection systems are available to the end users. For more detailed
information about disposal of old electrical and electronic equipment, please contact your
city office, waste disposal service or the shop where you purchased the equipment.
For China
8
CONNECTIONS AND SETTINGS
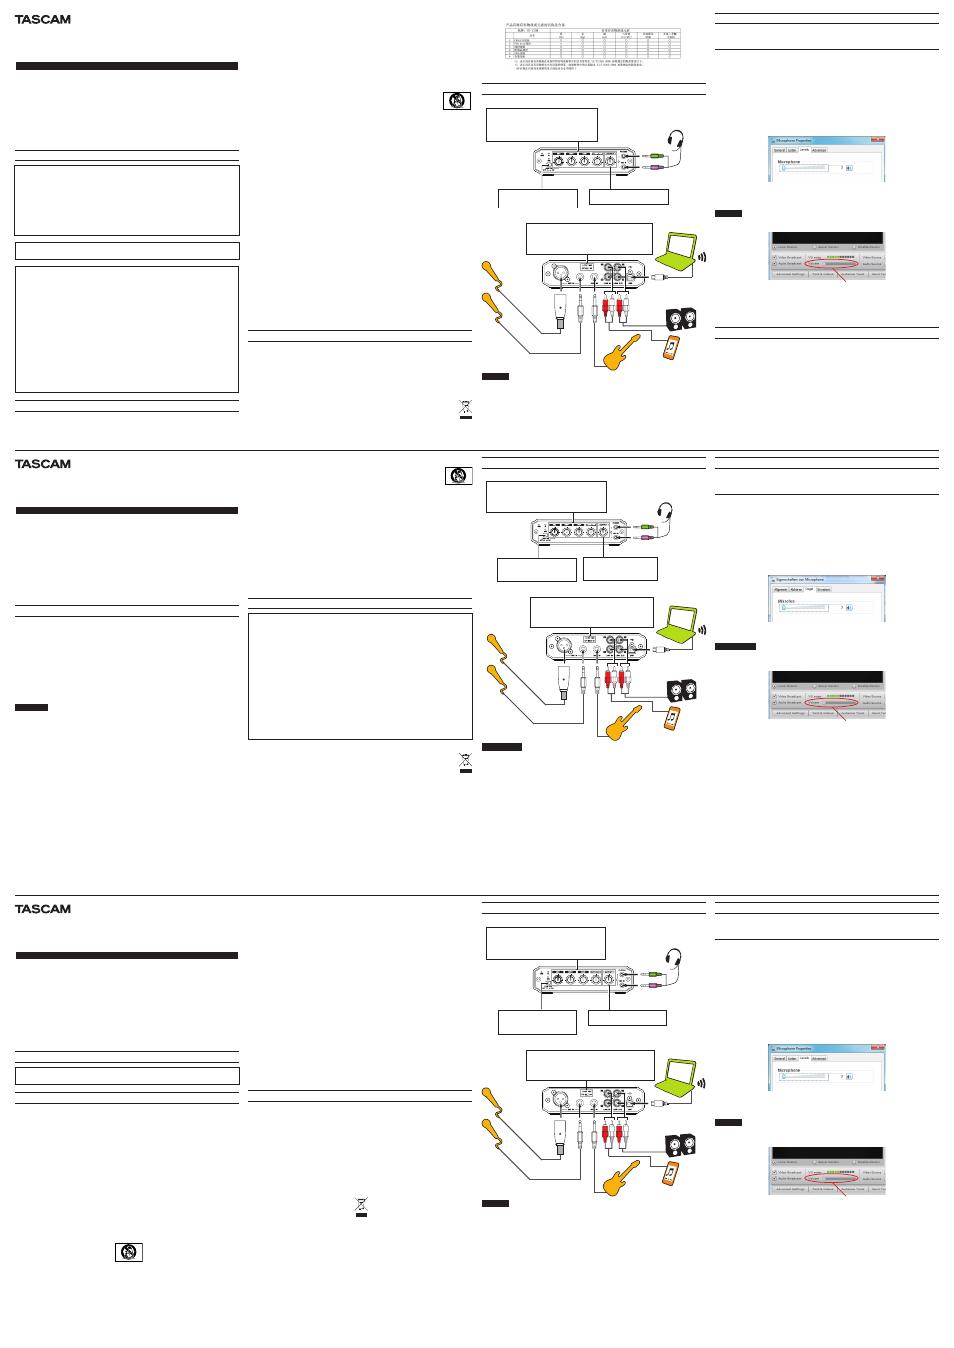
Front panel
8
OUTPUT level knob
Use this knob to adjust the level output from
the LINE OUT and PHONES jacks.
LIMITER button
If you set this button to ON, you can prevent
distortion caused by sudden overloads from a
microphone input.
Input level knobs (mixer)
Adjust the level of each input using the corresponding knob (MIC,
INST, LINE or COMPUTER). (You can also control the computer
playback volume from the computer.)
Adjust the levels so that the overload indicator (OL) does not light.
By adjusting them in this way, the recording levels can be set
correctly.
Mic input priority 1
Headset
(supports headsets and other microphones
that require plug-in power supported)
Rear panel
8
LOOP MIX switch
This sets whether or not the signal output from the computer is returned to
the computer after being mixed with other signals (loop mix function). Set
it according to how you are using the mixer.
ON: Use to live Internet broadcasts, for example.
OFF: Use with a DAW, for example.
Powered speakers or
amplifier and speakers
MP3
player
Computer
Instrument
(Hi-Z)
Mic
Mic input
priority 2
Mic input
priority 3
Mic
NOTE
When more than one microphone is connected at the same time, the signal from the one with the
•
highest priority will be input.
This unit does not provide phantom power. If you want to use a condenser microphone that requires
•
it, you will need to prepare an external phantom power supply.
When headphones are connected, sound will not be output from the
•
LINE OUT jacks. Disconnect
headphones when you want to use external speakers.
COMPUTER SETTINGS
When you connect the unit to a computer by USB, it will be recognized automatically by Windows
and Mac operating systems. (The installation of driver software is not necessary.) After the unit is
automatically recognized, adjust the volume as shown below.
Adjusting the volume using the Windows Control Panel
If the volume is set too high, sound will distort. Use the following procedures to adjust it appropriately.
Setting the level
8
Follow these procedures to set the level.
1 Click the Start button (Windows icon) at the bottom left of the screen.
2 Open in order: Control Panel q Hardware and Sound q Sound q Recording tab q Microphone/
USB Audio CODEC q Properties button q Microphone Properties q Levels tab.
3 Set the mic volume level as follows according to your OS.
Window 7 32-bit edition: 2 (of 100) is the standard level
Window 7 64-bit edition: 3 (of 100) is the standard level
For other Windows and for Mac operating systems, the default value is the standard level.
Example from Windows 7 64-bit edition
4 Press the OK button on the Microphone Properties window and then the OK button on the Sound
window to close them.
NOTE
When streaming audio live, sounds could loop back through the computer, causing a repeated echo.
•
If this occurs, set the monitor volume setting in the application that you are using to “0”.
Monitor volume level = 0
Example: Ustream
If you are unable to properly set up the unit even after precisely following the procedures in this
•
Quick Start Guide or if you want more detailed information, please visit the TASCAM website where
you can find additional information and download the Owner’s Manual (http://tascam.com/) for
reference.
USER REGISTRATION
Customers in the USA, please visit the TASCAM website (http://tascam.com/) to register as a user online.
Quick Start Guide
US-125M
USB-Audiomixer
Danke, dass Sie sich für den USB-Audiomixer Tascam US-125M entschieden haben. Dieses kompakte
USB-Audiointerface ist ideal, um Klangmaterial aus verschiedensten Quellen auf einfache Weise
zusammenzumischen: Computer, Spielekonsolen, Gitarren, Synthesizer und andere Instrumente,
oder auch Mikrofone für Sprache oder Gesang. Diese Mischung kann anschließend live über das
Internet verbreitet oder mittels einer computerbasierten digitalen Aufnahmeumgebung weiter
verarbeitet werden. Wird das Gerät nicht als Audiointerface verwendet, lässt es sich, über einen
Wechselstromadapter betrieben, auch als eigenständiger Mixer nutzen. (Der als Zubehör erhältliche
Wechselstromadapter Tascam PS-P515 entspricht den Spezifikationen des Geräts.) Für gewöhnlich kann
das Gerät allein über eine USB-Verbindung mit Strom versorgt werden, so dass es zusammen mit einem
Laptop ein äußerst kompaktes und mobiles digitales Aufnahmesystem bildet.
Diese Kurzanleitung zeigt Beispiele für den grundlegenden Betrieb des Mixers. Weitere Einzelheiten
entnehmen Sie bitte dem Benutzerhandbuch, das auf der Tascam-Website unter http://tascam.de/ zum
Download zur Verfügung steht.
Wichtige Hinweise zu Ihrer Sicherheit
Diese Anleitung ist Teil des Geräts. Bewahren Sie sie gut auf und geben Sie das Gerät nur mit dieser
•
Anleitung weiter.
Lesen Sie diese Anleitung, um das Gerät fehlerfrei nutzen zu können und sich vor eventuellen
•
Restgefahren zu schützen.
Beachten Sie alle Warnhinweise. Neben den hier aufgeführten allgemeinen Sicherheitshinweisen
•
sind möglicherweise weitere Warnungen an entsprechenden Stellen dieses Handbuchs aufgeführt.
Lassen Sie Wartungsarbeiten und Reparaturen nur von einem Tascam-Servicecenter ausführen.
•
Bringen Sie das Gerät zu einem Tascam-Servicecenter, wenn es Regen oder Feuchtigkeit ausgesetzt
war, wenn Flüssigkeit oder Fremdkörper hinein gelangt sind, wenn es heruntergefallen ist oder nicht
normal funktioniert oder wenn das Netzkabel beschädigt ist. Benutzen Sie das Gerät nicht mehr, bis
es repariert wurde.
Bestimmungsgemäße Verwendung
Benutzen Sie das Gerät nur zu dem Zweck und auf die Weise, wie in dieser Anleitung beschrieben.
WARNUNG
Schutz vor Sach- und Personenschäden durch Stromschlag, Kurzschluss oder Brand
Öffnen Sie nicht das Gehäuse.
•
Stellen Sie das Gerät in der Nähe einer gut erreichbaren Steckdose auf. Es muss jederzeit möglich
•
sein, den Netzstecker zu ziehen, um das Gerät vom Stromnetz zu trennen.
Verbinden Sie das Gerät nur dann mit dem Stromnetz, wenn die Angaben auf dem Gerät mit der
•
örtlichen Netzspannung übereinstimmen. Fragen Sie im Zweifelsfall einen Elektrofachmann.
Wenn der mitgelieferte Netzstecker nicht in Ihre Steckdose passt, ziehen Sie einen Elektrofachmann
•
zu Rate.
Verwenden Sie nur den mitgelieferten oder vom Hersteller empfohlene Wechselstromadapter.
•
Verwenden Sie den Wechselstromadapter nicht mit anderen Geräten.
Sorgen Sie dafür, dass das Netzkabel nicht gedehnt, gequetscht oder geknickt werden kann –
•
insbesondere am Stecker und am Netzkabelausgang des Geräts – und verlegen Sie es so, dass man
nicht darüber stolpern kann.
Ziehen Sie den Netzstecker bei Gewitter oder wenn Sie das Gerät längere Zeit nicht benutzen.
•
Wenn das Gerät raucht oder einen ungewöhnlichen Geruch verströmt, trennen Sie es sofort vom
•
Stromnetz und bringen Sie es zu einem Tascam-Servicecenter.
Stellen Sie das Gerät immer so auf, dass es nicht nass werden kann. Setzen Sie das Gerät niemals
•
Regen, hoher Luftfeuchte oder anderen Flüssigkeiten aus.
Stellen Sie keine mit Flüssigkeit gefüllten Behälter (Vasen, Kaffeetassen usw.) auf das Gerät.
•
Reinigen Sie das Gerät nur mit einem trockenen Tuch.
•
Schutz vor Sach- und Personenschäden durch Überhitzung
Versperren Sie niemals vorhandene Lüftungsöffnungen.
•
Stellen Sie das Gerät nicht in der Nähe von Hitze abstrahlenden Geräten (Heizlüfter, Öfen, Verstärker
•
usw.) auf.
Stellen Sie dieses Gerät nicht an einem räumlich beengten Ort ohne Luftzirkulation auf.
•
Schutz vor Sach- und Personenschäden durch falsches Zubehör
•
Verwenden Sie nur Zubehör oder Zubehörteile, die der Hersteller empfiehlt.
•
Verwenden Sie nur Wagen, Ständer, Stative, Halter oder Tische, die vom Hersteller
•
empfohlen oder mit dem Gerät verkauft werden.
Schutz vor Hörschäden
Denken Sie immer daran: Hohe Lautstärkepegel können schon nach kurzer Zeit Ihr Gehör schädigen.
Ergänzende Sicherheitshinweise zur Aufstellung
Stellen Sie das Gerät nicht an den im Folgenden bezeichneten Orten auf. Andernfalls kann es zu
•
Fehlfunktionen kommen.
Orte, die starken Erschütterungen ausgesetzt sind oder die instabil sind,
•
Orte mit direkter Sonneneinstrahlung (z. B. an ein Fenster),
•
in der Nähe von Heizgeräten oder an anderen Orten, an denen hohe Temperaturen herrschen,
•
wenn die Temperatur unter dem Gefrierpunkt liegt,
•
Orte mit schlechter Belüftung oder hoher Luftfeuchte,
•
Orte mit hoher Staubkonzentration.
•
Stellen oder legen Sie keine Gegenstände auf das Gerät, damit die Wärmeabfuhr gewährleistet ist.
•
Stellen Sie das Gerät nicht auf einen Leistungsverstärker oder andere Geräte, die Wärme abgeben.
•
Wenn Sie das Gerät aus einer kalten Umgebung in eine warme Umgebung bringen, in einem schnell
•
beheizbaren Raum einsetzen oder anderen plötzlichen Temperaturschwankungen aussetzen,
besteht die Gefahr, dass sich Kondenswasser bildet. Um dies zu vermeiden, lassen Sie das Gerät ein
bis zwei Stunden stehen, bevor Sie es einschalten.
Angaben zur Umweltverträglichkeit und zur Entsorgung
Informationen zur elektromagnetischen Verträglichkeit
Dieses Gerät wurde auf die Einhaltung der Grenzwerte gemäß der EMV-Richtlinie 2004/108/EG der
Europäischen Gemeinschaft hin geprüft. Diese Grenzwerte gewährleisten einen angemessenen
Schutz vor schädlichen Störungen im Wohnbereich. Dieses Gerät erzeugt und nutzt Energie
im Funkfrequenzbereich und kann solche ausstrahlen. Wenn es nicht in Übereinstimmung mit
den Anweisungen der Dokumentation installiert und betrieben wird, kann es Störungen im
Rundfunkbetrieb verursachen.
Grundsätzlich sind Störungen jedoch bei keiner Installation völlig ausgeschlossen. Sollte dieses Gerät
Störungen des Rundfunk- und Fernsehempfangs verursachen, was sich durch Ein- und Ausschalten
des Geräts überprüfen lässt, so kann der Benutzer versuchen, die Störungen durch eine oder mehrere
der folgenden Maßnahmen zu beseitigen:
Richten Sie die Empfangsantenne neu aus, oder stellen Sie sie an einem anderen Ort auf.
•
Vergrößern Sie den Abstand zwischen dem Gerät und dem Empfänger.
•
Schließen Sie das Gerät an eine Steckdose an, die mit einem anderen Stromkreis verbunden ist als
•
die Steckdose des Empfängers.
Wenden Sie sich an Ihren Händler oder einen Fachmann für Rundfunk- und Fernsehtechnik.
•
Warnhinweis
Änderungen oder Modifikationen am Gerät, die nicht ausdrücklich von der TEAC Corporation geprüft
und genehmigt worden sind, können zum Erlöschen der Betriebserlaubnis führen.
Entsorgung von Altgeräten
Wenn ein Symbol einer durchgestrichenen Mülltonne auf einem Produkt, der Verpackung
und/oder der begleitenden Dokumentation angebracht ist, unterliegt dieses Produkt den
europäischen Richtlinien 2002/96/EC und/oder 2006/66/EC sowie nationalen Gesetzen zur
Umsetzung dieser Richtlinien.
Richtlinien und Gesetze schreiben vor, dass Elektro- und Elektronik-Altgeräte nicht in den Hausmüll
(Restmüll) gelangen dürfen. Um die fachgerechte Entsorgung, Aufbereitung und Wiederverwertung
sicherzustellen, sind Sie verpflichtet, Altgeräte über staatlich dafür vorgesehene Stellen zu entsorgen.
Durch die ordnungsgemäße Entsorgung solcher Geräte leisten Sie einen Beitrag zur Einsparung
wertvoller Rohstoffe und verhindern potenziell schädliche Auswirkungen auf die menschliche
Gesundheit und die Umwelt, die durch falsche Abfallentsorgung entstehen können. Die Entsorgung ist
für Sie kostenlos.
Weitere Informationen zur Wertstoffsammlung und Wiederverwertung von Altgeräten erhalten
Sie bei Ihrer Stadtverwaltung, dem für Sie zuständigen Abfallentsorgungsunternehmen oder der
Verkaufsstelle, bei der Sie das Produkt erworben haben.
Hinweis zum Stromverbrauch
Dieses Gerät verbraucht auch dann eine geringe Menge Strom, wenn es mit dem Stromnetz verbunden
und ausgeschaltet ist.
CONNECTIONS AND SETTINGS
Gerätefront
8
OUTPUT-Regler
Mit diesem Regler passen Sie den Pegel des
Line-Ausgangs (LINE OUT) und des Kopfhörer-
ausgangs (PHONES) ein.
LIMITER-Taste
Drücken Sie diese Taste hinein, um zu vermeiden,
dass plötzliche Pegelsprünge am Mikrofon-
eingang zur Übersteuerung und damit zu
Verzerrungen führen.
Eingangspegelregler (Mixer)
Passen Sie den Pegel des jeweiligen Eingangs mit dem entsprechenden
Regler an (MIC, INST, LINE, COMPUTER). (Den Pegel des vom Computer
zugeführten Signals können Sie auch am Computer selbst einstellen.)
Passen Sie die Pegel so an, dass das jeweilige Übersteuerungslämpchen (OL)
gerade nicht aufleuchtet. Auf diese Weise sorgen Sie für den richtigen
Aufnahmepegel.
Mikrofoneingang, Priorität 1
Headset
(Kopfhörer/Mikrofon)
(geeignet für Headsets und andere Kleinmikrofone,
die eine Versorgungsspannung benötigen)
Geräterückseite
8
LOOP MIX-Schalter
Hiermit legen Sie fest, ob das vom Computer kommende Signal nach dem
Mischen mit anderen Signalen an den Computer zurückgeleitet wird oder
nicht. Wählen Sie die Einstellung entsprechend dem Einsatzzweck.
ON: Zum Beispiel für Liveübertragungen ins Internet
OFF: Zum Beispiel für die Verwendung mit einer Audio-Workstation.
Aktivlautsprecher oder
Verstärker und Lautsprecher
MP3-
player
Computer
Instrument
(hochohmig)
Mikrofon
Mikrofon-eingang
Priorität 2
Mikrofon-
eingang
Priorität 3
Mikrofon
Anmerkung
Wenn mehrere Mikrofone zur gleichen Zeit angeschlossen sind, wird nur das Signal am Eingang mit
•
der höchsten Priorität in das Gerät geleitet.
Das Gerät liefert keine Phantomspeisung. Wenn Sie ein Kondensatormikrofon verwenden wollen, das
•
Phantomspeisung benötigt, müssen Sie eine externe Phantomstromversorgung nutzen.
Bei angeschlossenem Kopfhörer wird am Lineausgang (LINE OUT) kein Signal ausgegeben. Ziehen
•
Sie daher den Stecker des Kopfhörers heraus, wenn Sie über externe Lautsprecher abhören wollen.
Einstellungen auf dem Computer vornehmen
Wenn Sie das Gerät über USB mit einem Computer verbinden, wird es von Windows- und Macintosh-
Betriebssystemen automatisch erkannt. (Die Installation eines Treibers ist nicht erforderlich.) Sobald das
Gerät erkannt wurde, nehmen Sie die folgenden Einstellungen vor.
Den Pegel in der Windows-Systemsteuerung einstellen
Wenn die folgende Pegeleinstellung zu hoch ist, kommt es zu Verzerrungen. Passen Sie sie deshalb wie
folgt an.
1 Klicken Sie auf Start (das Windows-Symbol).
2 Wählen Sie der Reihe nach: Systemsteuerung q Hardware und Sound q Sound q Registerkarte
Aufnahme q Mikrofon/USB Audio CODEC q Eigenschaften q Registerkarte Pegel.
3 Wählen Sie den für Ihr Betriebssystem passenden Standardpegel.
Window 7, 32 Bit: 2 (von 100) ist der Standardpegel
Window 7, 64 Bit: 3 (von 100) ist der Standardpegel
Für andere Windows- und für Macintosh-Betriebssystem wählen Sie als Standardpegel den
Vorgabewert des Betriebssystems.
Beispiel: Windows 7, 64 Bit
4 Klicken Sie zwei Mal auf OK, um die Fenster zu schließen.
Anmerkung
Wenn Sie Audiodaten live streamen, kann es zu einer Signalrückführung über den Computer
•
kommen, wodurch ein wiederholtes Echo entsteht. Sollte dies geschehen, stellen Sie die
Abhörlautstärke in der von Ihnen verwendeten Audioanwendung auf Null.
Abhörlautstärke = 0
Beispiel: Ustream
Wenn es Ihnen trotz genauester Befolgung der hier aufgeführten Schritte nicht gelingt, das
•
Gerät richtig einzurichten, oder wenn Sie weitere Einzelheiten wissen wollen, lesen Sie bitte das
Benutzerhandbuch, das auf der Tascam-Website http://tascam.de/downloads/US-125M zum
Download zur Verfügung steht.
Kurzanleitung
US-125M
Interface-mélangeur audio USB
Merci pour votre achat de l’interface-mélangeur audio USB TASCAM US-125M.
Cette interface audio USB compacte est idéale pour mixer facilement les sons de toute une variété de
sources telles qu’un ordinateur, une console de jeux, une guitare, un synthétiseur ou autre instrument
ainsi qu’un microphone, qui peut servir aux commentaires. Ce mixage peut ensuite être employé pour
une diffusion en direct sur internet ou dans un système d’enregistrement numérique informatique. En
outre, quand vous n’utilisez pas ce mélangeur comme interface audio USB, vous pouvez vous en servir
comme mélangeur analogique autonome en l’alimentant à l’aide d’un adaptateur secteur (l’adaptateur
secteur PS-P515U de TASCAM, qui est vendu séparément, répond aux spécifications de cette unité).
Sinon, cette unité peut fonctionner ordinairement en n’étant alimentée que par l’USB, afin de pouvoir
l’employer avec un ordinateur portable de type notebook pour constituer un système de mixage et
d’enregistrement audio extrêmement compact.
Ce document fournit des exemples de fonctionnement basique du mélangeur. Pour des détails, veuillez
télécharger le Mode d’emploi sur le site web TASCAM (http://tascam.com/) et vous y référer.
PRÉCAUTIONS DE SÉCURITÉ IMPORTANTES
THIS CLASS B DIGITAL APPARATUS COMPLIES WITH CANADIAN ICES-003.
CET APPAREIL NUMÉRIQUE DE LA CLASSE B EST CONFORME À LA NORME NMB-003 DU CANADA.
INSTRUCTIONS DE SÉCURITÉ IMPORTANTES
1 Lisez ces instructions.
2 Conservez ces instructions.
3 Tenez compte de tous les avertissements.
4 Suivez toutes les instructions.
5 N'utilisez pas cet appareil avec de l'eau à proximité.
6 Nettoyez-le uniquement avec un chiffon sec.
7 Ne bloquez aucune ouverture de ventilation. Installez-le conformément aux instructions du
fabricant.
8 Ne l'installez pas près de sources de chaleur telles que des radiateurs, bouches de chauffage, poêles
ou autres appareils (y compris des amplificateurs) produisant de la chaleur.
9 Ne neutralisez pas la fonction de sécurité de la fiche polarisée ou de terre. Une fiche polarisée a deux
broches, l'une plus large que l'autre. Une fiche de terre a deux broches identiques et une troisième
broche pour la mise à la terre. La broche plus large ou la troisième broche servent à votre sécurité.
Si la fiche fournie n'entre pas dans votre prise, consultez un électricien pour le remplacement de la
prise obsolète.
10 Évitez de marcher sur le cordon d'alimentation et de le pincer, en particulier au niveau des fiches,
des prises secteur, et du point de sortie de l'appareil.
11 N'utilisez que des fixations/accessoires spécifiés par le fabricant.
12 Utilisez-le uniquement avec des chariots, socles, trépieds, supports ou tables spécifiés par le
fabricant ou vendus avec l'appareil. Si un chariot est utilisé, faites attention à ne pas être blessé par
un renversement lors du déplacement de l'ensemble chariot/appareil.
13 Débranchez cet appareil en cas d'orage ou de non utilisation prolongée.
14 Confiez toute réparation à des techniciens de maintenance qualifiés. Une réparation est
nécessaire si l'appareil a été endommagé d'une quelconque façon, par exemple si le cordon ou
la fiche d'alimentation est endommagé, si du liquide a été renversé sur l'appareil ou si des objets
sont tombés dedans, si l'appareil a été exposé à la pluie ou à l'humidité, s'il ne fonctionne pas
normalement, ou s'il est tombé.
N’exposez pas cet appareil aux gouttes ni aux éclaboussures.
•
Ne placez pas d’objet rempli de liquide sur l’appareil, comme par exemple un vase.
•
N’installez pas cet appareil dans un espace confiné comme une bibliothèque ou un meuble similaire.
•
L’appareil tire un courant nominal de veille de la prise secteur quand son interrupteur POWER ou
•
STANDBY/ON n’est pas en position ON.
L’appareil doit être placé suffisamment près de la prise de courant pour que vous puissiez à tout
•
moment attraper facilement la fiche du cordon d’alimentation
La fiche secteur est utilisée comme dispositif de déconnexion et doit donc toujours rester disponible.
•
Si le produit utilise des piles/batteries (y compris un pack de batteries ou des piles installées), elles ne
•
doivent pas être exposées au soleil, au feu ou à une chaleur excessive.
PRÉCAUTION pour les produits qui utilisent des batteries remplaçables au lithium : remplacer une
•
batterie par un modèle incorrect entraîne un risque d’explosion. Remplacez-les uniquement par un
type identique ou équivalent.
Des précautions doivent être prises en cas d’utilisation d’écouteurs ou d’un casque avec le produit
•
car une pression sonore excessive (volume trop fort) dans les écouteurs ou dans le casque peut
causer une perte auditive.
Autres précautions
N’installez pas le produit dans les types de lieu suivants. Cela pourrait entraîner un mauvais
•
fonctionnement.
Lieux sujets à des vibrations significatives ou globalement instables
•
Près de fenêtres ou dans des endroits exposés directement au soleil
•
Près de chauffages ou dans des lieux extrêmement chauds
•
Lieux extrêmement froids
•
Lieux mal ventilés ou très humides
•
Lieux très poussiéreux
•
Évitez d’installer cet appareil au-dessus d’un dispositif électrique produisant de la chaleur comme un
•
amplificateur de puissance.
Ne placez aucun objet sur l’unité.
•
Si l’unité est déplacée d’un endroit froid à un endroit chaud, ou utilisée après un changement
•
soudain de température, il existe un danger de condensation. Pour empêcher cela ou si cela se
produit, laissez l’unité une ou deux heures à la température de la nouvelle pièce avant de l’utiliser.
Informations de sécurité
Pour les consommateurs européens
8
Mise au rebut des équipements électriques et électroniques
(a) Tout équipement électrique et électronique doit être traité séparément de la collecte municipale
d’ordures ménagères dans des points de collecte désignés par le gouvernement ou les autorités
locales.
(b) En vous débarrassant correctement des équipements électriques et électroniques, vous
contribuerez à la sauvegarde de précieuses ressources et à la prévention de potentiels effets
négatifs sur la santé humaine et l’environnement.
(c) Le traitement incorrect des déchets d’équipements électriques et électroniques peut avoir des
effets graves sur l’environnement et la santé humaine en raison de la présence de substances
dangereuses dans les équipements.
(d) Le symbole de déchets d’équipements électriques et électroniques (DEEE), qui représente une
poubelle à roulettes barrée d’une croix, indique que l’équipement électrique et électronique doit
être collecté et traité séparément des déchets ménagers.
(e) Des systèmes de retour et de collecte sont disponibles pour l’utilisateur final. Pour des informations
plus détaillées sur la mise au rebut des vieux équipements électriques et électroniques, veuillez
contacter votre mairie, le service d’ordures ménagères ou le magasin auprès duquel vous avez
acquis l’équipement.
BRANCHEMENTS ET RÉGLAGES
Face avant
8
Bouton de niveau de sortie OUTPUT
Utilisez ce bouton pour régler le niveau de
sortie par les prises LINE OUT et PHONES.
Touche LIMITER
Si vous enclenchez cette touche (ON), vous
pouvez empêcher la distorsion causée par
les saturations soudaines d’ une entrée
microphone.
Boutons de niveau d'entrée (mélangeur)
Réglez le niveau de chaque entrée à l'aide du bouton lui correspondant
(MIC, INST, LINE ou COMPUTER pour respectivement micro, instrument,
ligne ou ordinateur). (Vous pouvez aussi contrôler le volume de lecture
de l'ordinateur depuis ce dernier.)
Réglez les niveaux pour que le voyant de saturation (OL) ne s'allume pas.
En les fixant ainsi, les niveaux d'enregistrements seront corrects.
Entrée micro de priorité 1
Combiné micro-casque
(accepte les micros-casques et autres
microphones nécessitant une alimentation
par la prise de type « plug-in »)
Face arrière
8
Commutateur LOOP MIX
Il détermine si le signal sortant de l’ ordinateur est renvoyé à celui-ci après
mixage avec d’ autres signaux (fonction de mixage en boucle ou « loop mix »).
Réglez-le en fonction de votre usage du mélangeur.
ON : sert par exemple aux diffusions en direct sur internet.
OFF : sert par exemple avec une station de travail audio numérique (« DAW »)
Enceintes amplifiées ou
amplificateur et enceintes
Lecteur
MP3
Ordinateur
Instrument
(haute impédance)
Micro
Entrée micro
de priorité 2
Entrée micro
de priorité 3
Micro
NOTE
Quand plusieurs microphones sont branchés en même temps, c’est le signal de celui ayant la plus
•
haute priorité qui entre.
Cette unité ne fournit pas d’alimentation fantôme. Si vous désirez utiliser un microphone à
•
condensateur qui en nécessite une, vous devrez préparer une alimentation fantôme externe.
Quand un casque est branché, le son ne sort plus par les prises
•
LINE OUT. Débranchez le casque si
vous voulez utiliser des enceintes externes.
RÉGLAGES DE L’ORDINATEUR
Quand vous branchez l’unité par USB à un ordinateur, elle est automatiquement reconnue par les
systèmes d’exploitation Windows et Mac (il n’est pas nécessaire d’installer un pilote logiciel). Une fois
l’unité automatiquement reconnue, réglez le volume comme indiqué ci-dessous.
Réglage du volume à l’aide du panneau de configuration Windows
Si le volume est réglé trop haut, le son souffrira de distorsion. Utilisez la procédure suivante pour le
régler de façon appropriée.
Réglage du niveau
8
Suivez cette procédure pour régler le niveau.
1 Cliquez sur le bouton Démarrer (icône Windows) en bas à gauche de l’écran.
2 Ouvrez dans l’ordre : Panneau de configuration q Matériel et audio q Son q Onglet
Enregistrement q CODEC Microphone/USB Audio q Bouton Propriétés q Propriétés de microphone
q
Onglet Niveaux.
3 Réglez le niveau de volume du micro comme suit en fonction de votre système d’exploitation.
Window 7 édition 32 bits : 2 (sur 100) est le niveau standard
Window 7 édition 64 bits : 3 (sur 100) est le niveau standard
Pour les autres systèmes d’exploitation Windows et Mac, la valeur par défaut est le niveau
standard.
Exemple de Windows 7 édition 64 bits
4 Cliquez sur le bouton OK dans la fenêtre Propriétés de microphone puis sur le bouton OK dans la
fenêtre Son pour les fermer.
NOTE
Quand vous diffusez de l’audio en direct par streaming, les sons peuvent être renvoyés à l’ordinateur,
•
causant un écho de répétition. Si cela se produit, réglez sur « 0 » le volume d’écoute de contrôle
(monitor) dans l’application que vous employez.
Niveau de volume d’ écoute de contrôle = 0
Exemple : Ustream
Si vous n’arrivez pas à convenablement régler l’unité même après avoir précisément suivi les
•
procédures de ce Guide de prise en main ou si vous souhaitez des informations plus détaillées,
veuillez aller sur le site web TASCAM où vous trouverez des informations supplémentaires et pourrez
télécharger le mode d’emploi (http://tascam.com/) pour vous y référer.
Guide de prise en main