Tc-8, Tg-7, Chromatic tuner/metronome – Teac TC-8 User Manual
Page 2: Guitar & bass tuner/metronome, Owner's manual, Important safety instructions, Conventions used in this manual, Trademarks, Names of parts, Batteries
OWNER'S MANUAL
TC-8
Chromatic Tuner/Metronome
TG-7
Guitar & Bass Tuner/Metronome
Thank you for your purchase of the TASCAM TC-8 Chromatic Tuner/Metronome, TG-7 Guitar & Bass Tuner/
Metronome.
Before connecting and using the unit, please take time to read this manual thoroughly to ensure you
understand how to properly set up and connect the unit, as well as the operation of its many useful and
convenient functions. After you have finished reading this manual, please keep it in a safe place for future
reference.
You can also download the Owner’s Manual from the TASCAM web site (http://www.tascam.com).
IMPORTANT SAFETY INSTRUCTIONS
If the product uses batteries (including a battery pack or installed batteries), they should not be exposed
•
to sunshine, fire or excessive heat.
CAUTION for products that use replaceable lithium batteries: there is danger of explosion if a battery is
•
replaced with an incorrect type of battery. Replace only with the same or equivalent type.
Use the volume control to minimize the volume before turning on the unit. Failure to do so could cause a
•
sudden burst of loud noise, which might result in hearing damage, for example.
Caution should be taken when using earphones or headphones with the product because excessive
•
sound pressure (volume) from earphones or headphones can cause hearing loss.
Cautions about Batteries
This product uses batteries. Misuse of batteries could cause a leak, rupture or other trouble. Always abide by
the following precautions when using batteries.
Never recharge non-rechargeable batteries. The batteries could rupture or leak, causing fire or injury.
•
When installing batteries, pay attention to the polarity indications (plus/minus (+/–) orientation), and
•
install them correctly in the battery compartment as indicated. Putting them in backward could make the
batteries rupture or leak, causing fire, injury or stains around them.
When you store or dispose of batteries, isolate their terminals with insulation tape or something like that
•
to prevent them from contacting other batteries or metallic objects.
When throwing used batteries away, follow the disposal instructions indicated on the batteries and the
•
local disposal laws.
Do not use batteries other than those specified. Do not mix and use new and old batteries or different
•
types of batteries together. The batteries could rupture or leak, causing fire, injury or stains around them.
Do not carry or store batteries together with small metal objects. The batteries could short, causing leak,
•
rupture or other trouble.
Do not heat or disassemble batteries. Do not put them in fire or water. Batteries could rupture or leak,
•
causing fire, injury or stains around them.
If the battery fluid leaks, wipe away any fluid on the battery case before inserting new batteries. If
•
the battery fluid gets in an eye, it could cause loss of eyesight. If fluid does enter an eye, wash it out
thoroughly with clean water without rubbing the eye and then consult a doctor immediately. If the fluid
gets on a person’s body or clothing, it could cause skin injuries or burns. If this should happen, wash it off
with clean water and then consult a doctor immediately.
The unit power should be off when you install and replace batteries.
•
Remove the batteries if you do not plan to use the unit for a long time. Batteries could rupture or leak,
•
causing fire, injury or stains around them. If the battery fluid leaks, wipe away any fluid on the battery
compartment before inserting new batteries.
Other cautions
Do not install in the following types of places. Doing so could cause malfunctions.
•
Places with significant vibrations or that are otherwise unstable
•
Near windows or other places exposed to direct sunlight
•
Near heaters or other extremely hot places
•
Extremely cold places
•
Places with bad ventilation or high humidity
•
Very dusty locations
•
Avoid installing this unit on top of any heat-generating electrical device such as a power amplifier.
•
Hum might occur if a powered amplifier or other device with a large transformer is used near this unit.
•
If this should happen, try increasing the distance between this unit and that device and changing their
orientations.
Uneven colors might appear on televisions and noise might be heard from radios that are used near this
•
unit. If this should happen, use the unit further from the affected device.
Noise might be heard from this unit if a mobile telephone or other wireless device is used nearby during
•
calls and when data is transmitted and received. If this should happen, use that device farther from the
unit or turn its power off.
If the unit is moved from a cold to a warm place, or used after a sudden temperature change, there is
•
a danger of condensation; vapor in the air could condense on the internal mechanism, making correct
operation impossible. To prevent this, or if this occurs, let the unit sit for one or two hours at the new room
temperature before using.
Use a dry soft cloth to wipe the unit clean. Do not clean the unit with a chemically treated cloth or
•
substances such as benzene, thinner and alcohol because they might cause damage to the surface of the
unit.
FOR U.S.A.
TO THE USER
This equipment has been tested and found to comply with the limits for a Class B digital device, pursuant
to Part 15 of the FCC Rules. These limits are designed to provide reasonable protection against harmful
interference in a residential installation. This equipment generates, uses, and can radiate radio frequency
energy and, if not installed and used in accordance with the instruction manual, may cause harmful
interference to radio communications. However, there is no guarantee that interference will not occur in a
particular installation. If this equipment does cause harmful interference to radio or television reception,
which can be determined by turning the equipment off and on, the user is encouraged to try to correct
the interference by one or more of the following measures.
a) Reorient or relocate the receiving antenna.
b) Increase the separation between the equipment and receiver.
c) Connect the equipment into an outlet on a circuit different from that to which the receiver is
connected.
d) Consult the dealer or an experienced radio/TV technician for help.
CAUTION
Changes or modifications to this equipment not expressly approved by TEAC CORPORATION for
compliance could void the user's authority to operate this equipment.
THIS CLASS B DIGITAL APPARATUS COMPLIES WITH CANADIAN ICES-003.
CET APPAREIL NUMÉRIQUE DE LA CLASSE B EST CONFORME À LA NORME NMB-003 DU CANADA.
For European Customers
Disposal of your old appliance
1. When this crossed-out wheeled bin symbol is attached to a product it means the
product is covered by the European Directive 2002/96/EC.
2. All electrical and electronic products should be disposed of separately from the
municipal waste stream via designated collection facilities appointed by the
government or the local authorities.
3. The correct disposal of your old appliance will help prevent potential negative
consequences for the environment and human health.
4. For more detailed information about disposal of your old appliance, please contact
your city office, waste disposal service or the shop where you purchased the product.
Conventions used in this manual
The following conventions are used in this manual.
Keys, jacks and other parts of this unit and other equipment are indicated in a bold font like this:
•
HOME
key.
Characters that appear on the display are shown like this:
•
ON
Trademarks
TASCAM is a trademark of TEAC Corporation, registered in the U.S. and other countries.
•
Other company names and product names in this document are the trademarks or registered trademarks
•
of their respective owners.
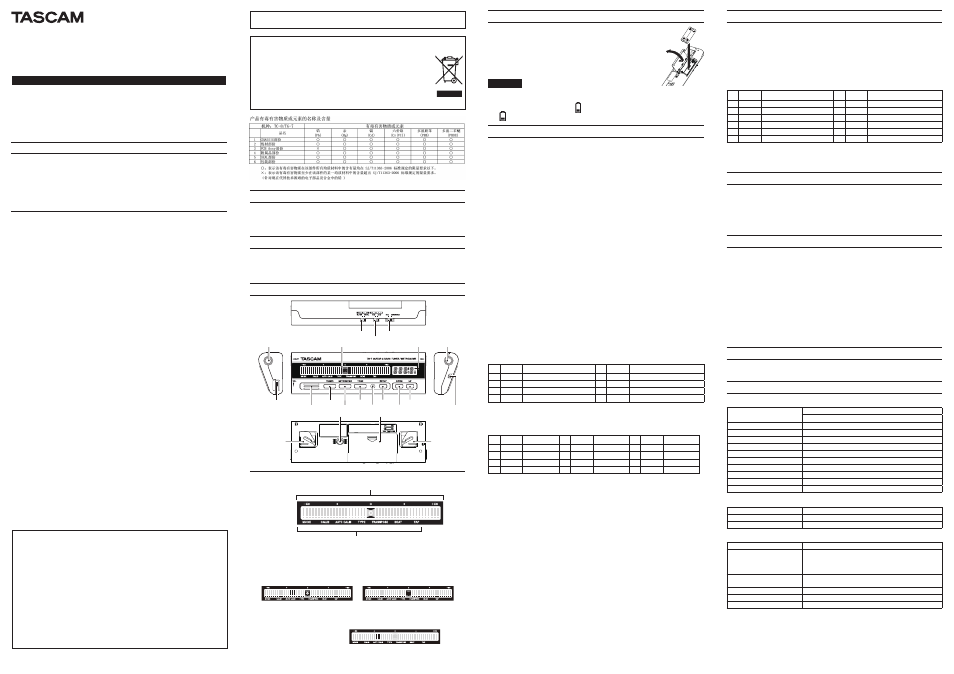
Names of parts
THRU OUT switch (TG-7 only)
STANDBY/ON switch
BACKLIGHT switch
OUT jack (TG-7 only)
Bar meter
Information display
IN jack
Volume
Built-in speaker
TUNER key
METRONOME key
TONE key
Built-in mic
SETUP key
UP key
DOWN key
Strap holder
Tripod mounting point (1/4-inch)
Battery compartment
Foldable stand
Foldable stand
Bar meter area
TC-8
Scale (cents)
Items shown
TC-8: MODE/CALIB/AUTO CALIB/SCALE/TRANSPOSE/BEAT/TAP
TG-7: MODE/CALIB/AUTO CALIB/TYPE/TRANSPOSE/BEAT/TAP
When tuning meter is active
Bars appear to the left when the pitch is too low, and bars appear to the right when the pitch is too high. The
number of bars increases when the pitch becomes more incorrect. When the tuning is accurate, the pitch
guide circle in the center lights.
Out of tune (pitch too low) In tune
Item selection indication
Three bars appear above an item when it is selected
Example when the AUTO CALIB item is selected
Batteries
Types of batteries that can be used
Manganese, alkaline or nickel-metal hydride AAA batteries can be used
with this unit.
Inserting the batteries
Slide open the battery compartment cover on the bottom of the unit. Insert 2 AAA
batteries oriented correctly with the + and – marks inside the compartment, and
reclose the cover.
CAUTION
The included alkaline batteries are provided for testing the operation of the unit and might not last long.
Low battery warning
When the battery charge becomes low, the
icon appears at the bottom right of the information display.
If the
icon begins to blink, the power will turn OFF soon.
Tuner
To use this function, set the STANDBY/ON switch to ON, and press the TUNER key. Press the UP key to
increase the response speed of the tuner, and press the DOWN key to decrease it. Press the UP and DOWN
keys at the same time to reset it to the default value (0). Press and hold the TUNER key to show the current
response speed setting on the information display.
When the tuner is active, press the SETUP key to access settings for each item. Each time you press the
SETUP key, the setting item changes. Press the TUNER key to reactivate the tuner.
MODE
Use this item to set the tuner mode. Press the UP and DOWN keys to change the setting. Press the UP and
DOWN keys at the same time to reset it to its default mode (NDL).
When METR (meter) mode is active, the note name is shown on the information display, and the meter
•
shows the amount of detuning (more than ±50 cents, −50 cents to +50 cents with each bar representing 2.5
cents).
When STRB (animated strobe) mode is active, the note name is shown on the information display. An
•
animated strobe is shown to the right if the pitch is too high and to the left if the pitch is too low. The
more out of tune the input sound is the faster the animated strobe moves. The strobe stops when the
played input sound is in tune.
When FINE mode is active, the meter shown is more precise. The range is ±20 cents with each bar
•
representing 1 cent. The note name is shown on the information display, and F appears on the far left to
indicate that fine mode is active. (Example: F C#4)
When NDL (needle) mode is active, the note name is shown on the information display, and the amount
•
of detuning is shown by three bars, including the bar at that position and the ones to the left and right of
it.
CALIB: Calibration
Use this to set the standard frequency of A (la) in a range between 349.0–499.0 Hz in 1 Hz increments. Press
the UP key to raise the frequency, and press the DOWN key to lower it. Press the UP and DOWN keys at the
same time to set it to the default value (440.0 Hz).
AUTO CALIB: Automatic calibration
Set the standard frequency of A (la) by matching it to an input sound. The setting range is 349.0–499.0 Hz
in 0.1 Hz increments. Calibration starts when an input sound is detected. During calibration, the bar moves
from the center to the right. Calibration is complete when the bar reaches the right edge. Press the UP and
DOWN keys at the same time to set it to the default value (440.0 Hz).
SCALE: Setting the scale (TC-8)
Use the UP and DOWN keys to select the desired scale. Press the keys to cycle through the scale options in
the following order. Press the UP and DOWN keys at the same time to set it to the default value (12EQ). The
abbreviated scale name appears on the information display.
Display
Scale
Display
Scale
1 12EQ
12-note equal temperament
5 KBG
Kirnberger III
2 PTG
Pythagorean
6 KLR
Kellner
3 MNT
Mean tone
7 VLT
Vallotti
4 WKM
Werckmeister III
8 YNG
Young
TYPE: Setting the tuning type (TG-7)
Use the UP and DOWN keys to select the desired type of guitar or bass tuning.
Press the UP and DOWN keys at the same time to set it to the default value (GTR). The abbreviated tuning
name appears on the information display.
Display
Tuning
Display
Tuning
Display
Tuning
1 GTR
Regular guitar
5 DP-G
Drop-G
9 USR2
User setting 2
2 BASS
Regular bass
6 OP-D
Open-D
10 USR3
User setting 3
3 CHRO
Chromatic
7 OP-G
Open-G
11 USR4
User setting 4
4 DP-D
Drop-D
8 USR1
User setting 1
12 USR5
User setting 5
Using the user settings
Select one of the user settings (USR1–USR5) and press the SETUP key. User setting names can be set. The
leftmost character blinks, showing that it can be changed. Use the UP and DOWN keys to select the desired
character and press the SETUP key to confirm it and move to the next character. Repeat this procedure to
set a user setting name.
Next, set the string tunings. Use the same keys to select the string numbers and set the pitch for each one (the
first string also shows the octave).
After setting all the strings, press the TUNER key to return to the tuner mode.
TRANSPOSE: Transpose the key
Press the UP key to raise by a semitone, and press the DOWN key to lower by a semitone.
TC-8: You can shift from the standard key. You can also change the standard pitch of the alternate scales.
TG-7: You can easily use flat (â) tuning and double flat (ââ) tuning, for example.
The setting range is from –6 to +6 (with a default value of 0).
Metronome
To use the unit as a metronome, set the STANDBY/ON switch to ON and press the METRONOME key. The
information display shows the current tempo, showing that the metronome is ready to use. Use the UP and
DOWN keys to set the tempo in a range between 30 and 300 beats per minute (BPM) in units of 1 BPM. Press
the UP and DOWN keys at the same time to set it to the default value (120). Press the SETUP key when
using the metronome function to switch between BEAT and TAP settings.
Press the METRONOME key again to start the metronome. Pressing the METRONOME key turns the
metronome on and off.
BEAT
Use to select the rhythm. Press the UP and DOWN keys to cycle through the following options. Press the UP
and DOWN keys at the same time to set it to the default value (4/4).
Display
Rhythm
Display
Rhythm
1 0/0
Mute
7 6/4
6/4 time
2 1/4
No accent
8 7/4
7/4 time
3 2/4
2/4 time
9 8
Duplets (8th notes)
4 3/4
3/4 time
10 12
Triplets
5 4/4
4/4 time
11 SHU
Triplet shuffle
6 5/4
5/4 time
12 16
Quadruplets (16th notes)
TAP
Set the BPM by tapping the UP or DOWN key. Press the UP and DOWN keys at the same time to set it to the
default value (120).
Tone
Set the STANDBY/ON switch to ON. Press the TONE key to show the pitch name of the tone that is ready to
be output. Press the UP and DOWN keys to change the tone in semitone increments (in the range between
B1 and B6). Press the UP and DOWN keys at the same time to set it to the default value (A4). Press the TONE
key again to start tone output. Pressing the TONE key turns the tone on and off. Use the Volume control to
adjust the loudness of the tone output from the speaker.
We recommend minimizing the volume (set it to 0) before turning the tone on. Raise the volume after
pressing the TONE key.
Other features
IN jack
An external microphone can be connected to the IN jack on the TC-8 for use with the unit. The output of
a guitar or an external microphone can be connected to the IN jack on the TG-7 for use with the unit. The
built-in mic is disabled when something is connected to the IN jack.
OUT jack (TG-7 only)
The sound input through the TG-7 IN jack can be passed through the unit and output from this jack. Set the
THRU switch on the rear panel to through output (THRU) or no output (MUTE).
Backlight
Use the BACKLIGHT switch on the back of the unit to turn the display backlight ON and OFF.
Stands
Use the built-in stands to angle the unit on a tabletop, or use the slits in the stands to place the unit on a
music stand. This will not attach the unit firmly. Be careful to prevent the unit from falling off of a music
stand, for example.
Product Registration
Customers in the USA, please register your product online at tascam.com.
Click on “Product Registration” on the bottom of the homepage.
Specifications
Functions
Tunings
TC-8: equal temperament, 7 other temperaments (see chart)
TG-7: equal temperament only (including 7-string guitars)
Detection range
A0 (27.5 Hz) – C8 (4186.010006 Hz)
Tone output range
B1 (61.73541 Hz) – B6 (1975.533672 Hz)
Note names
C, C#, D, Eâ, E, F, F#, G, G#, A, Bâ, B
Tuning modes
Meter, animated strobe, fine, needle and tone output
Calibration range
349.0–499.0 Hz, 1 Hz intervals (CALIB)/0.1 Hz intervals (AUTO CALIB)
Detection accuracy
within 1 cent (at A = 440 Hz)
Standard pitch output precision
within ±1 cent
Tempo range
É
= 30–300
Rhythms (accent frequency)
1, 2, 3, 4, 5, 6, 7, 8, 12, 16, shuffle
Built-in mic
omnidirectional, mono
Inputs and outputs
IN jack
6.3-mm (1/4”) standard mono jack
OUT jack
6.3-mm (1/4”) standard mono jack (TG-7 only)
Built-in speaker output
0.4 W
General
Power
2 AAA batteries
Continuous battery operation time
300 hours or longer (with “A” pitch continuously input and backlight
OFF)
(Time above is given using AAA alkaline batteries. Actual times will
vary according to conditions.)
External dimensions (W x H x D,
excluding protrusions)
150 x 50 x 29 mm/5.906 x 1.969 x 1.142 in.
Weight (not including batteries)
100 g/3.527 oz
Operating temperature range
5–35°C/41–95°F
Included accessories
2 alkaline AAA batteries, Owner’s Manual (this document), warranty
Illustrations in this manual may differ in part from the actual product.
•
Specifications and the external appearance may be changed without notification to improve the product.
•
TEAC CORPORATION
Phone: +81-42-356-9143
1-47 Ochiai, Tama-shi, Tokyo 206-8530 Japan
Printed in China
D01129230A