Installation guide – Upsite 10161 Modular Containment: Rack Top Vertical Baffle User Manual
Page 2
Installation Guide
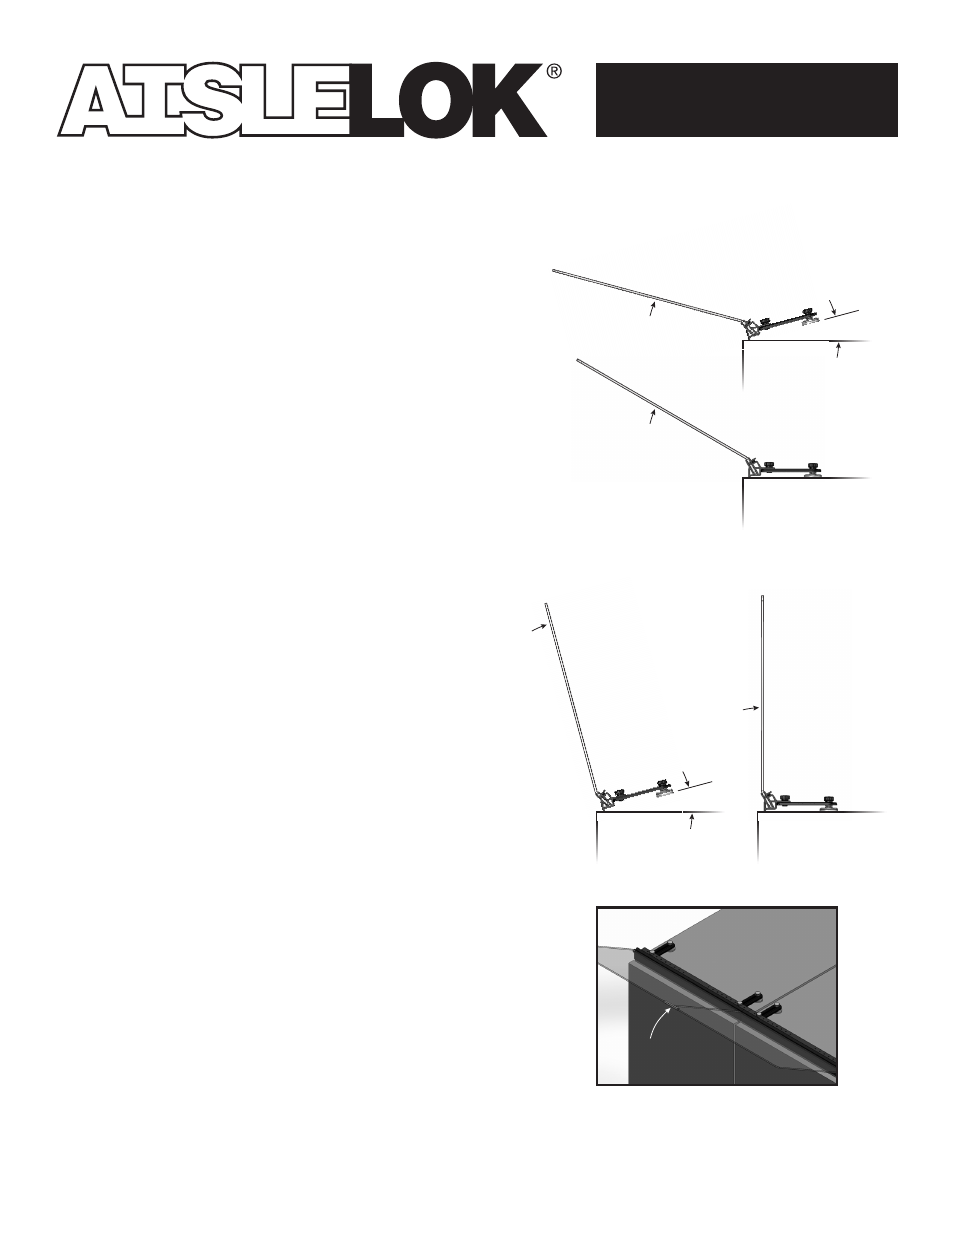
3. Position the AisleLok
®
Rack Top Baffle Assembly on
top of the rack
a. To simplify full front to back and side to side
adjustability, the key is to keep the magnets elevated,
free from making any contact, until proper positioning
has been established.
b. Starting at the end of the aisle, rest the front contact
edge of the AisleLok
®
Rack Top Baffle Assembly
extrusion base as close to the front of the cabinet frame
(not the door) as allowable.
c. Maintain the AisleLok
®
Rack Top Baffle Assembly with
the magnet tails in the air, at approx a 15 – 30° angle to
the top of the rack, and then center the AisleLok
®
Rack
Top Baffle Assembly left to right.
d. When proper positioning has been established allow
the magnet tails to rotate downwards until the magnets
make contact with the sheetmetal with an audible ‘click’.
Note: To reposition the baffle, grab the middle top of the
clear panel and push up or in, in a continuous manner, such
that the action lifts the front edge of the extrusion base off
the cabinet and peels off the magnets from contact.
Important: Do not attempt remove Rack Top Baffle
Assembly by pulling down or forward.
4. Continue placing the AisleLok
®
Rack Top Baffle
Assembly on top of each rack in the aisle
a. Continue to populate the aisle by placing the AisleLok
®
Rack Top Baffle Assembly on top of each rack in the
row. It is best to manage both sides of the aisle, as you
move down the rows.
b. Keep the gap between the plastic panels at a minimum
and align the Rack Top Baffle Assemblies evenly across
the top of the racks.
c. An optional alignment clip is provided to address any
baffle misalignment.
Use of the clips will help straighten out the alignment of the
baffles. Simply slide the clip to the top edge, across the
gap, of two adjacent panels.
Instructions for Cleaning
a. To clean clear plastic panels, mix warm water with a
small amount of liquid household detergent.
b. Using a micro fiber towel, lightly apply mixture to the
clear plastic. It is not recommended to use abrasive
cleaning items (i.e. scratch pads), as these items have
the potential to damage the product.
c. Wipe dry with a clean microfiber towel.
15 – 30˚
15 – 30˚
Position then rotate up,
until magnets click.
30° Angular Configuration
90° Vertical Configuration
To disengage
magnets, push up
ENGAGE
Position then rotate up,
until magnets click.
ENGAGE
DISENGAGE
To disengage
magnets, push up
DISENGAGE
Alignment
Clip