Control panel – Laney AH210 User Manual
Page 9
9
Control Panel
CH5/6
MASTER
VOLUME
5
4
3
2
1
0
10
9
8
7
6
5
4
3
2
1
0
10
9
8
7
6
5
4
3
2
1
0
10
9
8
7
6
5
4
3
2
1
0
10
9
8
7
6
5
4
3
2
1
0
10
9
8
7
6
-5
+5
4
4
3
3
2
2
1
1
0
-5
+5
4
4
3
3
2
2
1
1
0
-5
+5
4
4
3
3
2
2
1
1
0
-5
+5
4
4
3
3
2
2
1
1
0
5
4
3
2
1
0
10
9
8
7
6
5
4
3
2
1
0
10
9
8
7
6
5
4
3
2
1
0
10
9
8
7
6
5
4
3
2
1
0
10
9
8
7
6
MASTER ECHO
BASS
BASS
BASS
PHANTOM
POWER
LIMIT
POWER
TREBLE
LINE
LINE
LINE
LINE
MIC
MIC
MIC
MIC
PEAK
PEAK
PEAK
PEAK
TREBLE
TREBLE
TREBLE
LEVEL
LEVEL
L
L
R
R
CH1
CH2
CH3
CH4
5
4
3
2
1
0
10
9
8
7
6
5
4
3
2
1
0
10
9
8
7
6
5
4
3
2
1
0
10
9
8
7
6
5
4
3
2
1
0
10
9
8
7
6
-5
+5
4
4
3
3
2
2
1
1
0
-5
+5
4
4
3
3
2
2
1
1
0
-5
+5
4
4
3
3
2
2
1
1
0
-5
+5
4
4
3
3
2
2
1
1
0
ECHO
ECHO
ECHO
ECHO
BASS
AUX IN
LEVEL
LEVEL
LEVEL
LEVEL
LEVEL
MONITOR OUTPUTS
10
9
11
12
13
14
15
16
17
20
18
19
21
22
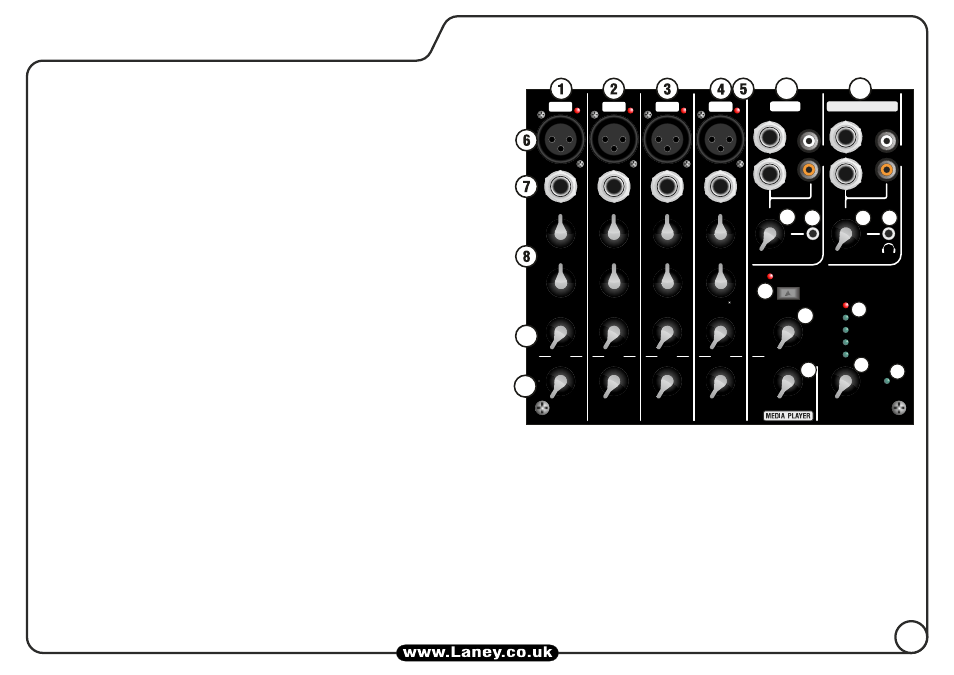
1-4: MONO INPUT CHANNELS.
5. PEAK: Adjust the level controls and signal level from your source(s) so the LED
illuminates only briefly on peaks in the music. Using the system with this LED on all or most of
the time will result in poor sound quality.
6. MIC INPUT: A balanced XLR input for low level, low impedance devices eg. - mic (200-
600ohms) or
electro-acoustic guitar.
7. LINE INPUT: an unbalanced input - for higher output line level devices eg. -keyboard,
processor, sample/drum machine etc.
Note: Mic and Line inputs can be used simultaneously.
8. EQ: 2 band active EQ for adjusting the signal. Setting both controls to 0 is a good starting
point.
9. ECHO: This control determines how much (if any) of each channel is sent through
the onboard echo FX processor - also see (15)
10. LEVEL: Controls the channel level to the master volume - also see (22).
11. CH 5/6: A multi input line level Stereo channel. Choose from 2x 6.35mm jack, RCA or
3.5mm jack. Any combination, or all can be used together.
12. LEVEL: Control the level of signal from channel 5/6 to the Master Volume.
13: AUX IN: Connect an audio feed from an external MP3 player or mobile phone here.
Please use a stereo cable for this. The level can be adjusted using Level control(12).
14. PHANTOM POWER: Turns on Phantom Power to all Mic channels should it be
needed, eg. condenser mic’s.
15. MASTER ECHO: Control the overall level of the feed from the onboard FX processor.
If you want to apply Echo to a mono channel, first set the Master control to 5. Slowly increase
the Input Echo send control until the desired amount of echo is achieved. The Master control
can then be used to control the overall Echo level.
16. MEDIA PLAYER LEVEL: Controls the overall level of music from the onboard media player. See media player controls 23-30.
17. MONITOR OUTPUTS: A convenient way of connecting your AH210 AudioHub to another device such as an additional amp/speaker setup, recording device or
possibly both at the same time via the jack and RCA connectors or 6.35mm jacks. You can also monitor this signal feed via headphones.
18. MONITOR LEVEL: Control the MONITOR OUTPUT and headphone level.
19: HEADPHONES: Connect your headphones here. The volume can be adjusted using level control (18).
20. OUTPUT LEVEL METER: Use this to give an idea of the overall output level of your AH210 AudioHub system. If the LIMIT led is constantly on, reduce the MASTER
VOLUME (22)
21 POWER LED: This will illuminate when the unit is powered up.
22. MASTER VOLUME: Controls the overall level of your AH210 AudioHub system.