Crivit Z31324 User Manual
Expander-set, Komplet ekspandorów, Expander készlet
GB
GB
GB
GB
Nie naciągaj produktu ponad maksymalną długość (patrz tabela w rozdziale „Dane techniczne“).
OSTROŻNIE! NIEBEZPIECZEŃSTWO SZKÓD MATERIALNYCH! Aby uniknąć niebezpieczeństwa obrażeń oraz
uszkodzenia mienia, używaj produktu wyłącznie w pomieszczeniach, w których możliwe jest zachowanie bezpiecznego
odstępu od innych osób i przedmiotów.
Przed każdym użyciem sprawdź produkt czy nie jest uszkodzony. Produktu należy używać wyłącznie wówczas, gdy jest on
w nienagannym stanie.
Podczas rozciągania produktu utrzymuj dłonie w jednej linii z przedramieniem i nie wyginaj nadgarstków!
Zawsze utrzymuj taśmy dobrze naciągnięte i uważaj, aby się nie poślizgnąć!
Rozluźniaj produkt do stanu początkowego zawsze powoli, utrzymując ich naprężenie.
Nigdy nie zaczepiaj produktu o przedmioty, np. stół, drzwi lub podest.
Nigdy nie ciągnij produktu w kierunku twarzy ani nie owijaj go wokół głowy, szyi lub klatki piersiowej.
Utrzymuj produkt z dala od ostrych, spiczastych, gorących oraz / lub niebezpiecznych przedmiotów.
Chroń produkt przed bezpośrednim działaniem promieni słonecznych oraz źródeł ciepła.
Instrukcja wykonywania ćwiczeń
Poniżej przedstawiamy przykłady ćwiczeń. Dalsze informacje na temat ćwiczeń są dostępne w odpowiedniej literaturze.
Załóż wygodną odzież sportową.
Przed przystąpieniem do ćwiczenia przeprowadź rozgrzewkę.
Ćwiczenia wykonuj w równym tempie i przy spokojnym oddechu. Proszę stosować się do podanego układu ruchów i nie
przeceniać swoich możliwości podczas ćwiczeń. Podczas napinania mięśni wykonuj wydech, podczas rozluźniania wdech.
Każde ćwiczenie powtórz 10–20 razy.
Ćwiczenia
Ekspander pierścieniowy:
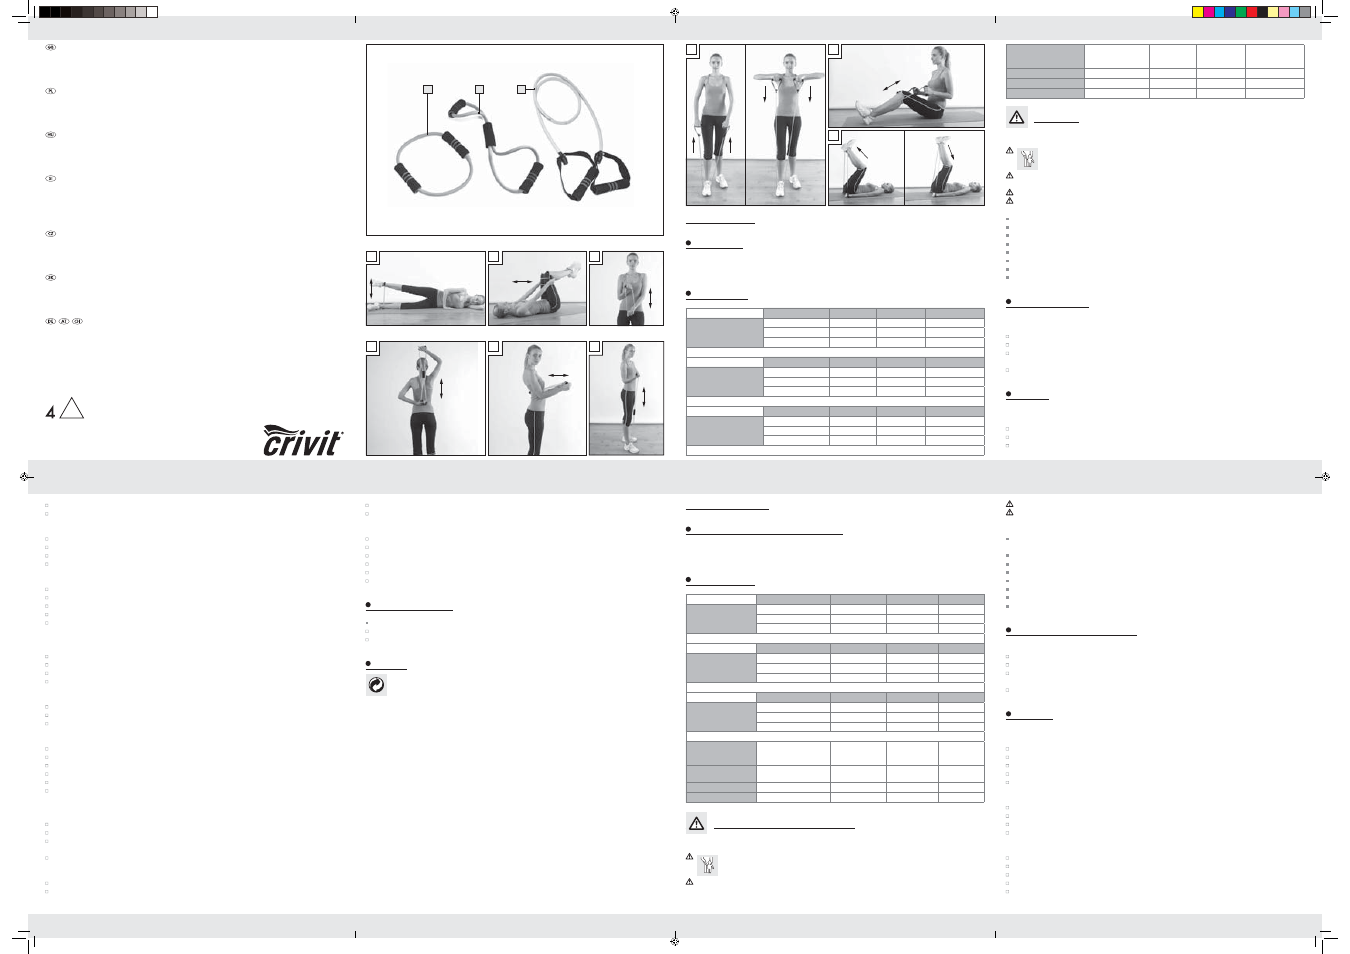
Uda (patrz ilustracja A)
Ułóż się na boku i oprzyj na łokciach.
Uniesiona noga znajduje się na wysokości bioder.
Umieść ekspander pierścieniowy na wysokości kostek.
Powoli unoś i opuszczaj nogę.
Powtórz ćwiczenie na drugiej nodze.
Brzuch (patrz ilustracja B)
Połóż się na plecach i ułóż uda pod kątem 90° do ciała.
Uchwyty produktu trzymaj obiema dłońmi i ułóż go wokół ud.
Podciągaj kolana do ciała wbrew oporowi ekspandera pierścieniowego.
Podczas całego ćwiczenia pozostaw głowę i ramiona w pozycji wyjściowej.
Biceps (patrz ilustracja C)
Ustaw się w pozycji wyprostowanej, stopy rozstawione na szerokość ramion.
Weź po jednym uchwycie ekspandera pierścieniowego w dłoń i połóż jedną na biodrze.
Ramię powinno przy tym płasko przylegać do ciała.
Pociągnij przedramię do góry naprzeciw oporowi adaptera pierścieniowego a następnie powróć do pozycji wyjściowej.
Uważaj podczas całego ćwiczenia na to aby rozciągać plecy.
Komplet ekspandorów
Zastosowanie zgodne z przeznaczeniem
Produkt został opracowany jako przyrząd sportowy i nie jest przeznaczony do zastosowań komercyjnych. Produkt nie nadaje się
do użycia w leczeniu terapeutycznym oraz medycznym.
Dane techniczne
Długość
40 cm
50 cm
60 cm
Ekspan-
der pierścieniowy /
* siła rozciągająca
Zielony (Z31324A)
22 N
30 N
39 N
Lila (Z31324B)
23 N
33 N
43 N
Różowy (Z31324C)
38 N
54 N
66 N
Długość
60 cm
80 cm
105 cm
Ekspan-
der krzyżowy /
* siła rozciągająca
Zielony (Z31324A)
13 N
28 N
40 N
Lila (Z31324B)
19 N
35 N
54 N
Różowy (Z31324C)
20 N
42 N
65 N
Długość
240 cm
270 cm
300 cm
Ekspander wężowy /
* siła rozciągająca
Zielony (Z31324A)
14 N
20 N
26 N
Lila (Z31324B)
14 N
22 N
27 N
Różowy (Z31324C)
15 N
24 N
29 N
* Tolerancja wcześniej wymienionych sił: + / - 20 %
Uchwyt do
uchwytu
Lekko
Zielony
(Z31324 A)
Średnio
Lila
(Z31324 B)
Ciężko
Różowy
(Z31324 C)
Maks.
długość
Ekspander
pierścieniowy
24 cm
24 cm
24 cm
60 cm
Ekspander krzyżowy
42 cm
42 cm
42 cm
105 cm
Ekspander wężowy
148 cm
160 cm
172 cm
300 cm
Wskazówki dotyczące bezpieczeństwa
PRZED UŻYCIEM NALEŻY ZAPOZNAĆ SIĘ Z INSTRUKCJĄ OBSŁUGI! INSTRUKCJĘ OBSŁUGI NALEŻY ZACHOWAĆ!
OSTROŻNIE! NIEBEZPIECZEŃSTWO ODNIESIENIA OBRAŻEŃ! Produkt nie jest zabawką i może być
używany przez dzieci wyłącznie pod nadzorem osób dorosłych.
Jeżeli masz problemy zdrowotne, reakcje alergiczne lub obrażenia, przed użyciem produktu skonsultuj się ze swoim lekar-
zem. Jeżeli podczas wykonywania ćwiczeń pojawią się mdłości, złe samopoczucie lub inne dolegliwości, bezzwłocznie
przerwij ćwiczenia.
PL
PL
Bend the arms alongside your body. Bend the elbows approx. 90°.
Slightly pull both elbows backward keeping them close to the body until the hands are at hip level.
Legs (see Fig. I)
Lie on your back.
Raise your legs as shown in Figure I and place the long resistance tube flat around both feet.
Hold the grips in both hands, moving them down. Place them to the side of your rear.
Now straighten your legs as if attempting to lift a weight.
Do not fully straighten your legs.
Slowly return to the starting position.
Cleaning and storage
Never use abrasive or caustic cleaning agents. The product will otherwise be damaged.
Only clean the product with lukewarm water and dry well with a cloth.
Always store the product dry and clean, in a temperate room.
Disposal
The packaging is made from environmentally friendly materials, which may be disposed through your
local recycling facilities.
Contact your municipality for details on how to dispose of your worn-out product.
Slowly raise and lower the upper leg.
Then repeat this exercise with the other leg.
Abs (see Fig. B)
Lie on your back and bring the thighs 90° to your body.
Firmly hold the grips of the product with both hands and place them around your thighs.
Pull your knees toward your body, moving against the resistance of the circle resistance tube.
The head and arms remain in the starting position throughout the exercise.
Biceps (see Fig. C)
Stand with your feet apart at shoulder width.
Hold the circle resistance tube grips one in each hand and place one hand on your hip.
Keep the upper arm against the body.
Now draw the forearm upward against the resistance of the circle adapter, then return to the starting position.
Be sure to keep the back straight throughout the exercise.
Figure 8 resistance tube:
Triceps (see Fig. D)
Stand upright. Bend one arm behind your back, bend the other arm above your head.
Hold the handles with your hands. The wrists should be straight.
Pull the cross tube upwards with the upper hand. The lower hand should be a stabiliser.
Afterwards repeat this exercise with the other arm.
Chest (see Fig. E)
Place your feet at hip width.
Place the figure 8 resistance tube across the back, below the shoulder blades and hold the grips taut in front of the chest.
Move your arms forward using a controlled motion.
Biceps (see Fig. F)
Slight walking stance with the right foot on the grip of the figure 8 resistance band, keeping the body straight.
Hold the other grip in your right hand at hip level. Keep your elbow against the body.
Move your hand to about shoulder level. Keep the elbow against the body throughout this exercise.
Slowly return to the starting position.
Be sure to keep the back and neck straight throughout the exercise.
Switch sides after a few repetitions.
Long resistance tube:
Shoulders (see Fig. G)
Slight walking stance with the right foot on the centre of the long resistance tube, the body straight.
Hold the grips at hip level.
With the elbows bent, keeping the arms in front of the body, pull the long resistance tube straight up until the grips are at
chest level.
Slowly return to the starting position.
Back (see Fig. H)
Sit down on the floor with the legs and back straight.
Place the long resistance tube flat around both feet and tauten with both hands.
Grip to grip
Light
Green
(Z31324 A)
Medium
Purple
(Z31324 B)
Heavy
Pink
(Z31324 C)
Max. stretching
length
Circle resistance tube
24 cm
24 cm
24 cm
60 cm
Figure 8 resistance tube
42 cm
42 cm
42 cm
105 cm
Long resistance tube
148 cm
160 cm
172 cm
300 cm
Safety notes
PLEASE READ THE INSTRUCTIONS FOR USE PRIOR TO USE! PLEASE KEEP THE INSTRUCTIONS FOR USE IN A SAFE PLACE!
CAUTION! RISK OF INJURY! This product is not a toy and should only be used under adult supervision.
Consult your doctor before using this product, if you have health problems, allergic reactions or an injury. Stop the exercises
immediately if you feel sick or unwell whilst exercising or if any other complaints arise.
Do not extend the product beyond its maximum length (see table under “Technical data“).
CAUTION! RISK OF PROPERTY DAMAGE! Only use the product in areas where you can maintain adequate distance
from persons / objects to avoid injuries and property damage.
Check the product for damage and wear before every use. Only use this product in proper condition.
When stretching the product hold your hands directly extending the forearms, do not overextend the wrists!
Always keep the tubes taut and be careful not to slip!
Always slowly return the product to the starting position, keeping it taut.
Never secure the product to objects, e.g. table, door or the landing.
Never extend the product toward the face, and never wrap it around the head, neck or chest.
Keep the product away from sharp, pointed, hot and / or dangerous objects.
Avoid direct sunlight and heating sources.
Exercise instructions
The following instructions are only a sample of possible exercises. Please refer to the respective literature for information about
other exercises.
Wear comfortable sports or leisure clothing.
Always warm up before beginning the exercises.
Perform the exercises at a consistent speed and breathing evenly. Follow the specified motion sequences and do not overesti-
mate yourself. Breath out when contracting the muscles, breath in when releasing them.
Repeat each exercise 10–20 times.
Exercises
Circle resistance tube:
Thigh (see Fig. A)
Lie on your side, supporting yourself on your elbows.
Place the upper leg at hip height.
Secure the circle resistance band ankle high.
1
2
3
A
B
C
D
E
F
H
G
I
Resistance Tube Set
Intended use
This product is designed as a piece of sports equipment and is not intended for commercial use. This product is not suitable for
therapeutic or medical use.
Technical Data
Stretching length
40 cm
50 cm
60 cm
Circle resistance tube /
* Tension
Green (Z31324A)
22 N
30 N
39 N
Purple (Z31324B)
23 N
33 N
43 N
Pink (Z31324C)
38 N
54 N
66 N
Stretching length
60 cm
80 cm
105 cm
Figure 8 resistance
tube / * Tension
Green (Z31324A)
13 N
28 N
40 N
Purple (Z31324B)
19 N
35 N
54 N
Pink (Z31324C)
20 N
42 N
65 N
Stretching length
240 cm
270 cm
300 cm
Long resistance tube /
* Tension
Green (Z31324A)
14 N
20 N
26 N
Purple (Z31324B)
14 N
22 N
27 N
Pink (Z31324C)
15 N
24 N
29 N
* Tolerance of the above tensions: + / - 20 %
EXPANDER-SET
Bedienungs- und Sicherheitshinweise
Z31324A
Z31324B
Z31324C
RESISTANCE TUBE SET
Operation and Safety Notes
KOMPLET EKSPANDORÓW
Wskazówki dotyczące obsługi i bezpieczeństwa
EXPANDER KÉSZLET
Kezelési és biztonsági utalások
KOMPLET FITNES PRIPOMOČKOV
ZA RAZTEZANJE
Navodila za upravljanje in varnostna opozorila
SADA EXPANDÉRŮ
Pokyny pro obsluhu a bezpečnostní pokyny
SÚPRAVA POSILŇOVAČOV SVALOV
Pokyny pre obsluhu a bezpečnostné pokyny
78299_cri_Fitness_Band_LB4.indd 1
29.08.12 09:05