Florabest 360L Compost Bin User Manual
Qe r t, 2a 2b 2c
90
o
90
o
90
o
90
o
Q
E
R
T
2a
2b
2c
1
2
4.1
4.2
W
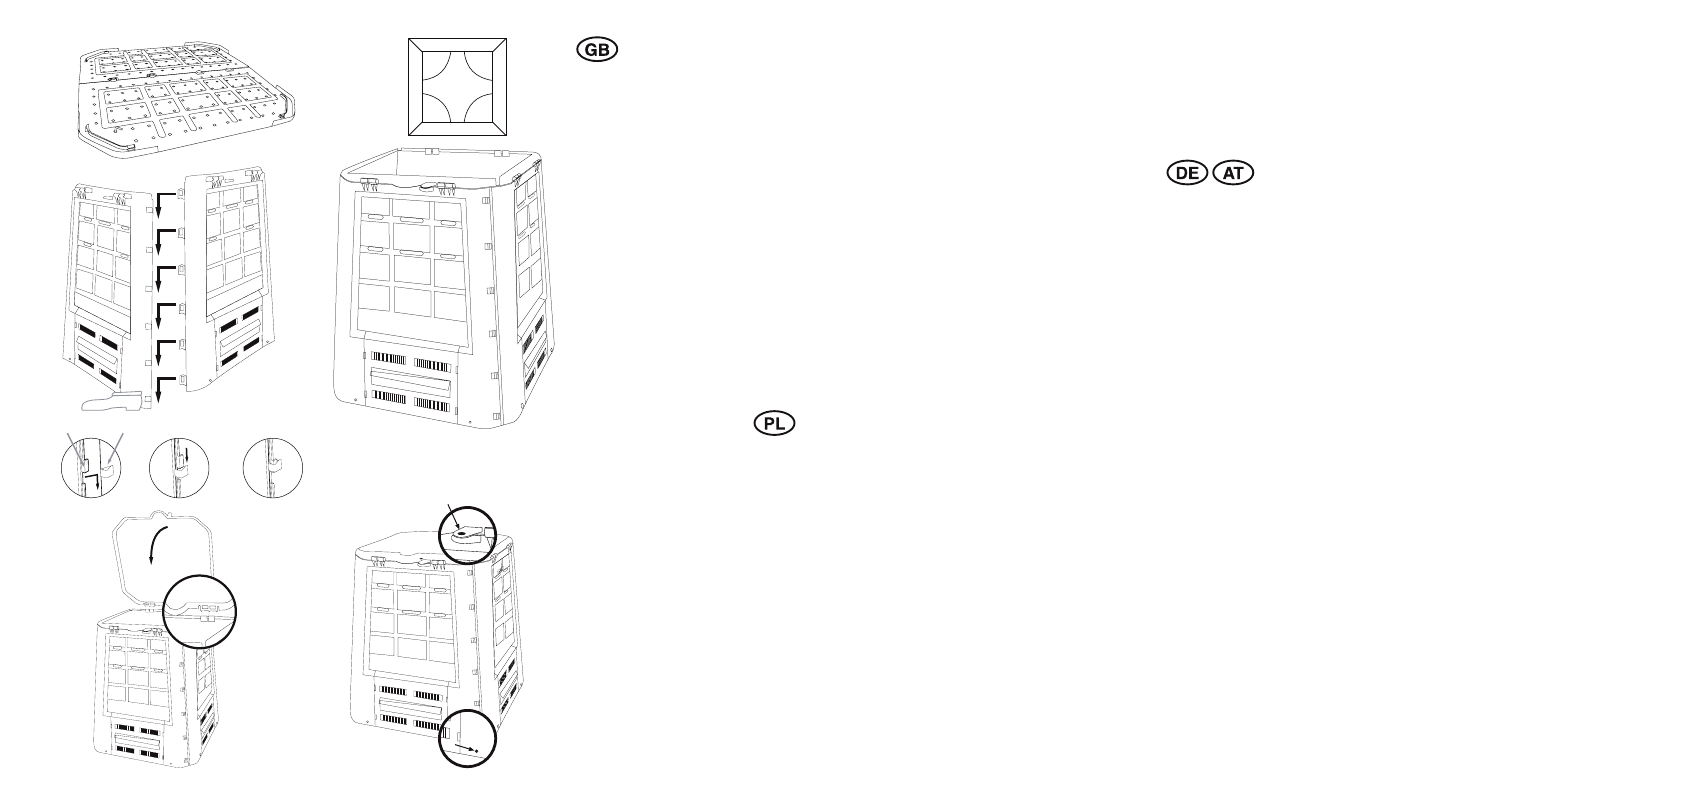
Assembly instructions
Please note:
Assemble your composter in accordance with the following
instructions, placing it on a level supporting surface.
Included components:
4 x sides, each with a prefitted slide opening for removal
1 x lid
1 x bottom screen
4 x ground spikes
Selecting a suitable site
The ideal site for the composter is in the half shade of
flowers or hedges. Ensure that the composter is in direct
contact with garden soil. This will allow essential garden
organisms to work unhindered on your compost. A layer of
coarser stalks, shredded material or grass sods is perfect
for ensuring the correct moisture content is maintained.
1) Anchor the two parts of the bottom screen together
Push the fastening nose (1) into the slot (2) until it engages.
Insert the 4 ground spikes through the holes in the corners
of the bottom screen and anchor them to the ground.
2) Attaching the sides to one another
Note: You will find it easier to assemble the composter if
you stand outside it. Using your left foot to steady the left
hand side part of each corner, slide the fastening lugs of
the right hand side part into the corresponding slots ofthe
left hand side part.
2a Fastening lug (1) & slot (2)
2b Slide the fastening lug into the slot
2c Press down
3) Squaring up the four sides
Adjust the four sides – once you have slid them together
as instructed in 2 – so that they are at right angles (90°) to
one another.
Connecting the bottom screen to the sides
Set down the connected sides on the bottom screen. Press
them down slightly so that the sides engage.
4) Putting on and engaging the lid
Angle the lid towards the front, ... Press it down and engage
it. Attach the lid to any side part by the hinge points and
engage it (see sketch). If the hinge part on any side part
gets damaged you can use the hinge part on another side.
5) The assembly is complete
The composter has a hole for a lock (see Fig. 4.1). If
necessary you can lock the composter with a padlock
(padlock not included).
COMPOSTER
It is important to fill your composter correctly
• begin with a layer of earth
• then add garden waste, if possible with intermediate layers
woody material and leaves, i.e. create a mixture of nitrogen-
rich green waste and carbon-rich materials
• the individual layers should not be thicker than 15 cm
• to avoid smells building up, it is helpful to lightly mix
through the composting material in the composter using a
garden fork. This will allow fresh air to be introduced into the
rotting process
• the materials in the composter are relatively poor in
nutrient content but are important for their humus content,
therefore it may be beneficial to enrich the mixture by
adding nutrients, for example farmyard dung
• water the compost from time to time to avoid it drying out
completely, especially in the summer months
Compostable wastes include:
• garden waste (chopped or cut into small pieces)
• cut grass, allowed to dry slightly first
• leaves (in small pieces if possible)
• tree or hedge cuttings (shredded)
• coffee grounds, filters, teabags, eggshells
• wood ashes and soot
Introduce the waste in such a way that it is as loose as
possible. Do not press or pat down the waste to form a sold
mass, otherwise this could prevent the micro-organisms
from working properly on the compost.
Items unsuitable for composting include:
• kitchen wastes containing meat, fish, cheese, soup,
cooking fat, oil, bones or bread. These materials contribute
to the formation of mould.
• materials treated with chemicals, likewise avoid potato
peelings
• never place citrus fruit peel in your compost
Tips for accelerating the composting process
How quickly your composter processes the waste depends
mainly on the mixing of the materials, moisture content and
temperature. Grass cuttings, vegetable and garden waste,
and farmyard dung rot down in a few months.
The rotting process can be further accelerated if you
sprinkle each layer of well mixed and thoroughly damp
material with a compost starter (obtainable from a garden
centre), mixed organic fertilisers and old compost earth or
by adding garden worms. You can also add garden earth,
stone dust or crushed coral. In the summer months in
particular, the num-ber of micro-organisms increases greatly
and this leads to a speedy breakdown of the green waste.
Removing the finished compost
• First test whether the compost is ready. Slide open the
opening so that you can see the structure of the humus.
When the compost is ready it has a dark brown, grainy
appearance and smells like the forest floor.
• Sieve the finished compost before use (not too fine).
Return any materials that are not completely rotted, e.g.
pieces of branch, back into the composter.
Instrukcja montażu
Prosimy pamiętać:
Kompostownik należy zmontować w sposób niżej opisany i
usadowić go wyłącznie na równym podłożu.
Produkt składa się z następujących części:
4 x elementy boczne z zamontowaną klapą do
pobierania kompostu
1 x pokrywa
1 x kratą spodnią
4 x kotwy
Wybrać stanowisko
Korzystną lokalizacją kompostownika jest
miejsce znajdujące się w półcieniu kwiatów
lub żywopłotu. Należy pamiętać, aby kompostownik
miał bezpośredni kontakt z ogrodową
ziemią. Dzięki temu organizmy żyjące w ziemi
potrzebne do procesu kompostowania będą
mieć wolny dostęp do składowanych w nim
odpadów. Do utrzymania wilgoci najlepiej
nadaje się warstwa chrustu, kory lub torfu.
1) Połączyć ze sobą obie części kraty spodniej
Wsunąć występ mocujący (1) we wpust (2) do
momentu ich zazębienia.
Wsunąć cztery kotwy w otwory znajdujące się
w narożnikach kraty spodniej i zakotwiczyć
w podłożu.
2) Połączyć ze sobą elementy boczne
Wskazówka: ustawić się na zewnątrz
kompostownika, dzięki temu można będzie go
łatwiej zmontować. Lewą stopą unieruchomić
lewy element boczny i wsunąć noski mocujące
prawej części bocznej do rowków znajdujących
się w części lewej.
2a Nosek mocujący (1) & rowek (2)
2b Wsunąć nosek mocujący do rowka
2c Docisnąć elementy
3) Wszystkie cztery boki ustawić pod kątem
prostym
Wszystkie cztery elementy boczne złączone w sposób opisany
w pkt. 2 należy teraz ustawić względem siebie pod kątem
prostym (90°).
Połączyć kratę spodnią ze ścianami bocznymi.
Nasadzić połączone ściany boczne na kratę spodnią. Docisnąć
w dół do momentu ich zazębienia.
4) Przyłożyć i docisnąć pokrywę tak, aby się ona wyraźnie
zazębiła
Pokrywę ustawić lekko pod kątem w kierunku do przodu, i
docisnąć w dół aż do jej słyszalnego zazębienia się.
Przyłożyć pokrywę do dowolnego elementu bocznego w
punktach, w których znajdują się zawiasy i docisnąć ją aż do jej
zazębienia się (patrz szkic). W przypadku uszkodzenia części
zawiasu możemy użyć zawiasu innego elementu bocznego
5) Montaż jest zakończony
Kompostownik posiada otwór zamkowy (patrz ilustracja 4.1).
W razie potrzeby kompostownik można zamknąć przy pomocy
kłódki (kłódka nie jest zawarta w wyposażeniu).
KOMPOSTOWNIK
Prawidłowe napełnianie kompostownika
• należy zacząć od warstwy ziemi
• następnie odpady ogrodowe; o ile to możliwe poprzedzielane
warstwami drewna i liści, odpadki zielone o dużej zawartości
azotu zmieszane z odpadkami o dużej zawartości węgla
• poszczególne warstwy nie powinny przekraczać grubości 15 cm
• unikajmy nadmiernego tworzenia się nieprzyjemnego
zapachu; pomocne w tym celu będzie lekkie przemieszanie
kompostowanego materiału widłami – dzięki doprowadzeniu
świeżego powietrza proces rozpadu ulegnie przyspieszeniu
• Materiał dostający się do kompostownika jest relatywnie
ubogi w substancje odżywcze, jego główna wartość kryje
się w zawartości humusu, dlatego korzystne jest dodatkowe
nawożenie (np. obornikiem)
• unikajmy całkowitego wysychania kompostu (szczególnie w
miesiącach letnich), od czasu do czasu nawadniając go.
Odpady nadające się do kompostowania to m in.:
• odpady ogrodowe (rozdrobnione)
• skoszona, lekko wysuszona trawa
• liście (w miarę możliwości rozdrobnione)
• ścinki po pielęgnacji drzew i żywopłotów (rozdrobnione)
• fusy z kawy wraz z papierowymi wkładami filtrującymi, herbata
ekspresowa w saszetkach, skorupki jajek
• popiół drzewny
Wrzucane odpady powinny być w miarę luźne. Nigdy mocno
nie ugniatać odpadów, aby umożliwić pracę organizmom
przerabiającym masę organiczną.
Do kompostownika nie należy wrzucać m in.:
• odpadów kuchennych takich jak resztki mięsa, ryb, serów,
zup, tłuszczu ze smażenia, oleju, kości i chleba - produkty te
przyczyniają się do powstawania pleśni!
• należy także unikać łupin kartoflanych traktowanych środkami
chemicznymi
• w żadnym wypadku nie wrzucać do kompostownika skórek
po cytrusach
Wskazówki dla przyspieszenia procesu kompostowania
Szybkość procesu powstawania dojrzałego kompostu zależy
w dużej mierze od składu zgromadzonego w kompostowniku
materiału, jego wilgotności i temperatury. Ścięta trawa, odpady
owocowe i warzywne, obornik rozkładają się w ciągu kilku
miesięcy.
Proces rozkładu można przyspieszyć dzięki mieszaniu warstw
kompostowanego materiału, dobremu napowietrzeniu i
dodawaniu starterów dostępnych w sklepach specjalistycznych,
nawozów organicznych i starej ziemi kompostowej bądź też
dżdżownic. Alternatywnie można użyć także ziemi ogrodowej,
mączki kamiennej lub wapna glonowego. Mikroorganizmy
biorące udział w procesie kompostowania rozmnażają się
szczególnie intensywnie w okresie lata powodując szybki
rozkład odpadów roślinnych.
Wybieranie gotowego kompostu
• Najpierw należy sprawdzić stopień dojrzałości kompostu.
Otworzyć klapę i sprawdzić strukturę humusu. Gotowa ziemia
kompostowa powinna mieć ciemnobrązową barwę, powinna być
ziarnista i pachnieć leśną ściółką.
• Gotową ziemię kompostową przed użyciem należy przesiać
(nie za drobno). Składniki nierozłożone jak np. fragmenty gałęzi
należy ponownie umieścić w kompostowniku.
nizmi
Aufbauanleitung
Bitte beachten Sie:
Bauen Sie den Komposter in den nachfolgend
beschriebenen Schritten und stellen Sie ihn nur auf ebenem
Untergrund auf.
Lieferumfang:
4 x Seitenteile mit jeweils vormontiertem Entnahmeschieber
1 x Deckel
1 x Bodengitter
4 x Erdspieße
Wählen Sie den Standort aus
Der günstigste Standort für den Komposter ist im
Halbschatten von Blumen und Hecken. Sorgen Sie dafür,
dass der Komposter direkten Kontakt zur Gartenerde hat.
Dadurch können die notwendigen Bodenorganismen
ungehindert arbeiten. Zur Erhaltung der Feuchtigkeit sind
eine Schicht Reisig, Schredderabfälle oder Torf am besten
geeignet.
1) Verankern Sie die beiden Teile des Bodengitters
miteinander
Schieben Sie die Befestigungsnase (1) in die Nut (2) und
lassen sie diese einrasten. Stecken Sie die vier Erdspieße
durch die Löcher an den Ecken des Bodengitters und
verankern Sie diese mit dem Boden.
2) Verankern Sie die Seitenteile miteinander
Hinweis: Stellen Sie sich außerhalb des Komposters, so
lässt er sich leichter aufbauen. Fixieren Sie mit Hilfe des
linken Fußes das jeweils linke Seitenteil, und schieben Sie
die Befestigungsnasen des jeweils rechten Seitenteiles in
die Nuten des jeweils linken Seitenteiles.
2a Befestigungsnase (1) & Nut (2)
2b Befestigungsnase in Nut schieben
2c Runterdrücken
3) Richten Sie die vier Seiten rechtwinklig aus
Richten Sie die vier -wie in 2 zusammen geschobenen-
Seitenteile rechtwinklig (90°) aus.
Verbinden Sie das Bodengitter mit den Seitenteilen
Setzen Sie die verbundenen Seitenteile auf das
Bodengitter. Drücken Sie diese etwas runter und lassen Sie
die Seitenteile einrasten.
4) Setzen Sie den Deckel an und lassen Sie ihn
einrasten
Deckel leicht nach vorn anwinkeln, ... Runterdrücken
und einrasten Setzen Sie den Deckel an einem beliebigen
Seitenteil an den Scharnierpunkten an und lassen Sie
ihn einrasten (siehe Skizze). Bei Beschädigung eines
Scharnierteils kann das Scharnierteil eines anderen
Seitenteiles verwendet werden.
5) Der Aufbau ist abgeschlossen
Der Komposter verfügt über eine Schlossbohrung (siehe
Abb. 4.1). Verriegeln Sie den Komposter bei Bedarf mit
einem Vorhängeschlosses (das Schloss ist nicht im
Lieferumfang enthalten).
KOMPOSTER
Befüllen Sie den Komposter richtig
• beginnen Sie mit einer Lage Erde
• dann Gartenabfälle; möglichst mit zwischen gelagertem
Holz und Blättern, d.h. stickstoffreiche, grüne Abfälle mit
kohlenstoffreichen gemischt
• die einzelnen Lagen sollten eine Höhe von etwa 15 cm
nicht übersteigen
• vermeiden Sie Geruchsbelästigung; dazu ist es hilfreich,
wenn Sie das eingegebene Kompostiergut im Komposter
mit einer Grabegabel leicht durchmischen - durch
diese Frischluftzufuhr wird der Verrottungsprozess
vorangetrieben
• Stoffe, die in den Komposter gelangen sind relativ
nährstoffarm, ihr Hauptwert liegt im Humusgehalt, darum
ist auch eine zusätzliche Anreicherung mit Nährstoffen
(z.B. Stalldünger) günstig
• vermeiden Sie eine völlige Austrocknung des Kompostes
(speziell in den Sommermonaten), indem Sie den
Kompost ab und zu wässern
Kompostierbare Abfälle sind u.a.:
• anfallende Gartenabfälle (gehäckselt oder klein
geschnitten)
• geschnittenes, leicht angetrocknetes Gras
• Laub (möglichst zerkleinert)
• Baum- oder Heckenschnitt (geschreddert)
• Kaffeesatz mit Filtertüte, Teebeutel, Eierschale
• Holzasche und Ruß
Werfen Sie alle Abfälle möglichst locker ein. Drücken
oder stampfen Sie die Abfälle niemals fest, damit die
Organismen im Kompost arbeiten können.
Nicht in den Kompost gehören u.a.:
• Küchenabfälle wie Reste von Fleisch, Fisch, Käse
Suppen, Bratfett, Öl, Knochen und Brot. Diese Produkte
tragen zur Schimmelbildung bei! • mit chemischen Mitteln
behandelte Schalen von Kartoffeln sollten ebenfalls
vermieden werden
• Schalen von Zitrusfrüchten gehören keinesfalls in den
Kompost
Tipps zur Beschleunigung des Kompostiervorgangs
Wie schnell ein Komposter zur Reife gelangt, ist im
wesentlichen abhängig von der Materialzusammensetzung,
deren Feuchtigkeitsgehalt und der Temperatur.
Grasschnitte, Gemüse- und Gartenabfälle, Stallmist
verrotten in wenigen Monaten.
Der Rotteprozess wird weiter beschleunigt, wenn man die
einzelnen gut vermischten und durchfeuchteten Lagen
mit Kompoststartern aus dem Fachhandel, organischen
Mischdünger und alter Kompostererde bestreut oder
durch Zugabe von Regenwürmern. Alternativ kann auch
die Gartenerde, Gesteinsmehl oder Algenkalk verwendet
werden. Speziell in den Sommermonaten vermehren sich
die Mikroorganismen stark und bewirken eine rasche
Zersetzung der Pflanzenteile.
Entnehmen Sie den fertigen Kompost
• Prüfen Sie zunächst den Reifegrad des Kompostes.
Öffnen Sie den Schieber, um die Struktur des Humus zu
erkennen. Fertige Komposterde sollte dunkelbraun, körnig
sein und nach Waldboden riechen.
• Sieben Sie die fertige Komposterde vor der Verwendung
(nicht zu fein) durch. Geben Sie nicht verrottete
Bestandteile wie z.B. Aststücke dann erneut in den
Komposter.
90
o
90
o
90
o
90
o
Q
E
R
T
2a
2b
2c
1
2
4.1
4.2
W
Assembly instructions
Please note:
Assemble your composter in accordance with the following
instructions, placing it on a level supporting surface.
Included components:
4 x sides, each with a prefitted slide opening for removal
1 x lid
1 x bottom screen
4 x ground spikes
Selecting a suitable site
The ideal site for the composter is in the half shade of
flowers or hedges. Ensure that the composter is in direct
contact with garden soil. This will allow essential garden
organisms to work unhindered on your compost. A layer of
coarser stalks, shredded material or grass sods is perfect
for ensuring the correct moisture content is maintained.
1) Anchor the two parts of the bottom screen together
Push the fastening nose (1) into the slot (2) until it engages.
Insert the 4 ground spikes through the holes in the corners
of the bottom screen and anchor them to the ground.
2) Attaching the sides to one another
Note: You will find it easier to assemble the composter if
you stand outside it. Using your left foot to steady the left
hand side part of each corner, slide the fastening lugs of
the right hand side part into the corresponding slots ofthe
left hand side part.
2a Fastening lug (1) & slot (2)
2b Slide the fastening lug into the slot
2c Press down
3) Squaring up the four sides
Adjust the four sides – once you have slid them together
as instructed in 2 – so that they are at right angles (90°) to
one another.
Connecting the bottom screen to the sides
Set down the connected sides on the bottom screen. Press
them down slightly so that the sides engage.
4) Putting on and engaging the lid
Angle the lid towards the front, ... Press it down and engage
it. Attach the lid to any side part by the hinge points and
engage it (see sketch). If the hinge part on any side part
gets damaged you can use the hinge part on another side.
5) The assembly is complete
The composter has a hole for a lock (see Fig. 4.1). If
necessary you can lock the composter with a padlock
(padlock not included).
COMPOSTER
It is important to fill your composter correctly
• begin with a layer of earth
• then add garden waste, if possible with intermediate layers
woody material and leaves, i.e. create a mixture of nitrogen-
rich green waste and carbon-rich materials
• the individual layers should not be thicker than 15 cm
• to avoid smells building up, it is helpful to lightly mix
through the composting material in the composter using a
garden fork. This will allow fresh air to be introduced into the
rotting process
• the materials in the composter are relatively poor in
nutrient content but are important for their humus content,
therefore it may be beneficial to enrich the mixture by
adding nutrients, for example farmyard dung
• water the compost from time to time to avoid it drying out
completely, especially in the summer months
Compostable wastes include:
• garden waste (chopped or cut into small pieces)
• cut grass, allowed to dry slightly first
• leaves (in small pieces if possible)
• tree or hedge cuttings (shredded)
• coffee grounds, filters, teabags, eggshells
• wood ashes and soot
Introduce the waste in such a way that it is as loose as
possible. Do not press or pat down the waste to form a sold
mass, otherwise this could prevent the micro-organisms
from working properly on the compost.
Items unsuitable for composting include:
• kitchen wastes containing meat, fish, cheese, soup,
cooking fat, oil, bones or bread. These materials contribute
to the formation of mould.
• materials treated with chemicals, likewise avoid potato
peelings
• never place citrus fruit peel in your compost
Tips for accelerating the composting process
How quickly your composter processes the waste depends
mainly on the mixing of the materials, moisture content and
temperature. Grass cuttings, vegetable and garden waste,
and farmyard dung rot down in a few months.
The rotting process can be further accelerated if you
sprinkle each layer of well mixed and thoroughly damp
material with a compost starter (obtainable from a garden
centre), mixed organic fertilisers and old compost earth or
by adding garden worms. You can also add garden earth,
stone dust or crushed coral. In the summer months in
particular, the num-ber of micro-organisms increases greatly
and this leads to a speedy breakdown of the green waste.
Removing the finished compost
• First test whether the compost is ready. Slide open the
opening so that you can see the structure of the humus.
When the compost is ready it has a dark brown, grainy
appearance and smells like the forest floor.
• Sieve the finished compost before use (not too fine).
Return any materials that are not completely rotted, e.g.
pieces of branch, back into the composter.
Instrukcja montażu
Prosimy pamiętać:
Kompostownik należy zmontować w sposób niżej opisany i
usadowić go wyłącznie na równym podłożu.
Produkt składa się z następujących części:
4 x elementy boczne z zamontowaną klapą do
pobierania kompostu
1 x pokrywa
1 x kratą spodnią
4 x kotwy
Wybrać stanowisko
Korzystną lokalizacją kompostownika jest
miejsce znajdujące się w półcieniu kwiatów
lub żywopłotu. Należy pamiętać, aby kompostownik
miał bezpośredni kontakt z ogrodową
ziemią. Dzięki temu organizmy żyjące w ziemi
potrzebne do procesu kompostowania będą
mieć wolny dostęp do składowanych w nim
odpadów. Do utrzymania wilgoci najlepiej
nadaje się warstwa chrustu, kory lub torfu.
1) Połączyć ze sobą obie części kraty spodniej
Wsunąć występ mocujący (1) we wpust (2) do
momentu ich zazębienia.
Wsunąć cztery kotwy w otwory znajdujące się
w narożnikach kraty spodniej i zakotwiczyć
w podłożu.
2) Połączyć ze sobą elementy boczne
Wskazówka: ustawić się na zewnątrz
kompostownika, dzięki temu można będzie go
łatwiej zmontować. Lewą stopą unieruchomić
lewy element boczny i wsunąć noski mocujące
prawej części bocznej do rowków znajdujących
się w części lewej.
2a Nosek mocujący (1) & rowek (2)
2b Wsunąć nosek mocujący do rowka
2c Docisnąć elementy
3) Wszystkie cztery boki ustawić pod kątem
prostym
Wszystkie cztery elementy boczne złączone w sposób opisany
w pkt. 2 należy teraz ustawić względem siebie pod kątem
prostym (90°).
Połączyć kratę spodnią ze ścianami bocznymi.
Nasadzić połączone ściany boczne na kratę spodnią. Docisnąć
w dół do momentu ich zazębienia.
4) Przyłożyć i docisnąć pokrywę tak, aby się ona wyraźnie
zazębiła
Pokrywę ustawić lekko pod kątem w kierunku do przodu, i
docisnąć w dół aż do jej słyszalnego zazębienia się.
Przyłożyć pokrywę do dowolnego elementu bocznego w
punktach, w których znajdują się zawiasy i docisnąć ją aż do jej
zazębienia się (patrz szkic). W przypadku uszkodzenia części
zawiasu możemy użyć zawiasu innego elementu bocznego
5) Montaż jest zakończony
Kompostownik posiada otwór zamkowy (patrz ilustracja 4.1).
W razie potrzeby kompostownik można zamknąć przy pomocy
kłódki (kłódka nie jest zawarta w wyposażeniu).
KOMPOSTOWNIK
Prawidłowe napełnianie kompostownika
• należy zacząć od warstwy ziemi
• następnie odpady ogrodowe; o ile to możliwe poprzedzielane
warstwami drewna i liści, odpadki zielone o dużej zawartości
azotu zmieszane z odpadkami o dużej zawartości węgla
• poszczególne warstwy nie powinny przekraczać grubości 15 cm
• unikajmy nadmiernego tworzenia się nieprzyjemnego
zapachu; pomocne w tym celu będzie lekkie przemieszanie
kompostowanego materiału widłami – dzięki doprowadzeniu
świeżego powietrza proces rozpadu ulegnie przyspieszeniu
• Materiał dostający się do kompostownika jest relatywnie
ubogi w substancje odżywcze, jego główna wartość kryje
się w zawartości humusu, dlatego korzystne jest dodatkowe
nawożenie (np. obornikiem)
• unikajmy całkowitego wysychania kompostu (szczególnie w
miesiącach letnich), od czasu do czasu nawadniając go.
Odpady nadające się do kompostowania to m in.:
• odpady ogrodowe (rozdrobnione)
• skoszona, lekko wysuszona trawa
• liście (w miarę możliwości rozdrobnione)
• ścinki po pielęgnacji drzew i żywopłotów (rozdrobnione)
• fusy z kawy wraz z papierowymi wkładami filtrującymi, herbata
ekspresowa w saszetkach, skorupki jajek
• popiół drzewny
Wrzucane odpady powinny być w miarę luźne. Nigdy mocno
nie ugniatać odpadów, aby umożliwić pracę organizmom
przerabiającym masę organiczną.
Do kompostownika nie należy wrzucać m in.:
• odpadów kuchennych takich jak resztki mięsa, ryb, serów,
zup, tłuszczu ze smażenia, oleju, kości i chleba - produkty te
przyczyniają się do powstawania pleśni!
• należy także unikać łupin kartoflanych traktowanych środkami
chemicznymi
• w żadnym wypadku nie wrzucać do kompostownika skórek
po cytrusach
Wskazówki dla przyspieszenia procesu kompostowania
Szybkość procesu powstawania dojrzałego kompostu zależy
w dużej mierze od składu zgromadzonego w kompostowniku
materiału, jego wilgotności i temperatury. Ścięta trawa, odpady
owocowe i warzywne, obornik rozkładają się w ciągu kilku
miesięcy.
Proces rozkładu można przyspieszyć dzięki mieszaniu warstw
kompostowanego materiału, dobremu napowietrzeniu i
dodawaniu starterów dostępnych w sklepach specjalistycznych,
nawozów organicznych i starej ziemi kompostowej bądź też
dżdżownic. Alternatywnie można użyć także ziemi ogrodowej,
mączki kamiennej lub wapna glonowego. Mikroorganizmy
biorące udział w procesie kompostowania rozmnażają się
szczególnie intensywnie w okresie lata powodując szybki
rozkład odpadów roślinnych.
Wybieranie gotowego kompostu
• Najpierw należy sprawdzić stopień dojrzałości kompostu.
Otworzyć klapę i sprawdzić strukturę humusu. Gotowa ziemia
kompostowa powinna mieć ciemnobrązową barwę, powinna być
ziarnista i pachnieć leśną ściółką.
• Gotową ziemię kompostową przed użyciem należy przesiać
(nie za drobno). Składniki nierozłożone jak np. fragmenty gałęzi
należy ponownie umieścić w kompostowniku.
nizmi
Aufbauanleitung
Bitte beachten Sie:
Bauen Sie den Komposter in den nachfolgend
beschriebenen Schritten und stellen Sie ihn nur auf ebenem
Untergrund auf.
Lieferumfang:
4 x Seitenteile mit jeweils vormontiertem Entnahmeschieber
1 x Deckel
1 x Bodengitter
4 x Erdspieße
Wählen Sie den Standort aus
Der günstigste Standort für den Komposter ist im
Halbschatten von Blumen und Hecken. Sorgen Sie dafür,
dass der Komposter direkten Kontakt zur Gartenerde hat.
Dadurch können die notwendigen Bodenorganismen
ungehindert arbeiten. Zur Erhaltung der Feuchtigkeit sind
eine Schicht Reisig, Schredderabfälle oder Torf am besten
geeignet.
1) Verankern Sie die beiden Teile des Bodengitters
miteinander
Schieben Sie die Befestigungsnase (1) in die Nut (2) und
lassen sie diese einrasten. Stecken Sie die vier Erdspieße
durch die Löcher an den Ecken des Bodengitters und
verankern Sie diese mit dem Boden.
2) Verankern Sie die Seitenteile miteinander
Hinweis: Stellen Sie sich außerhalb des Komposters, so
lässt er sich leichter aufbauen. Fixieren Sie mit Hilfe des
linken Fußes das jeweils linke Seitenteil, und schieben Sie
die Befestigungsnasen des jeweils rechten Seitenteiles in
die Nuten des jeweils linken Seitenteiles.
2a Befestigungsnase (1) & Nut (2)
2b Befestigungsnase in Nut schieben
2c Runterdrücken
3) Richten Sie die vier Seiten rechtwinklig aus
Richten Sie die vier -wie in 2 zusammen geschobenen-
Seitenteile rechtwinklig (90°) aus.
Verbinden Sie das Bodengitter mit den Seitenteilen
Setzen Sie die verbundenen Seitenteile auf das
Bodengitter. Drücken Sie diese etwas runter und lassen Sie
die Seitenteile einrasten.
4) Setzen Sie den Deckel an und lassen Sie ihn
einrasten
Deckel leicht nach vorn anwinkeln, ... Runterdrücken
und einrasten Setzen Sie den Deckel an einem beliebigen
Seitenteil an den Scharnierpunkten an und lassen Sie
ihn einrasten (siehe Skizze). Bei Beschädigung eines
Scharnierteils kann das Scharnierteil eines anderen
Seitenteiles verwendet werden.
5) Der Aufbau ist abgeschlossen
Der Komposter verfügt über eine Schlossbohrung (siehe
Abb. 4.1). Verriegeln Sie den Komposter bei Bedarf mit
einem Vorhängeschlosses (das Schloss ist nicht im
Lieferumfang enthalten).
KOMPOSTER
Befüllen Sie den Komposter richtig
• beginnen Sie mit einer Lage Erde
• dann Gartenabfälle; möglichst mit zwischen gelagertem
Holz und Blättern, d.h. stickstoffreiche, grüne Abfälle mit
kohlenstoffreichen gemischt
• die einzelnen Lagen sollten eine Höhe von etwa 15 cm
nicht übersteigen
• vermeiden Sie Geruchsbelästigung; dazu ist es hilfreich,
wenn Sie das eingegebene Kompostiergut im Komposter
mit einer Grabegabel leicht durchmischen - durch
diese Frischluftzufuhr wird der Verrottungsprozess
vorangetrieben
• Stoffe, die in den Komposter gelangen sind relativ
nährstoffarm, ihr Hauptwert liegt im Humusgehalt, darum
ist auch eine zusätzliche Anreicherung mit Nährstoffen
(z.B. Stalldünger) günstig
• vermeiden Sie eine völlige Austrocknung des Kompostes
(speziell in den Sommermonaten), indem Sie den
Kompost ab und zu wässern
Kompostierbare Abfälle sind u.a.:
• anfallende Gartenabfälle (gehäckselt oder klein
geschnitten)
• geschnittenes, leicht angetrocknetes Gras
• Laub (möglichst zerkleinert)
• Baum- oder Heckenschnitt (geschreddert)
• Kaffeesatz mit Filtertüte, Teebeutel, Eierschale
• Holzasche und Ruß
Werfen Sie alle Abfälle möglichst locker ein. Drücken
oder stampfen Sie die Abfälle niemals fest, damit die
Organismen im Kompost arbeiten können.
Nicht in den Kompost gehören u.a.:
• Küchenabfälle wie Reste von Fleisch, Fisch, Käse
Suppen, Bratfett, Öl, Knochen und Brot. Diese Produkte
tragen zur Schimmelbildung bei! • mit chemischen Mitteln
behandelte Schalen von Kartoffeln sollten ebenfalls
vermieden werden
• Schalen von Zitrusfrüchten gehören keinesfalls in den
Kompost
Tipps zur Beschleunigung des Kompostiervorgangs
Wie schnell ein Komposter zur Reife gelangt, ist im
wesentlichen abhängig von der Materialzusammensetzung,
deren Feuchtigkeitsgehalt und der Temperatur.
Grasschnitte, Gemüse- und Gartenabfälle, Stallmist
verrotten in wenigen Monaten.
Der Rotteprozess wird weiter beschleunigt, wenn man die
einzelnen gut vermischten und durchfeuchteten Lagen
mit Kompoststartern aus dem Fachhandel, organischen
Mischdünger und alter Kompostererde bestreut oder
durch Zugabe von Regenwürmern. Alternativ kann auch
die Gartenerde, Gesteinsmehl oder Algenkalk verwendet
werden. Speziell in den Sommermonaten vermehren sich
die Mikroorganismen stark und bewirken eine rasche
Zersetzung der Pflanzenteile.
Entnehmen Sie den fertigen Kompost
• Prüfen Sie zunächst den Reifegrad des Kompostes.
Öffnen Sie den Schieber, um die Struktur des Humus zu
erkennen. Fertige Komposterde sollte dunkelbraun, körnig
sein und nach Waldboden riechen.
• Sieben Sie die fertige Komposterde vor der Verwendung
(nicht zu fein) durch. Geben Sie nicht verrottete
Bestandteile wie z.B. Aststücke dann erneut in den
Komposter.