Sealey BOOST120 User Manual
Page 3
3. chARgINg INSTRUcTIONS
3.1. Preparation
It is important to correctly prepare for charging, ensuring that you follow section 1 safety instructions carefully. check that the capacity
of the battery is compatible with the charger output.
3.1.1. follow any vehicle manufacturer’s instructions regarding battery charging. note special instructions for in-vehicle charging.
3.1.2. check the battery to ensure that the nEGAtIVE and PosItIVE terminals are clearly identifiable before removing the battery from the
vehicle.
3.1.3. subject to 3.1.1. above, disconnect and remove the battery from the vehicle and place in an appropriate safe area ready for charging.
3.1.4. remove the battery electrolyte cover or caps to allow the gases produced by charging to escape.
3.1.5. check that the electrolyte is covering the plates inside. If not, add distilled water so that the plates are covered by 5-10mm.
3.1.6. the correct charging status of the battery may be determined by use of a hydrometer which will measure the specific gravity of the
electrolyte.
the following figures (kg/ltr) apply at 20
°c: 1.28 = Fully charged,
1.21 = half charged, 1.14 = Fully discharged.
WARNING! Be cautious and vigilant as the electrolyte is a highly
corrosive acid.
3.2. connecting to the Battery
Ensure that the battery charger is unplugged from the mains power supply
before connecting the clamps to the battery.
3.2.1. set the charger voltage to match that of the battery voltage (i.e. 12 or 24Volts)
by connecting the positive (red) clamp lead to either the 12Volt output terminal
or the 24Volt output terminal as appropriate.
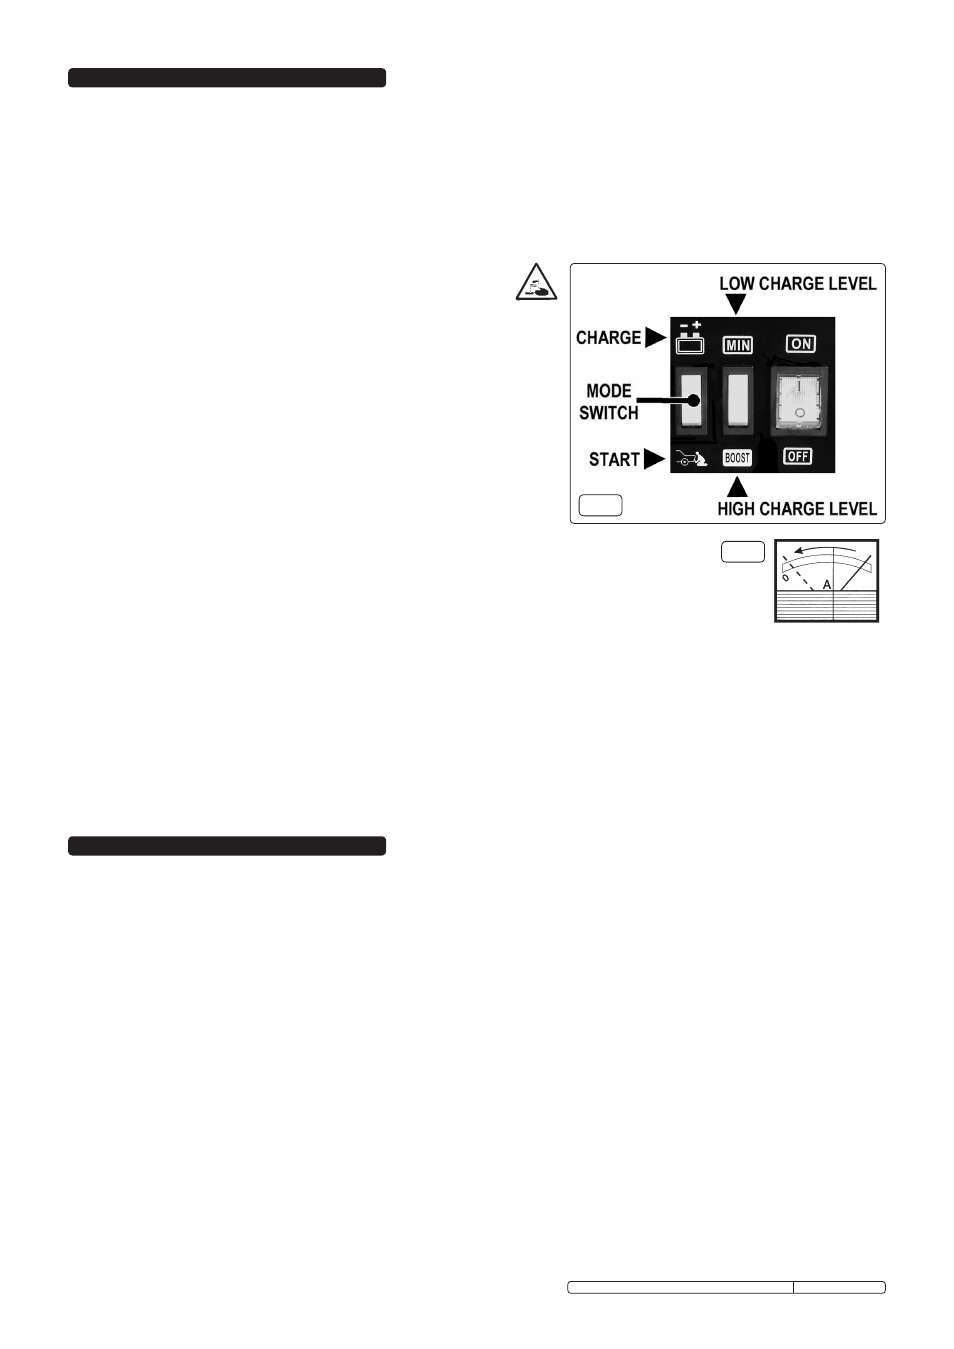
3.2.2. set the mode switch to “cHArGE”, indicated by the battery symbol (fig.1).
3.2.3. select the required rate of charge 'MIn / Boost' (fig.1).
3.2.4. check that the charger clamps and battery terminals are clean and free from
oxidation.
3.2.5. connect the PosItIVE (red or +) lead to the PosItIVE (+) terminal on the
battery and the nEGAtIVE (Black or -) lead to the nEGAtIVE (-) terminal on
the battery.
3.3. charging the Battery
3.3.1. connect the charger to the mains power supply and switch 'on' (fig.1).
3.3.2. check the current delivery to the battery by reading the ammeter on the front of the battery charger. During
charging the pointer on the ammeter will slowly decrease (move to the left) according to the capacity and condition
of the battery (see fig.2, dial face may vary according to model of charger).
3.3.3. When the battery is fully charged the reading on the ammeter should be at the “0” output indicator. At this point
the electrolyte in the battery will begin to bubble. stop charging at this point in order to protect the battery plates
from oxidisation and to keep the battery in good condition.
3.3.4. switch the charger 'off' and unplug from the mains power supply. Disconnect the power clamps, clean and store the charger in a safe,
dry area.
3.3.5. replace the battery electrolyte cover or caps. Wipe up any splashes or spillage (remember that the electrolyte is a corrosive acid).
return the battery to the vehicle and secure according the manufacturer’s instructions. reconnect the power leads. check to ensure all
tools etc. are removed before closing the bonnet or boot.
3.4. LOW or NO MAINTENANcE batteries
3.4.1. When charging a low, or no maintenance battery take special care to use only the 'MIn' low charge setting. use a battery tester to
continually check the voltage across the clamps. When 14.4Volts is reached stop the charging process.
4. STARTINg INSTRUcTIONS
Boost chargers are combination units capable of both charging batteries and providing boost power to start vehicles with flat
batteries.
4.1 Before starting, it is advisable to give the battery a short charge (Approx. 10mins). refer to section 3 'cHArGInG InstructIons' to
charge the battery.
4.2. connecting to the Battery.
4.2.1 check the vehicle manufacturer’s handbook and follow any specific instructions that may need to be followed for you vehicle and check
that the battery is in good condition.
4.2.2. these chargers have dual voltage output. connect the positive (red) clamp lead to either the 12Volt output terminal or the 24Volt output
terminal on the starter/charger, ensuring same voltage as the battery.
4.2.3. Ensure the charger is disconnected from the mains power supply and set the mode switch to “stArt” (fig.1).
4.2.4. check the charger clamps and battery terminals to ensure they are clean and free from oxidation.
4.2.5 connect the PosItIVE (red or +) lead to the PosItIVE (+) terminal on the battery and the nEGAtIVE (Black or -) lead to a good
earth on the vehicle bodywork or engine.
4.2.6. Plug the charger into the mains power supply and turn it 'on'.
4.2.7. turn on the vehicle ignition and crank the engine for 3 seconds then wait 120 seconds. repeat this for 5 cycles (unless engine starts).
WARNINg! If the vehicle does not start within this time DO NOT continue as vehicle battery and electrical circuit may be damaged and
the fuse in the charger will blow. If the vehicle fails to start, disconnect the charger and investigate.
4.2.8. When the engine is running, turn the machine 'off', unplug from the mains power and disconnect the clamps, removing the nEGAtIVE
(Black or -) lead first.
fig.2
fig.1
Original Language Version
Boost120, Boost140, Boost160, Boost200 Issue: 1 - 15/05/12