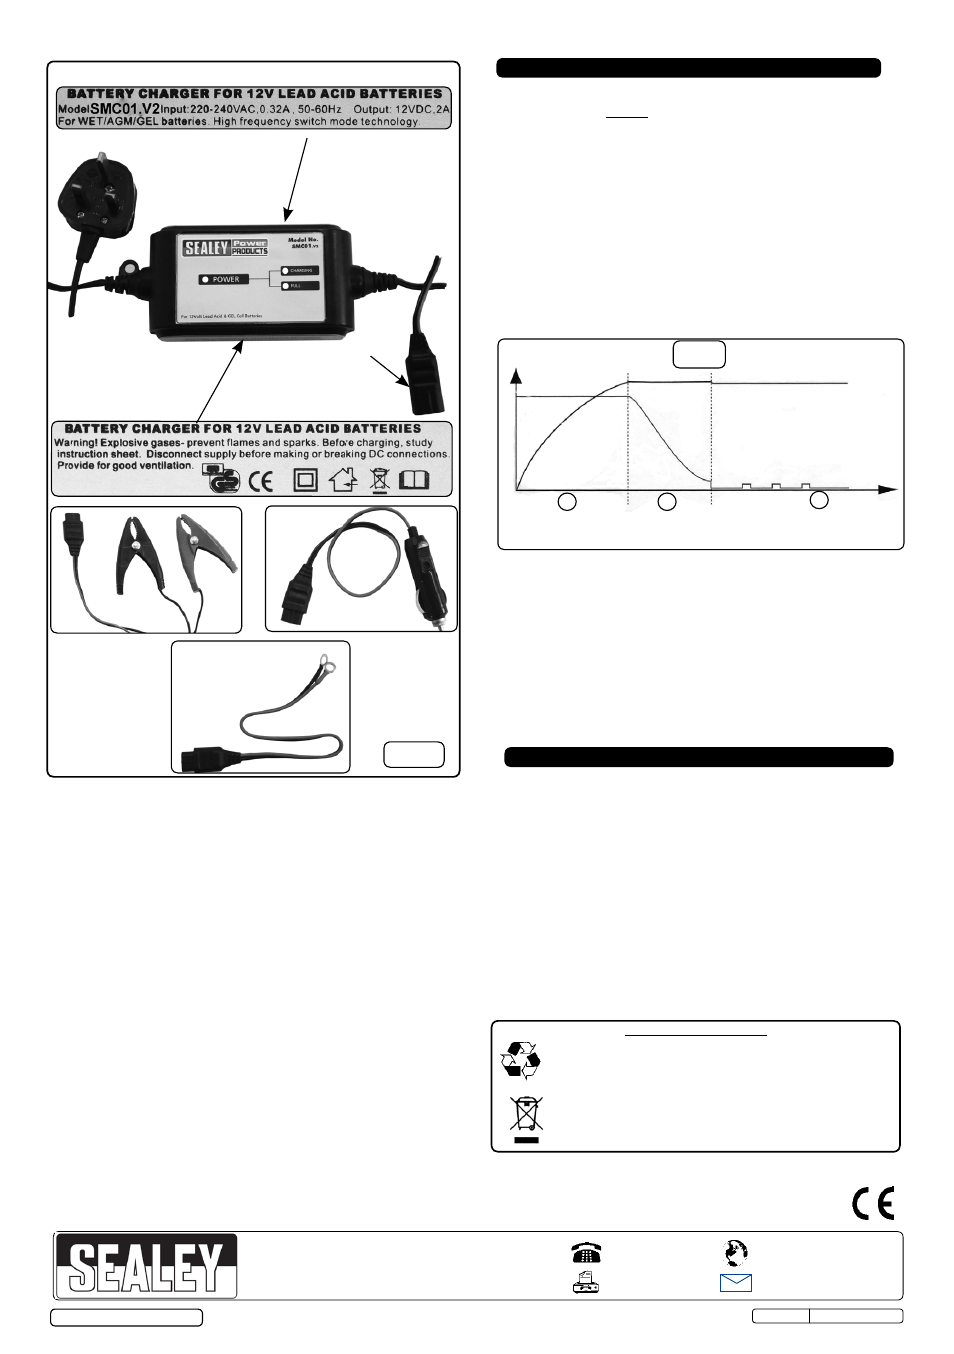
Fig.1, Voltage current, Fig.2 – Sealey SMC01 User Manual
Page 3
3.2
charging a negative earthed battery:
3.2.1 Ensure that the black clamp on the clamp lead is not
touching the battery or the fuel line.
3.2.2 connect the positive (+) red clamp to the positive (+)
battery post and connect the negative (-) black clamp
to the negative (-) battery post or vehicle chassis.
3.3
charging a positive earthed battery:
3.3.1 Ensure that the red clamp on the clamp lead is not
touching the battery or the fuel line.
3.3.2 connect the negative (-) black clamp to the negative
(-) battery post and connect the positive (+) red clamp
to the positive (+) battery post or vehicle chassis.
3.4
battery not connected to a vehicle.
3.4.1 connect the (+) red clamp to the positive (+) battery
post and connect the (-) black clamp to the negative
(-) battery post.
3.5
permanent connection to vehicle using
eyelet lead.
3.5.1 connect the eyelet on the red (+) wire to the positive
(+) battery terminal and connect the eyelet on the
black (-) wire to the negative (-) battery terminal.
4. operation
note:connect the charger to the battery as instructed in
section 3 before connecting to mains power supply.
4.1
connect charger to mains poWer supply.
4.1.1 insert the three pin plug on the mains lead into an
isolated mains power supply.
4.1.2 switch on the mains power supply and the “PoWEr”
LED will illuminate.
4.1.3 Depending upon battery status, either the
“cHArGinG” LED or the “fuLL” LED will also
illuminate.
4.1.4 if “cHArGinG”; monitoring only required.
4.1.5 if “fuLL” and maintainer mode is not required, switch
off the mains power supply, disconnect, clean and
store indoors.
fig.1
environmental protection.
recycle unwanted materials instead of disposing them as
waste. All tools, accessories and packaging should be sorted,
taken to a recycle centre and disposed of in a manner which
is compatible with the environment.
When the product is no longer required, it must be disposed of
in an environmentally protective way.
NOTE: It is our policy to continually improve products and as such we reserve the right to alter data, specifications and component parts without prior notice.
important: no liability is accepted for incorrect use of this product.
Warranty: Guarantee is 12 months from purchase date, proof of which will be required for any claim.
information: for a copy of our latest catalogue and promotions call us on 01284 757525 and leave your full name and address, including postcode.
01284 757500
01284 703534
sole uK distributor, sealey group,
Kempson Way, suffolk Business Park
,
Bury st. Edmunds, suffolk,
iP32 7Ar
www.sealey.co.uk
Web
Original Language Version
© Jack sealey Limited
sMc01.V2 issue: 1 - 31/10/13
socket
A
B
bulk
absorption
maintenance
1
2
3
voltage
current
3 cYcLE cHArGinG GrAPH
c
4.2
3 - stage charging (fig. 2)
4.2.1
stage 1 bulk/rapid start charge (20%-70% charge)
the charger delivers maximum charging amperage
to re-energise any 12 Volt battery, digital sensors
automatically moves into stage 2 of the process.
4.2.2
stage 2 absorption charge (70%-90% charge)
Maintains the charge at a safe voltage, which remains
constant while the current requirement diminishes.
4.2.3
stage 3 maintenance (90%-100% charge)
Voltage is automatically maintained with pulsing low
input current. occasional monitoring only required.
5. maintenance
5.1 This charger requires no specific maintenance other
than cleaning which should be done with a dry cloth or a
tissue.
do not use any solvents or cleaning agents on
the casing.
5.2 Ensure that the charger is unplugged from the mains
before installing or performing any maintenance.
fig.2
Bs 1363/A
uK 3 pin plug