Fig.1 fig.2, Ab c – Sealey SMC03 User Manual
Page 3
4. oPeration
Fig.1
Fig.2
Original Language Version
SMC03.V2 Issue: 1 - 31/10/13
© Jack Sealey Limited
A
B
C
3.2
cHarGinG a neGatiVe eartHeD Battery:
3.2.1 Ensure that the black clamp on the clamp lead is not
touching the battery or the fuel line.
3.2.2 Connect the positive (+) red clamp to the positive (+)
battery post and connect the negative (-) black clamp
to the negative (-) battery post or vehicle chassis.
3.3
cHarGinG a PositiVe eartHeD Battery:
3.3.1 Ensure that the red clamp on the clamp lead is not
touching the battery or the fuel line.
3.3.2 Connect the negative (-) black clamp to the negative
(-) battery post and connect the positive (+) red clamp
to the positive (+) battery post or vehicle chassis.
3.4
Battery not connecteD to a VeHicLe.
3.4.1 Connect the (+) red clamp to the positive (+) battery
post and connect the (-) black clamp to the negative
(-) battery post.
3.5
PerManent connection to VeHicLe usinG
eyeLet LeaD.
3.5.1 Connect the eyelet on the red (+) wire to the positive
(+) battery terminal and connect the eyelet on the
black (-) wire to the negative (-) battery terminal.
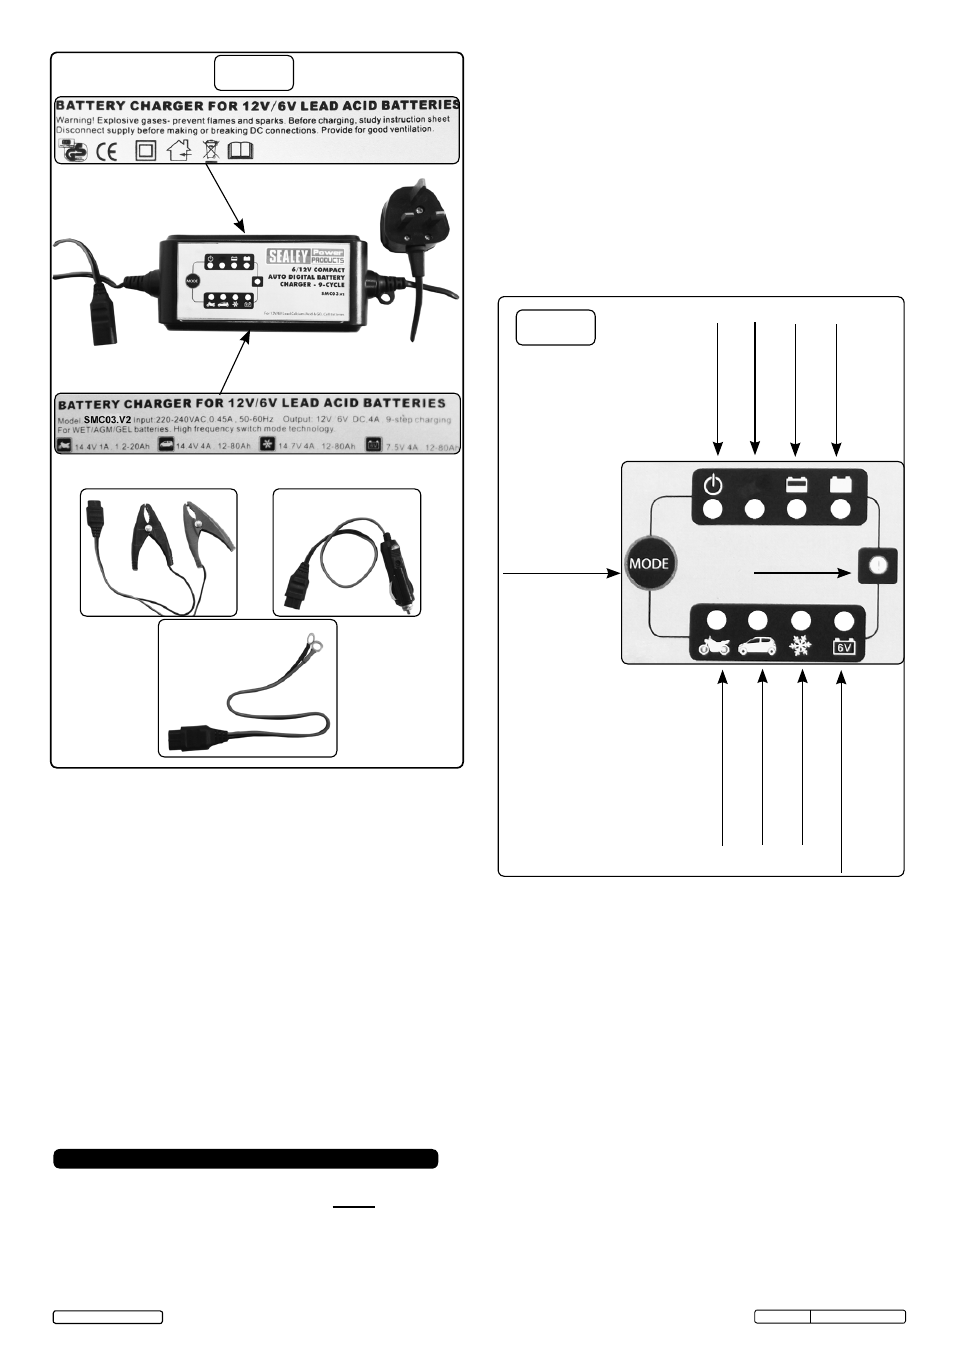
Socket
Fully Charged Green LED
Charging Red LED
Cacium Red LED
Power On Red LED
Charging Batteries < 20Ah
Charging Batteries < 80Ah
*5°C Charging Mode
6 V
olt Battery Charging < 80Ah
Mode Reset/
Selection Button
!
Fault Condition
4.2
cHarGinG MoDe seLection.
Repeatedly pressing the MODE button will cycle the
charger through the following options-: MODE1,
MODE2, MODE3, MODE4 and MODE5. Stop pressing
when the LED adjacent to the desired mode
illuminates.
4.2.1 If the Mode button is pressed again during charging the
charger will switch to the next charging mode and will
function in that mode. However, once the battery is
fully charged and if the charger remains connected,
the charger will switch to trickle charge mode and
will remain in this mode even if the user selects
another mode. This protects the battery from being
damaged.
4.3
MoDe 1 DescriPtion (*14.4V/1.0a)
4.3.1 This mode is suitable for charging small batteries with
a capacity below 20Ah. Press the MODE button until
the LED adjacent to the motorcycle symbol is
illuminated. Charging will automatically begin with a
current of 0.8A ± 10% and the 'charging' LED will
illuminate. This LED will remain on throughout the
entire charging process until the battery is fully charged
up to *14.4V ± 0.25V. At this stage the 'charging' LED will
illuminate and the 'fully charged' LED will extinguish.
The trickle charge current now becomes available for
battery maintenance.
4.4
MoDe 2 DescriPtion (*14.4V/4.0a)
4.4.1 This mode is mainly for charging large batteries with a
capacity over 14Ah in normal conditions. Press the
MODE button until the LED adjacent to the car symbol
is illuminated. Charging will automatically begin with a
current of 3.8A ± 10% and the 'charging' LED will
illuminate. This LED will remain on throughout the
entire charging process until the battery is fully
charged up to *14.4V ± 0.25V. At this stage the
'charging' LED will turn off and the 'fully charged'
LED will illuminate. The trickle charge current now
becomes available for battery maintenance.
1 2 3 4
All green LED’S
*Do not charge a frozen battery
note: Connect the charger output clamps to the battery
terminals as described in Section 3 before plugging in
to the mains power supply.
4.1
connect cHarGer to Mains PoWer suPPLy.
4.1.1 Plug the charger into the mains power supply and
switch on. The green power LED will illuminate. See
Fig.2.
BS 1363/A
UK 3 pin plug
Cal
cal
5