Sealey MOTB User Manual
Motb, motbkit, Mot tool board, mot tool board with tools, Clip/hook sizes clip/hook locations
INSTRUCTIONS FOR:
MOT TOOL BOARD, MOT TOOL BOARD with
TOOLS
MODEL NO’S:
MOTB, MOTBKIT
1. INTRODUCTION
2. INSTALLATION
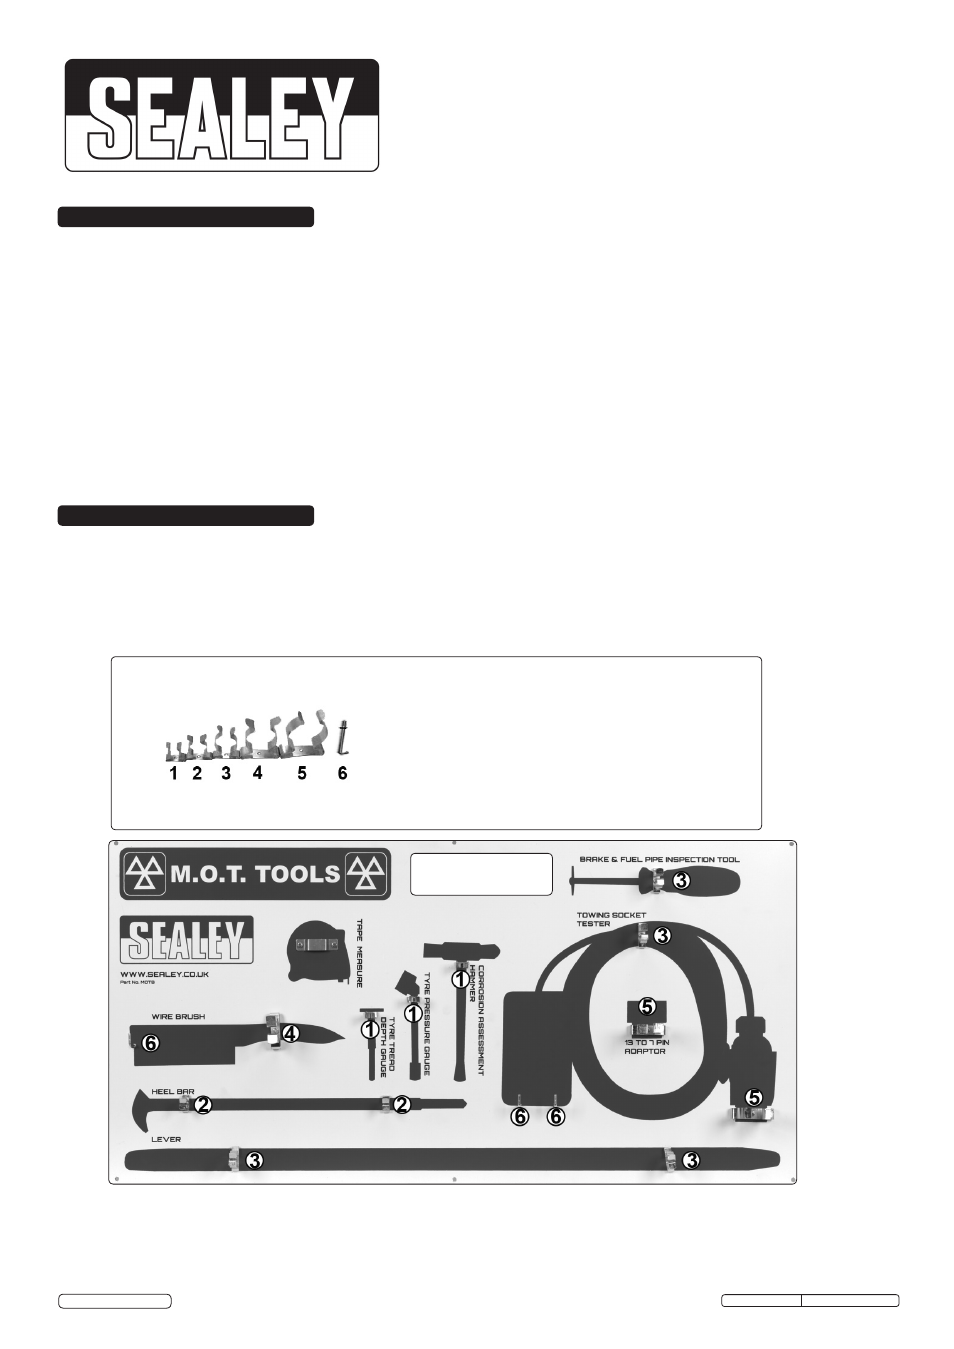
Shadow board with MOT approved and compliant tools. Keeps tools organised and in one location. Wall mounting and supplied with fitting kit.
MOTB is the shadow board (size: 812 x404mm) supplied without tools.
MOTBKIT is the shadow board complete with the following tools:
Model No: . . . . . . . . . . . . . . . . . . . . . . . . . . . . . . . . . . . . . . . . . . . . . . . . . . . Description
AK989 . . . . . . . . . . . . . . . . . . . . . . . . . . . . . . . . . . . . . . . . Rubber Measuring Tape 5mtr
H1MOT . . . . . . . . . . . . . . . . . . . . . . . . . . . . . . . . . . . . . Corrosion Assessment Hammer
S0837. . . . . . . . . . . . . . . . . . . . . . . . . . . . . . . . . . . . . . . . . . . . . . . . . . . . Heelbar 400mm
TST/DG . . . . . . . . . . . . . . . . . . . . . . . . . . . . . . . . . . . . . . . . . . . Tyre Tread Depth Gauge
TSTPG8. . . . . . . . . . . . . . . . . . . . . . . . . . Tyre Pressure Gauge with Pocket Clip 6-50psi
TST22 . . . . . . . . . . . . . . . . . . . . . . . . . . . . . . . . . . . . . 13-Pin Towing Socket Tester 12V
VS0210 . . . . . . . . . . . . . . . . . . . . . . . . . . . . . . . . . . . .Brake & Fuel Pipe Inspection Tool
VSTL760 . . . . . . . . . . . . . . . . . . . . . . . . . . . . . . . . . . . . . . . . . . . . . . .Tyre Lever 760mm
WB02 . . . . . . . . . . . . . . . . . . . . . . . . . . . . . . . . . . . . . . . . . . . . . . . . . . . . . . . . Wire Brush
1.
Using a 4mm drill, drill through the board at all the marked centres.
2.
Before fixing the clips, hold the board in position against the wall and mark through the six fixing holes.
3.
Drill the wall at the six marked locations and insert the wall plugs.
4.
Attach the fixings as shown in the list using 4mm bolts, washers and nuts.
5.
The tape measure
clip is held on by 2 x 4mm bolts, washers and nuts.
6.
When all the clips, hooks etc. have been secured, fix the board to the wall by screwing into the wall plugs installed in
section 2.3.
Ensure that the 5mm spacers are fitted around the fixing screws to allow the board to stand off from the wall.
Item No:
Description:
Size:
Quantity:
1
Spring Clip
3/8”
3
2
Spring Clip
1/2”
2
3
Spring Clip
1”
4
4
Spring Clip
1 1/4”
1
5
Spring Clip
1 1/2”
2
6
Hook
35mm
3
Clip/Hook Sizes
Clip/Hook
Locations
MOTB,MOTBKIT Issue: 1 - 13/01/15
Original Language Version
© Jack Sealey Limited