Installing the pop up drain, Installation du drain mécanique, Instalación del desagüe mecánico – MAAX JAZZ User Manual
Page 8
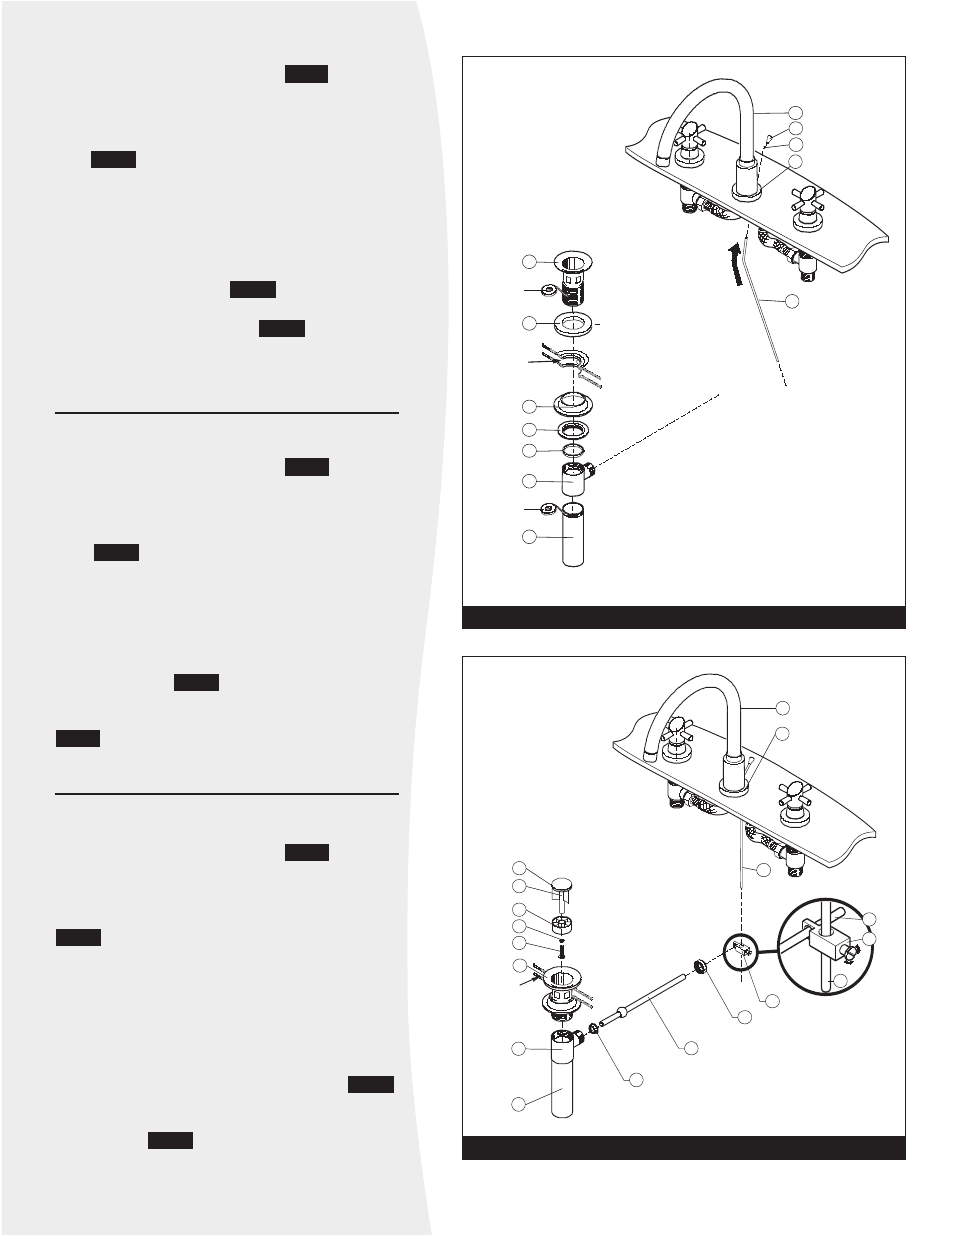
INSTALLING THE POP UP DRAIN
Place Teflon in the indicated areas
. Place the
drain (29) on the opening of the sink; the gasket seal
(30) can be replaced by the application of mastic. Install
the raised seal gasket (34) and tighten the nut (35).
Firmly tighten the drain mechanism (37) onto the drain
(32). .
Note: the horizontal rod (37) must be
pointed towards the faucet.
Insert the drain stopper (27) into the drain. Install the
pivoting rod (40) and tighten the pivoting rod bolt (41).
Unscrew the drain rod button (16) and insert the rod
(17) into the orifice under the faucet spout (15). Slide
the gasket seal (43) onto the rod (17) and retighten the
button (16) to the rod (17).
.
Bring the union (42) together to the pivoting rod (40)
and drain rod (17) and tighten.
. Adjust so the
drain stopper opens and closes effectively by screwing
or unscrewing the drain screw and nut and by adjusting
the height of the union on the rod.
Fig. 6
Fig. 5
Fig. 5
Fig. 5
INSTALLATION DU DRAIN
MÉCANIQUE
Mettre du téflon aux endroits indiqués
. Insérer le
drain (32) dans le renvoi du lavabo ; le joint d’étanchéité
(33) peut être remplacé par l’application de mastic. Enfiler le
joint d’étanchéité avec relief (34) et visser l’écrou (35).
Visser fermement le mécanisme du drain (37) au drain
(32).
. Note: la tige horizontale (40) doit être
orientée vers le robinet.
Insérer le bouchon (27) dans le drain. Installer la tige
pivotante et visser l’écrou de la tige pivotante (41).
Dévisser le bouton (16) de la tige et insérer la tige (17)
dans l’orifice sous le bec de robinet (15). Glisser le joint
d’étanchéité (43) sur la tige (17) et revisser le bouton
(16) à la tige (17).
.
Réunir l’union (42) (dans le sens illustré) à la tige
pivotante (40) et à la tige du drain (17) puis visser
. Ajuster de façon à ce que le bouchon du drain
ouvre et ferme efficacement en vissant ou en dévissant
la vis et l’écrou du bouchon du drain.
Fig. 6
Fig. 5
Fig. 5
Fig. 5
INSTALACIÓN DEL
DESAGÜE MECÁNICO
Poner teflón en los lugares indicados
. Insertar el
desagüe (32) en el colector del lavabo; la junta hermética
(33) puede ser remplazada por masilla. Introducir la junta
hermética con relieve (34) y apretar la tuerca (35). Apretar
con fuerza el mecanismo de desagüe (37) al desagüe (32).
. Nota: la varilla horizontal (40) debe estar orientada
hacia la llave de grifo.
Insertar el tapón (27) en el desagüe. Instalar la varilla
pivotante (40) y apretar la tuerca de la varilla pivotante
(38).
Aflojar el botón (16) de la varilla e introducir la varilla
(17) en el orificio, debajo del caño de la llave (15).
Deslizar la junta hermética (43) en la varilla (17) y
volver a apretar el botón (16) a la varilla (17).
.
Juntar la unión (42) (en el sentido ilustrado) con la
varilla pivotante (40) y con la varilla del desagüe (17),
luego apretar
. Ajustar de forma que el tapón
del desagüe abra y cierre eficazmente, apretando o
aflojando la tuerca del desagüe y ajustándolo a la
altura de la unión con la varilla.
Fig. 6
Fig. 5
Fig. 5
Fig. 5
15
20
16
17
43
32
33
34
35
36
37
38
Or mastic
Ou mastic
O masilla
Lavatory
Lavabo
Lavabo
Teflon
Téflon
Teflon
Téflon
Fig. 5
15
20
17
32
37
38
Lavatory
Lavabo
Lavabo
27
29
30
31
28
39
40
42
41
40
42
17
Fig. 6
8