Assembling the stand, Caution during assembly, Other cautions – KORG LP-380-73 User Manual
Page 17: Assembly procedure, Warning
17
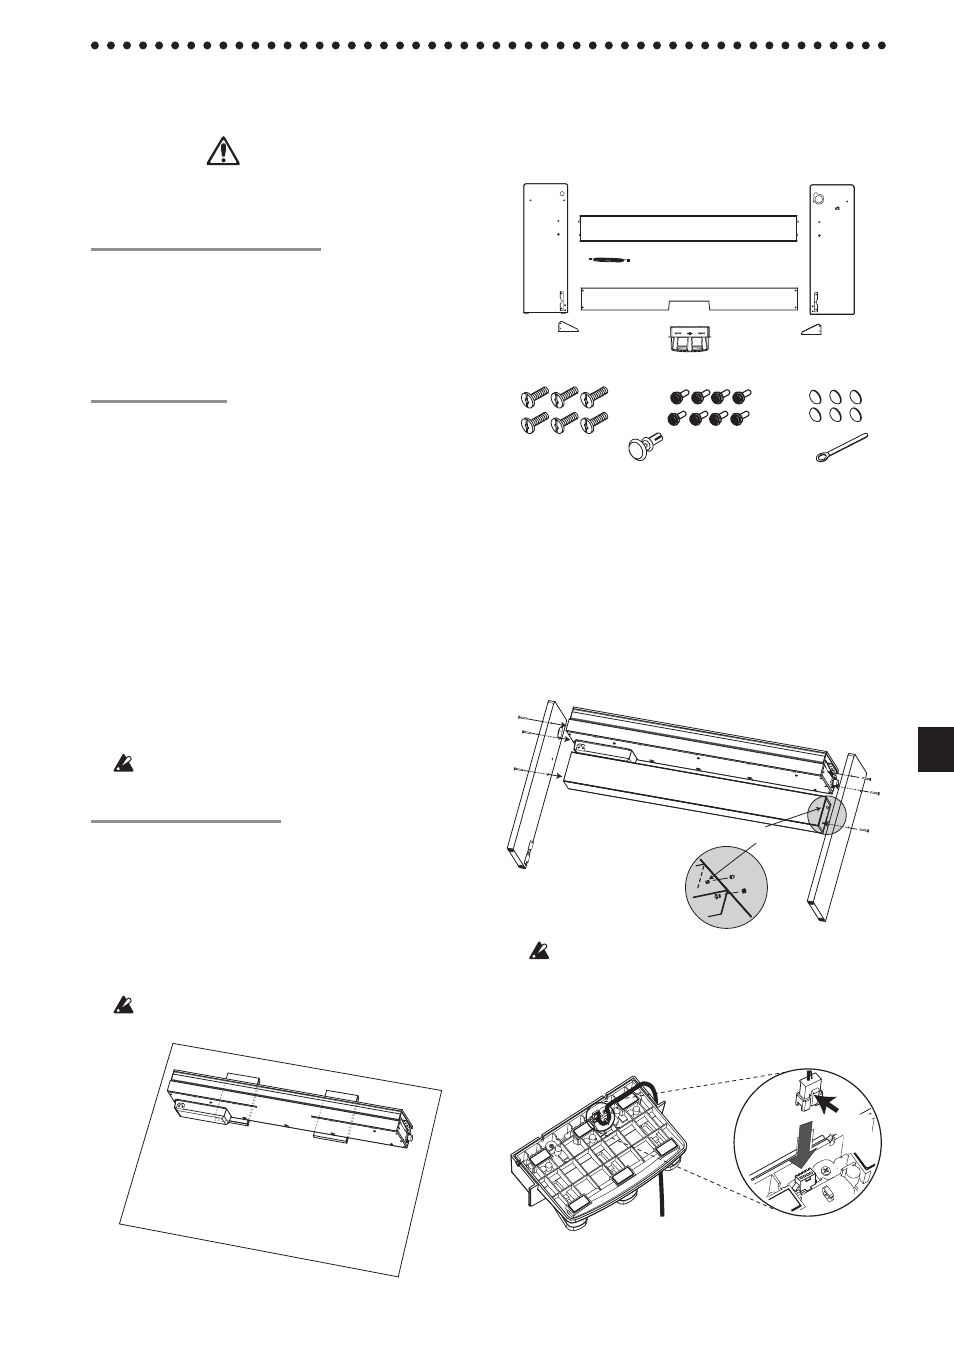
2. Make sure that all of the following parts are available.
Anti-tipping Bracket (left)
Anti-tipping Bracket (right)
Pedal unit
Pedal board
Speaker box
Side panel (right)
Side panel (left)
Pedal cord
Screws (M6) x 6 pcs.
Screws (M4) x 8 pcs.
Caps x 6 pcs.
Push rivet x 1 pc.
Cord holder x 1 pc.
3. Fasten the LP-380 and the speaker box to the right
and left side panels using eight screws (M6).
Position the speaker box so that the speaker cord is on
the left side. In this position, the speaker (the side cov-
ered with cloth) faces you.
First temporarily tighten* the screws on the right side
panel, and then temporarily tighten* the screws on the
left side panel.
* To temporarily tighten the screws is to tighten them
leaving a clearance of about 2 mm.
LP-380
the side covered with cloth
Speaker box
Screws
(M6)
Screws
(M6)
Side panel (right)
Side panel (left)
Positioning tab
Be careful not to pinch your fingers.
4. Connect the attached pedal cord, observing the correct ori-
entation, to the connector on the reverse side of the pedal
unit, and then engage it with a slot in the pedal unit.
The pedal cord can be attached to or detached from the
connector with its locking tab held down.
Locking
tab
Assembling the Stand
Warning
● At least one other person must help you as-
semble the stand.
Caution during assembly
In order to assemble the stand safely, please observe the
following points.
• Make sure that you have the correct part in the correct
orientation, and perform the assembly in the order
given.
Other cautions
Please check the following points after assembly.
• Loosened screws
The screws may loosen as time passes after assembly.
You should periodically check whether any screws
have become loose. If you feel that the stand vibrates
excessively, it is possible that screws have come loose.
If so, re-tighten them.
• When moving the digital piano to another location
To move the assembled stand, remove the AC adapter
cord from the stand, close the key cover, and then move
it slowly with at least two people keeping it as level as
possible.
• Disassembly
If you need to disassemble the stand, do so by revers-
ing the steps of the assembly procedure. After disas-
sembly, keep the screws and other parts in a safe place
so that they are not lost.
The LP-380 should always be laid down before dis-
assembled.
Assembly procedure
You’ll need a Phillips (+) screwdriver.
1. Put the protective sheet, which had covered the LP-
380, on a flat floor, and place the LP-380 on that sheet
with its rear facing the floor.
In addition, place cloths or magazines so that you may
easily put your hands under the LP-380 when assem-
bling and raising the stand.
Ensure that the LP-380’s key cover will not to open
until the end of the assembly.
Protective sheet
LP-380