Casio Privia PX-870 88-Console Piano with Built-In Speakers (Black) User Manual
Page 2
2/4
USER’S GUIDE
■
To play back a recorded performance
1.
Press the
MIDI REC
button once or twice (Until the
MIDI REC lamp is lit.)
This enters playback standby.
2.
Hold down the
FUNCTION
button and press the
a
button once or twice until the lamp of the track
to be played back is lit.
• To play back both tracks, make sure that both the L
and R lamps are lit.
3.
Press the
a
button.
This starts playback.
• To stop playback, press the
a
button.
■
To play back from one track as you record to
another track
1.
Press the
MIDI REC
button once or twice (Until the
MIDI REC lamp is lit.)
This enters playback standby.
2.
Hold down the
FUNCTION
button and press the
a
button once or twice until the lamp of the track
to be played back is lit.
3.
Press the
MIDI REC
button so the MIDI REC lamp is
flashing.
This enters record standby.
4.
Hold down the
FUNCTION
button and press the
a
button once or twice until the lamp of the track
to be recorded is flashing.
5.
Press the
a
button or start playing.
This starts recording and playback.
• If you want to re-record from the beginning, hold
down the
MIDI REC
button until the Digital Piano
beeps.
• To stop playback and recording, press the
a
button.
■
To delete a recorded performance
IMPORTANT!
• A track delete operation cannot be undone. Deleted
data is unrecoverable.
1.
Press the
MIDI REC
button once or twice so the
MIDI REC lamp is flashing.
2.
Hold down the
FUNCTION
button and press the
a
button once or twice until the lamp of the track
to be deleted is flashing.
3.
Hold down
MIDI REC
until the MIDI REC lamp is lit.
This enters delete standby.
4.
Hold down the
FUNCTION
button and press the
a
button.
This deletes the contents of the selected track.
• To exit the above operation at any point, press the
MIDI REC
button once or twice so the MIDI REC
lamp is unlit.
Hall simulation makes it possible to simulate the rich clarity,
unconstrained brilliance, and other distinctive acoustic
characteristics of world-famous concert halls.
1.
Hold down the
FUNCTION
button and press Hall
Simulator key of the simulation to be applied.
1.
Each press of the
REVERB
button toggles reverb
between on and off.
Reverb is applied when it is turned on.
■
To select the reverb type
1.
While holding down the
FUNCTION
button, press
the keyboard key of the reverb type to be applied.
1: Room
2: Small hall
3: Large hall
4: Stadium
Applying Hall Simulation (PX-870)
Name
Description
DUTCH CHURCH
Amsterdam church with acoustics
that are suitable for music
STANDARD HALL
Standard concert hall
BERLIN HALL
Berlin arena type classic concert
hall
FRENCH
CATHEDRAL
Large Gothic cathedral in Paris
Applying Reverb (PX-770)
You can record your performances as audio files to a USB
flash drive and play them back when you want.
Anything played on the Digital Piano is recorded to the USB
flash drive as audio data (WAV file
*
).
*
Linear PCM, 16bit, 44.1 kHz, Stereo
Bottom
■
Recording Capacity
• 99 files (TAKE01.WAV to TAKE99.WAV)
• Approximately 25 minutes maximum recording per file.
■
Recorded Data
• Everything played on the Digital Piano
• Individual part recording is not supported.
■
Recording Data Storage
Each new recording of audio data to a USB flash drive is
automatically assigned a new file name, so existing data is
not overwritten.
■
To record keyboard play
1.
Insert the USB flash drive into the USB flash drive
port.
• When you plug in a USB flash drive, the Digital
Piano performs a mounting sequence to prepare for
data exchange with the USB flash drive. The L and
R lamps flash and Digital Piano operations are
temporarily disabled during the mounting sequence.
• It may take up to 10 or 20 seconds or even longer
for USB flash drive mounting to finish. Do not
perform any operation on the Digital Piano mounting
is in progress.
• A USB flash drive needs to be mounted each time it
is connected to the Digital Piano.
2.
Press the
AUDIO REC
button once or twice so the
AUDIO REC lamp is flashing.
This enters record standby.
3.
To start recording, press the
a
button or start
playing.
This starts recording to the USB flash drive.
• Recording can also be started by pressing a pedal
or performing another operation.
• If, while recording is in progress, you want to re-
record from the beginning, hold down the
AUDIO
REC
button until the Digital Piano beeps. This
discards the current recording data and enters
recording standby.
• To stop recording, press the
a
button or
AUDIO
REC
button.
To record more, perform the above procedure from
step 2.
IMPORTANT!
• Do not remove the USB flash drive from the USB
flash drive port while the AUDIO REC lamp is
flashing. Doing so interrupts recording and may
corrupt data.
• A yellow flashing
METRONOME
button lamp
indicates an error. For more information, see “Error
Indicators (PX-870)” on this page of these
instructions.
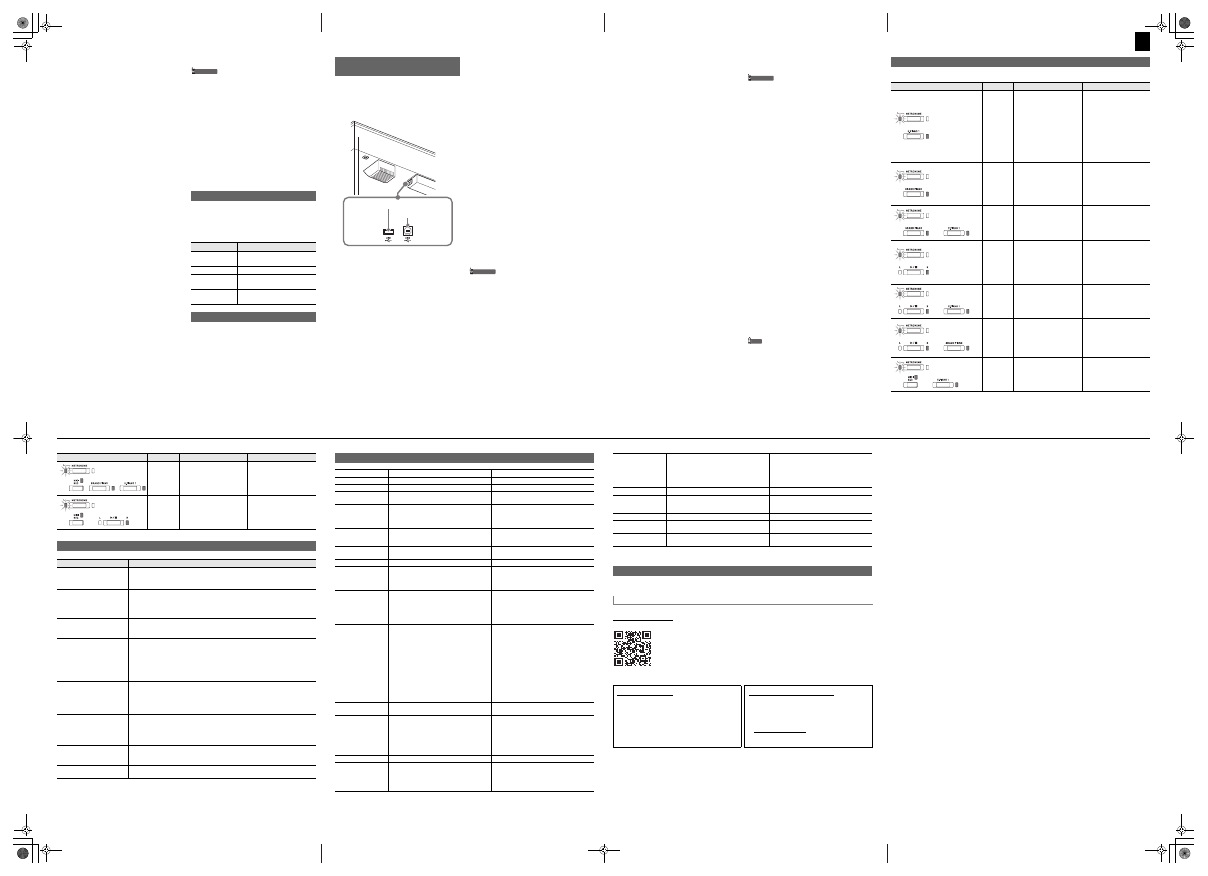
Using the Audio Recorder
(PX-870)
USB flash drive port (PX-870)
USB Port
■
To play back data recorded on a USB flash
drive
1.
Press the
AUDIO REC
button once or twice so the
AUDIO REC lamp is lit.
This enters playback standby.
2.
Select the song you want to play back.
If you want to play back the last file you recorded, jump
directly to step 3.
●
To select the previous song
Hold down the
FUNCTION
button and press the Select
Music Library Song minus (–) key.
Each press scrolls back one song.
●
To scroll in file number sequence
Hold down the
FUNCTION
button and press the Select
Music Library Song plus (+) key.
Each press scrolls forward one song.
●
To specify a file number
Use the Select Music Library Song number keys (0
through 9) to specify the file number (1 to 99) you want.
(TAKE01.WAV, TAKE02.WAV, etc.)
The Digital Piano beeps if a file with the specified
number does not exist.
3.
To start playback, press the
a
button.
• To stop song play, press the
a
button.
■
To delete an audio file from a USB flash drive
Files can be deleted one at a time.
IMPORTANT!
• Note that the file (recorded data) delete operation
cannot be undone.
1.
Press the
AUDIO REC
button once or twice so the
AUDIO REC lamp is lit.
This enters playback standby.
2.
Select the song you want to delete.
If you want to delete the last file you recorded, jump
directly to step 3.
●
To select the previous song
Hold down the
FUNCTION
button and press the Select
Music Library Song minus (–) key.
Each press scrolls back one song.
●
To scroll in file number sequence
Hold down the
FUNCTION
button and press the Select
Music Library Song plus (+) key.
Each press scrolls forward one song.
●
To specify a file number
Use the Select Music Library Song number keys (0
through 9) to specify the file number (1 to 99) you want.
(TAKE01.WAV, TAKE02.WAV, etc.)
The Digital Piano beeps if a file with the specified
number does not exist.
3.
Press the
AUDIO REC
button so the AUDIO REC
lamp is flashing.
4.
Hold down the
AUDIO REC
button until the AUDIO
REC lamp lights.
This enters delete standby, which is indicated by the L
and R lamps flashing.
5.
Hold down the
FUNCTION
button and press the
a
button.
This deletes the file and enters audio recorder playback
standby.
• To exit the above operation at any point, press the
AUDIO REC
button once or twice so the AUDIO
REC lamp is unlit.
NOTE
• The file number of the file you delete remains unused
(remaining files are not renumbered). Recording a new
file causes the file number that comes after the last file
recorded to the USB flash drive to be assigned to the new
file.
The information below shows how the lamps indicate the error type by flashing or lighting when an error occurs due to data
transfer failure or some other reason.
Error Indicators (PX-870)
Lamps
Error Type
Cause
Action
No Media
1. The USB flash drive is not
connected to the USB flash
drive port.
1. Correctly plug the USB
flash drive into the USB
flash drive port.
2. The USB flash drive was
removed while some
operation was in progress.
2. Do not remove the USB
flash drive while any
operation is in progress.
3. The USB flash drive is
write-protected.
3. Write-enable the USB flash
drive.
4. The USB flash drive is
protected by anti-virus
software.
4. Use a USB flash drive that
is not protected by anti-virus
software.
No File
There is no loadable file in the
“MUSICLIB” folder or no
playable file in the “AUDIO”
folder.
Move the file you want to load
into the appropriate location in
the “MUSICLIB” or “AUDIO”
folder.
For information about folders,
refer to the “User’s Guide
(Full)”.
No Data
You are attempting to save
data to a USB flash drive when
there is no data to save.
Record something before
performing a save operation.
Read Only
A read-only file with the same
name you are trying to use is
already stored on USB flash
drive.
Change the name and then
save the new data.
Remove the read-only attribute
from the existing USB flash
drive file and overwrite it with
the new data.
Use a different USB flash drive.
Media Full
There is not enough space
available on the USB flash
drive.
Delete some files from the USB
flash drive to make room for
new data or use a different USB
flash drive.
File Full
1. There are too many files on
the USB flash drive.
1. Delete some of the files on
the USB flash drive to make
room for new data.
2. There is a file named
TAKE99.WAV in the
“AUDIO” folder.
2. Delete the WAV file from
the “AUDIO” folder.
Wrong Data
1. The USB flash drive data is
corrupted.
–
2. USB flash drive contains
data that is not supported
by this Digital Piano.
Format
1. The USB flash drive format
is not compatible with this
Digital Piano.
1. Format the USB flash drive
on the Digital Piano.
2. USB flash drive memory is
corrupted.
2. Use a different USB flash
drive.
Media R/W
USB flash drive memory is
corrupted.
Use a different USB flash drive.
Troubleshooting
If this happens:
Do this:
No sound is produced when I
press a keyboard key.
1. Rotate the
VOLUME
knob more towards “MAX”.
2. Disconnect whatever is connected to the
PHONES/OUTPUT
jack.
3. Turn on the Local Control setting. For details, refer to the “User’s Guide (Full)”.
The pitch of the Digital Piano
is off.
1. Change the transpose setting to “0”. Or turn power off and then back on.
2. Change the tuning setting to 440.0 Hz. Or turn power off and then back on.
3. Change the octave shift setting to “0”. For details, refer to the “User’s Guide (Full)”.
4. Change the temperament setting to “00: Equal”.
Nothing happens when I press
a pedal.
Check the orientation of the pedal unit plug and makes sure it is inserted as far as it goes.
For the correct plug orientation, see “To connect the cables” under “Assembling the
Stand” of page 4/4 of these instructions.
Tones and/or effects sound
strange. Turning power off and
then back on again does not
eliminate the problem.
Example: No change in
intensity when key press
pressure (touch) is changed
Turn off Auto Resume, and then turn power off and then back on again. For details, refer
to the “User’s Guide (Full)”.
A tone’s quality and volume
sounds slightly different
depending where it is played
on the keyboard.
This is an unavoidable result of the digital sampling process,
*
and does not indicate
malfunction.
*
Multiple digital samples are taken for the low range, middle range, and high range of
the original musical instrument. There may be a very slight difference in tonal quality
and volume between sample ranges.
When I press a button, the
note that is sounding cuts out
momentarily or there is a
slight change in how effects
are applied.
This happens while multiple parts are sounding at the same time while using layer, using
the Duet Mode, playing back a built-in tune, recording, etc. Pressing a button when one of
these conditions exists causes the effect setting that is built into the tone to change
automatically, which causes notes to cut out momentarily or a slight change in how
effects are applied. It does not indicate malfunction
I need to reset all Digital Piano
data and settings to their
initial defaults.
Hold down the
FUNCTION
,
MIDI REC
and
E.PIANO1
buttons, and press the power
button to turn on power.
I need to reset a specific
setting to its initial default.
Hold down the
FUNCTION
button and press the + and – keyboard keys of the setting at
the same time.
Lamps
Error Type
Cause
Action
Product Specifications
Model
PX-870BK/PX-870BN/PX-870WE
PX-770BK/PX-770BN/PX-770WE
Keyboard
88-key piano keyboard, with Touch Response
88-key piano keyboard, with Touch Response
Maximum Polyphony
256 notes
128 notes
Tone
19 types
• Layer (excluding bass tones)
19 types
• Layer (excluding bass tones)
Acoustic Simulator
Damper Resonance (Damper Noise on/off),
Hammer Response, String Resonance, Lid
Simulator, Key Off Simulator, Key On Action
Noise, Key Off Action Noise
Damper Resonance (Damper Noise on/off),
Hammer Response
Effects
Brilliance (–3 to 0 to 3), Hall Simulator (4 types),
Chorus (4 types), DSP, Head Phone Mode,
Volume Sync Equalizer
Brilliance (–3 to 0 to 3), Reverb (4 types),
Chorus (4 types), DSP
Metronome
• Beats: 0 to 9
• Tempo range: 20 to 255
• Beats: 0 to 9
• Tempo range: 20 to 255
Duet Mode
Adjustable tone range (–2 to 2 octaves)
Adjustable tone range (–2 to 2 octaves)
Concert Play
• Songs: 10
• Song volume: Adjustable
• Part On/Off: L, R (Lesson Mode only)
• 3 Modes: LISTEN, LESSON, PLAY
• Songs: 10
• Song volume: Adjustable
• Part On/Off: L, R (Lesson Mode only)
• 3 Modes: LISTEN, LESSON, PLAY
Music Library
• Songs: 60; 10 download songs (Up to
approximately 90 KB per song, up to
approximately 900 KB/10 songs total)
*
*
Based on 1 KB = 1024 bytes
• Song volume: Adjustable
• Part On/Off: L, R
• Songs: 60; 10 download songs (Up to
approximately 90 KB per song, up to
approximately 900 KB/10 songs total)
*
*
Based on 1 KB = 1024 bytes
• Song volume: Adjustable
• Part On/Off: L, R
Recorder
MIDI Recorder
• Modes: Real-time recording, playback
• Songs: 1
• Tracks: 2
• Capacity: Approximately 5,000 notes total
• Recording storage: Built-in flash memory
Audio Recorder
• USB flash drive real-time recording and
playback; Linear PCM, 16bit, 44.1 kHz, stereo
.WAV format
• Songs: 99 files
• Approximately 25 minutes maximum
recording per file.
• Audio file volume: Adjustable
MIDI Recorder
• Modes: Real-time recording, playback
• Songs: 1
• Tracks: 2
• Capacity: Approximately 5,000 notes total
• Recording storage: Built-in flash memory
Pedals
Damper (seamless half-pedal support),
sostenuto, soft
Damper (half-pedal supported), sostenuto, soft
Other Functions
• Touch Response: 3 levels, Off
• Transpose: 2 octaves (–12 to 0 to +12)
• Tuning: 415.5 Hz to 440.0 Hz to 465.9 Hz (0.1
Hz steps)
• Temperament: Equal + 16 other types
• Octave Shift: 4 octaves (–2 to 0 to +2)
• Panel Lock
• Touch Response: 3 levels, Off
• Transpose: 2 octaves (–12 to 0 to +12)
• Tuning: 415.5 Hz to 440.0 Hz to 465.9 Hz (0.1
Hz steps)
• Temperament: Equal + 16 other types
• Octave Shift: 4 octaves (–2 to 0 to +2)
• Panel Lock
MIDI
16-channel multi-timbre receive
16-channel multi-timbre receive
USB Memory
• Supported capacity: 32 GB or less
recommended
• Functions: SMF playback, recorded song
storage, song data import, formatting, audio
data playback and storage
–
• Specifications and designs are subject to change without notice.
Your Digital Piano can connect with a smartphone, tablet, or other smart device. A special app is available to display music
scores and a piano roll display to support your practice.
Go to the website below to download the app and install it on your smart device.
http://web.casio.com/app/en/
Input/Output Terminals
• PHONES/OUTPUT jacks: Stereo standard
jacks × 2
• AC Adaptor Terminal: 24 VDC
• USB port: Type B
• USB flash drive port: Type A
• Pedal connector
• PHONES/OUTPUT jacks: Stereo standard
jacks × 2
• AC Adaptor Terminal: 12 VDC
• USB port: Type B
• Pedal connector
Speakers
φ
12cm × 2 +
φ
4cm × 2 (Output: 20W + 20W)
φ
12 cm × 2 (Output: 8W + 8W)
Power Requirements
AC adaptor: AD-E24250LW
• Auto Power Off: Approximately 4 hours; Can
be disabled.
AC adaptor: AD-A12150LW
• Auto Power Off: Approximately 4 hours; Can
be disabled.
Power Consumption
24V
=
20W
12V
=
18W
Dimensions
Piano and Stand: 139.3(W) × 29.9(D) × 80.1(H)
cm (54 7/8 Ч 11 3/4 Ч 31 9/16 inches)
Piano and Stand: 139.1(W) × 29.9(D) × 79.8(H)
cm (54 13/16 Ч 11 3/4 Ч 31 7/16 inches)
Weight
Piano and Stand: Approximately 34.3 kg (75.6
lbs)
Piano and Stand: Approximately 31.5 kg (69.4
lbs)
Linking with an Application (APP Function)
Downloading the Special App
Included Accessories
●
AC adaptor
●
Power cord
●
Music Stand
●
Leaflets
• Safety Precautions
• Other (Warranty, etc.)
Items included as accessories are subject to change
without notice.
Separately Available Accessories
• You can get information about accessories that are
separately for this product from the CASIO catalog
available from your retailer, and from the CASIO
website at the URL below.
http://world.casio.com/
Continued on sheet 3/4
[Continued below left]
PX870_770_EN.fm 2 ページ 2017年7月10日 月曜日 午後5時32分
B