Selecting an object, Slewing to an object – Celestron CPC Deluxe 1100 HD Computerized Telescope User Manual
Page 14
12
>>
www
.celestron
.com
EQ One-Star Align
EQ One-Star Align operates much the same way as EQ Two-Star Align,
however it only relies on the alignment of one star to align the telescope .
To use EQ One-Star Align follow the same steps as you would for
EQ Two-Star Align, but only using one star .
EQ Solar System Align
This alignment method allows you to use only one solar system object to
equatorially align the telescope for daytime use . To align your telescope
using a solar system object, follow steps 1 through 7 under the
EQ Two-Star Align section .
CPC Re-Alignment
The CPC has a re-alignment feature which allows you to replace either of
the original alignment stars with a new star or celestial object. This can
be useful in several situations:
• If you are observing over a period of a few hours, you may notice
that your original alignment stars have drifted towards the west
considerably . (Remember that the stars are moving at a rate of 15º
every hour) . Aligning on a new star that is in the eastern part of the
sky will improve your pointing accuracy, especially on objects in
that part of the sky .
• If you have aligned your telescope using the One-Star or Solar
System alignment method, you can use re-align to align to
additional objects in the sky. This will improve the pointing
accuracy of your telescope without having to re-enter addition
information .
To replace an existing alignment star with a new alignment star:
1. Select the desired star (or object) from the database and slew to it.
2. Carefully center the object in the eyepiece.
3. Once centered, press the UNDO button until you are at the main menu.
4 . With CPC Ready displayed, press the ALIGN key on the hand control.
5 . The display will then ask you which alignment star you want to replace .
Use the UP and DOWN scroll keys to select the alignment star to be
replaced. It is usually best to replace the star closest to the new object.
This will space out your alignment stars across the sky. If you have used
one of the single object alignment methods, then it is always best to
replace the object that is “unassigned” with an actual object.
6. Press ALIGN to make the change.
>>
Selecting an Object
Now that the telescope is properly aligned, you can choose an object
from any of the catalogs in the CPC’s extensive database . The hand
control has a key (4) designated for each of the catalogs in its database .
There are two ways to select objects from the database: scrolling
through the named object lists and entering object numbers.
Pressing the LIST key on the hand control will access all objects in the
database that have common names or types . Each list is broken down
into the following categories: Named Stars, Named Object, Double
Stars, Variable Stars, Asterisms and CCD Objects. Selecting any one of
these catalogs will display a numeric-alphabetical listing of the objects
under that list. Pressing the UP and DOWN keys (10) allows you to scroll
through the catalog to the desired object.
When scrolling through a long list of objects, holding down either
the UP or DOWN key will allow you to scroll through the catalog
at a rapid speed.
Pressing any of the other catalog keys (M, CALD, NGC or STAR) will
display a blinking cursor below the name of the catalog chosen . Use
the numeric key pad to enter the number of any object within these
standardized catalogs. For example, to find the Orion Nebula, press the
“M” key and enter “042” .
When entering the number for a SAO star, you are only required to enter
the first four digits of the objects six digit SAO number. Once the first
four digits are entered, the hand control will automatically list all the
available SAO objects beginning with those numbers. This allows you
to scroll through only the SAO stars in the database. For example, in
searching for the SAO star 40186 (Capella), the first four digits would be
“0401”. Entering this number will display the closest match from the SAO
stars available in the database. From there you can scroll down the list
and select the desired object.
>>
Slewing to an Object
Once the desired object is displayed on the hand control screen, choose
from the following options:
• Press the INFO Key. This will give you useful information about the
selected object such as R.A. and declination, magnitude size and
text information for many of the most popular objects.
• Press the ENTER Key. This will automatically slew the telescope to
the coordinates of the object.
Caution: Never slew the telescope when someone is looking into
the eyepiece. The telescope can move at fast slew speeds and may
hit an observer in the eye.
If you manually enter an object that is below the horizon, CPC will
notify you by displaying a message reminding you that you have
selected an object outside of your slew limits (see Slew Limits in the
Scope Setup section of the manual). Press UNDO to go back and
select a new object. Press ENTER to ignore the message and continue
the slew.
Object information can be obtained without having to do a star
alignment . After the telescope is powered on, pressing any of the
catalog keys allows you to scroll through object lists or enter catalog
numbers and view the information about the object as described above.
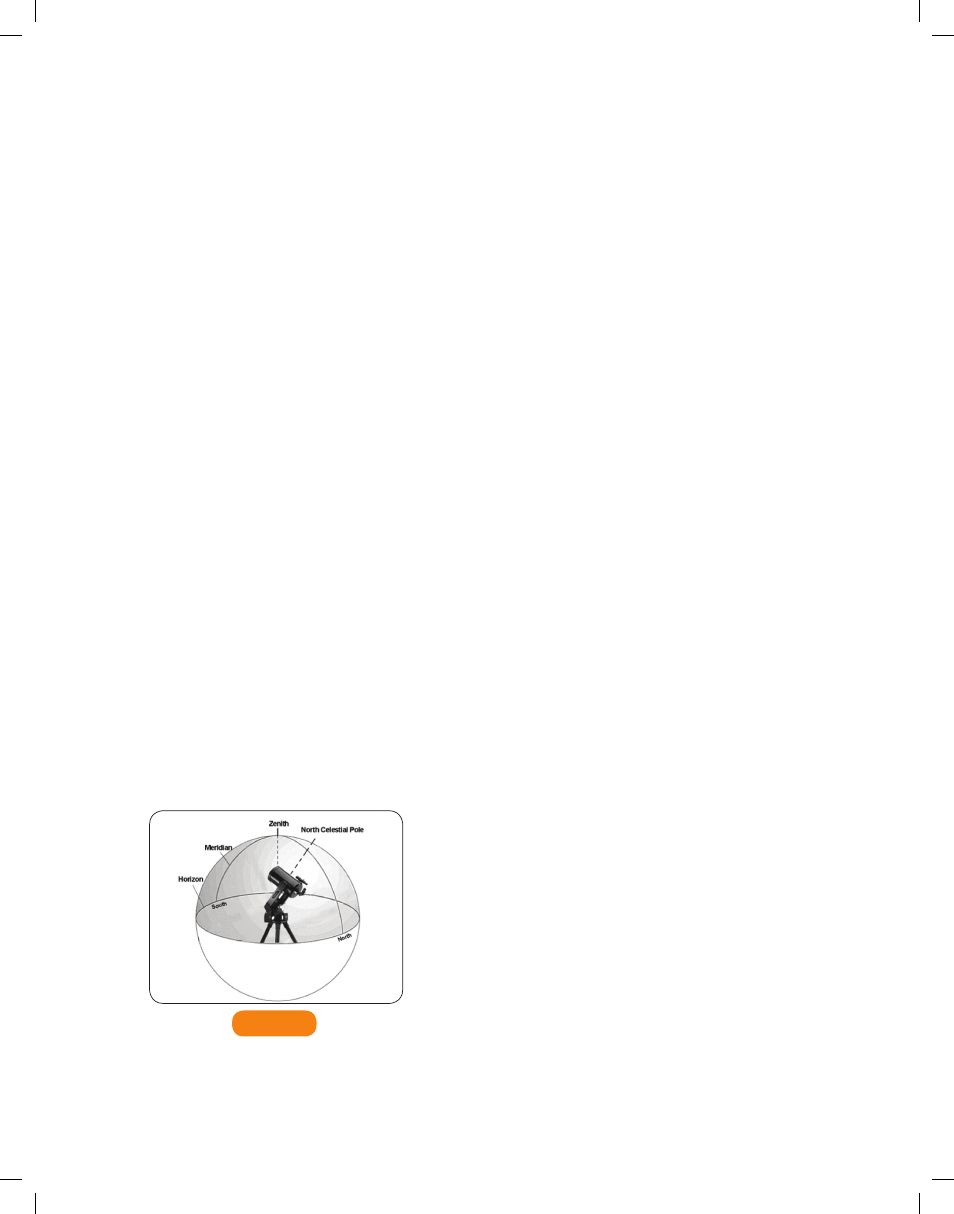
The Meridian is an imaginary line in the sky that starts at the
North celestial pole and ends at the South celestial pole and
passes through the zenith. If you are facing South, the meridian
starts from your Southern horizon and passes directly
overhead to the North celestial pole.
FIGURE 4-3