Polar alignment (with optional wedge), All-star polar alignment – Celestron CPC Deluxe 1100 HD Computerized Telescope User Manual
Page 23
>>
www
.celestron
.com
21
>>
Polar Alignment (with optional Wedge)
Even though the CPC can precisely track a celestial object while in the
Alt-Az position, it is still necessary to align the polar axis of the telescope
(the fork arm) to the Earth’s axis of rotation in order to do long exposure
astrophotography . To do an accurate polar alignment, the CPC requires
an optional equatorial wedge between the telescope and the tripod . This
allows the telescope’s tracking motors to rotate the telescope around the
celestial pole, the same way as the stars . Without the equatorial wedge,
you would notice the stars in the eyepiece would slowly rotate around
the center of the field of view. Although this gradual rotation would go
unnoticed when viewing with an eyepiece, it would be very noticeable
when imaging .
Polar alignment is the process by which the telescope’s axis of rotation
(called the polar axis) is aligned (made parallel) with the Earth’s axis of
rotation. Once aligned, a telescope with a clock drive will track the stars
as they move across the sky. The result is that objects observed through
the telescope appear stationary (i.e., they will not drift out of the field of
view). If not using the clock drive, all objects in the sky (day or night) will
slowly drift out of the field. This motion is caused by the Earth’s rotation.
>>
All-Star Polar Alignment
The CPC hand control has a polar alignment function called “All-Star”
polar alignment that will help you polar align your telescope for increased
tracking precision and astrophotography . This feature allows you to choose
any bright alignment stars to assist in accurately aligning your telescope and
wedge with the North Celestial Pole . Before using the Polar Align feature,
you must first perform an EQ North or South Alignment.
Once your telescope is EQ aligned, slew the telescope to any bright star
in its Named Star database list . This will be the star used for the All-Star
Polar Alignment. For best results, it is always good to choose a polar
alignment star that is high in the sky and near the Meridian . Try to avoid
stars that are close to the west/east horizon, directly overhead or too
near the celestial pole .
Press the Align button and use the Up/Down buttons on the hand
controller to select Polar Align from the list .
The Polar Align feature has two options: Align Wedge and Display Align .
Align Wedge – After performing an EQ North or South Alignment and
slewing your telescope to any bright star in the telescope’s database,
select the “Align Wedge” option . The telescope will then re-slew to the
same star .
1. Center the star in the finderscope and press ENTER.
2 . Then accurately center the star in your eyepiece and press
ALIGN. The telescope will then “sync” on this star and slew to
the position that the star should be if it were accurately
polar aligned .
For the most accurate alignment it is best to use a reticle eyepiece (see
Optional Accessories) or a high power eyepiece to precisely center the
star in the field of view.
3. Use the wedges latitude and azimuth adjustments to place the
star in the center of the eyepiece . Do not use the direction
buttons on the hand control to position the star. Once the star
is centered in the eyepiece, press ENTER; the polar axis should
now be pointed towards the North Celestial Pole .
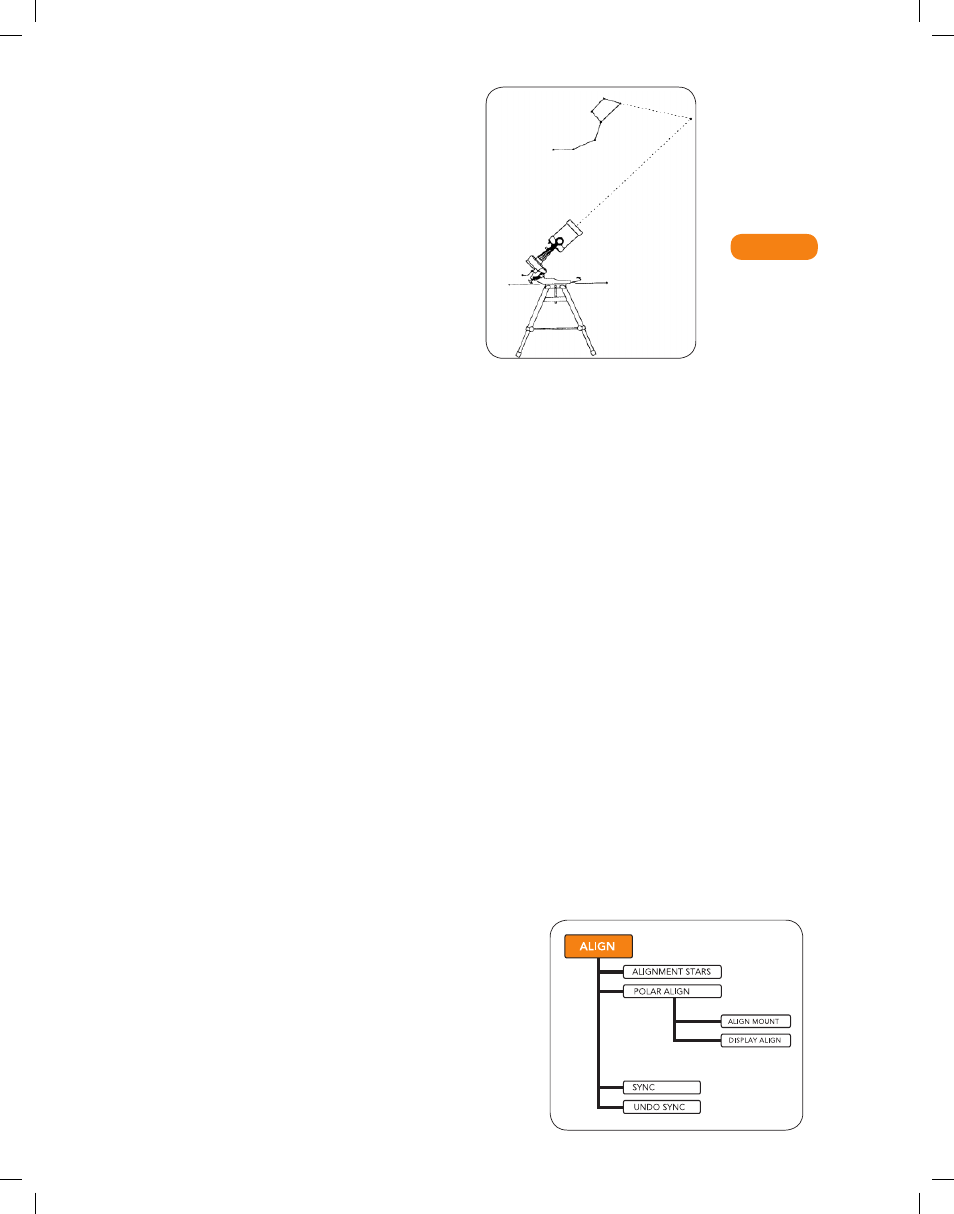
FIGURE 6-3
This is how the telescope
is to be set up for polar
alignment. The tube
should be parallel to the
fork arm and the mount
should point to Polaris.
Updating your Star Alignment
After polar alignment, it’s a good idea to check the pointing accuracy
of the telescope to see how much it may have been affected by moving
the mount . Since the polar alignment process requires you to “sync” the
telescope on a bright star before you begin, it will be necessary to undo
the sync before re-aligning . To undo the sync:
1 . Press the Align button and use the UP/DOWN buttons on the hand
controller to select Undo Sync from the list, and press Enter . The
message
Complete will display on the LCD .
To re-align your telescope:
2 . Slew the telescope to one of the original alignment stars, or another
bright star if the original alignment stars are no longer in a
convenient location . Press the Align button and use the UP/DOWN
buttons on the hand controller to select Alignment Stars from
the list .
3 . The hand control will ask you which of the original alignment stars
you wish to replace. Use the UP/DOWN buttons to select the
desired star and press Enter .
4. Once again, center the star in the finderscope and press Enter .
5 . Then center the star in the eyepiece and Press Align .
6. Repeat the process on a second alignment star.
Display Align – the user can now display the polar alignment error
in the RA and DEC axes . These values show how close the mount
is pointed at the celestial pole based on how accurately the user
centered the alignment star with the hand control and with the mount
adjustment. To display the alignment error:
1 . Press the Align button and use the UP/DOWN buttons on the hand
controller to select Display Align from the list, and press Enter .