Typical installation start-up and run check – Insinger I Series Food Waste Disposer User Manual
Page 9
Insinger Machine Company 2005
Page 9
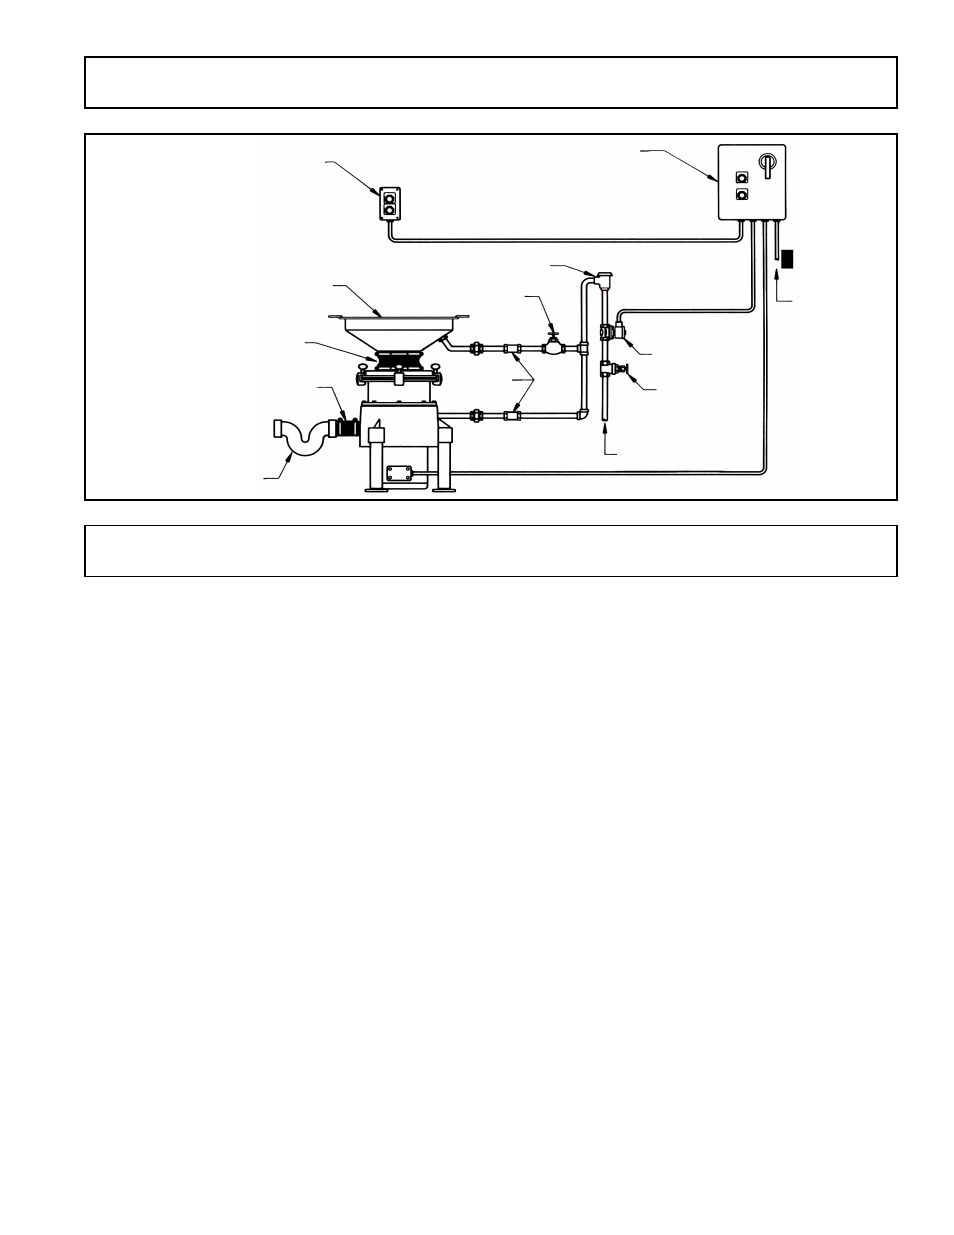
TYPICAL INSTALLATION
START-UP AND RUN CHECK
OPTIONAL REMOTE START/STOP SWITCH
POWER SUPPLY
SOLENOID VALVE
1
¼
2
” COLD WATER
SUPPLY
FLOW
CONTROL
VALVE
3” FLEXIBLE DRAIN
CONNECTOR
VACUUM BREAKER
TYPICAL CONTROL PANEL INSTALLATION:
AUTOMATIC REVERSING, NEMA 4X WITH
DISCONNECT SWITCH (MODEL RAC2)
CONE ASSEMBLY WITH WATER INLET VALVE
CONNECTOR SLEEVE
TRAP
GLOBE VALVE
GATE VALVE
1.
Check that vinyl silver trap scrapping ring is fully seated.
2.
Check that all connections are secure.
3.
Check that disposer is secured to floor.
4.
Open terminal wiring box on motor; pull out and separate motor leads to permit ampere reading on each leg.
Leave all connections and insulation in place.
5.
Clamp ammeter over input feed lead.
6.
Turn on disposer.
7.
Take ampere readings on each leg and verify against factory-checked motor test results (copy attached to
disposer and should be attached to Page 15 in this Owner’s Manual).
8.
Check for leaks, water flow, excessive noise or vibration, and regulate water flow if required.
NOTE: Before checking rotation reversal, be sure disposer is empty. Wear safety glasses or goggles. BE SURE
POWER SWITCH IS OFF SHOULD ADJUSTMENTS ON DISPOSER BE NECESSARY. NEVER REACH INTO
DISPOSER WHEN DISPOSER IS RUNNING.
9.
If disposer is connected to a reversing control, whether automatic or manual, check reversing.
10.
If disposer is connected to a manual reversing drum switch or contactor, START motor in forward position and
note rotation through top opening as motor coasts to a stop. RESTART motor in reverse position. Verify that
disposer restarted in opposite direction.
11.
If disposer is connected to a control center with automatic reversing (Model RAC1), verify if disposer reverses.
NOTE: Motor must be stopped or 30 seconds must have elapsed before pushing START; otherwise, motor will
not reverse. This is a safety cycle feature. Should START button be pressed earlier, motor will just run in same
direction. Push START. When disposer runs, press STOP and note coast down direction. When motor has
stopped, push START and note reversing of rotation.
12.
If disposer is wired with a RAC2, rotation reversing is done the same as #11 above, except that the control panel
will first switch over to a 2-minute clean-out cycle, as shown by the green light. Verify this time, keeping the
solenoid valve open and motor running. When the 2 minutes have elapsed and motor has stopped, turn ON
disposer and note rotation.
13.
In all shutdown phases, be sure water is being shut off by the closing of the solenoid valve.
14.
Reinsert all wiring, close all covers and shut all doors that were open during run check.