Operating instructions, Water shutoff delay adjustment, Automatic timed disposer shutoff – InSinkErator WX-300 User Manual
Page 14
15
TO START
1. Check to ensure disposer is free of foreign objects.
2. Ensure power is on.
3. Push start button. Disposer and Waste Xpress will run
and water will fl ow into disposer
TO STOP
1. Push stop button. System will stop.
2. Water may continue to fl ow into disposer for up to
10 minutes, per the time set on the water shutoff
delay timer. This post-fl ush clears the drain lines
of food waste.
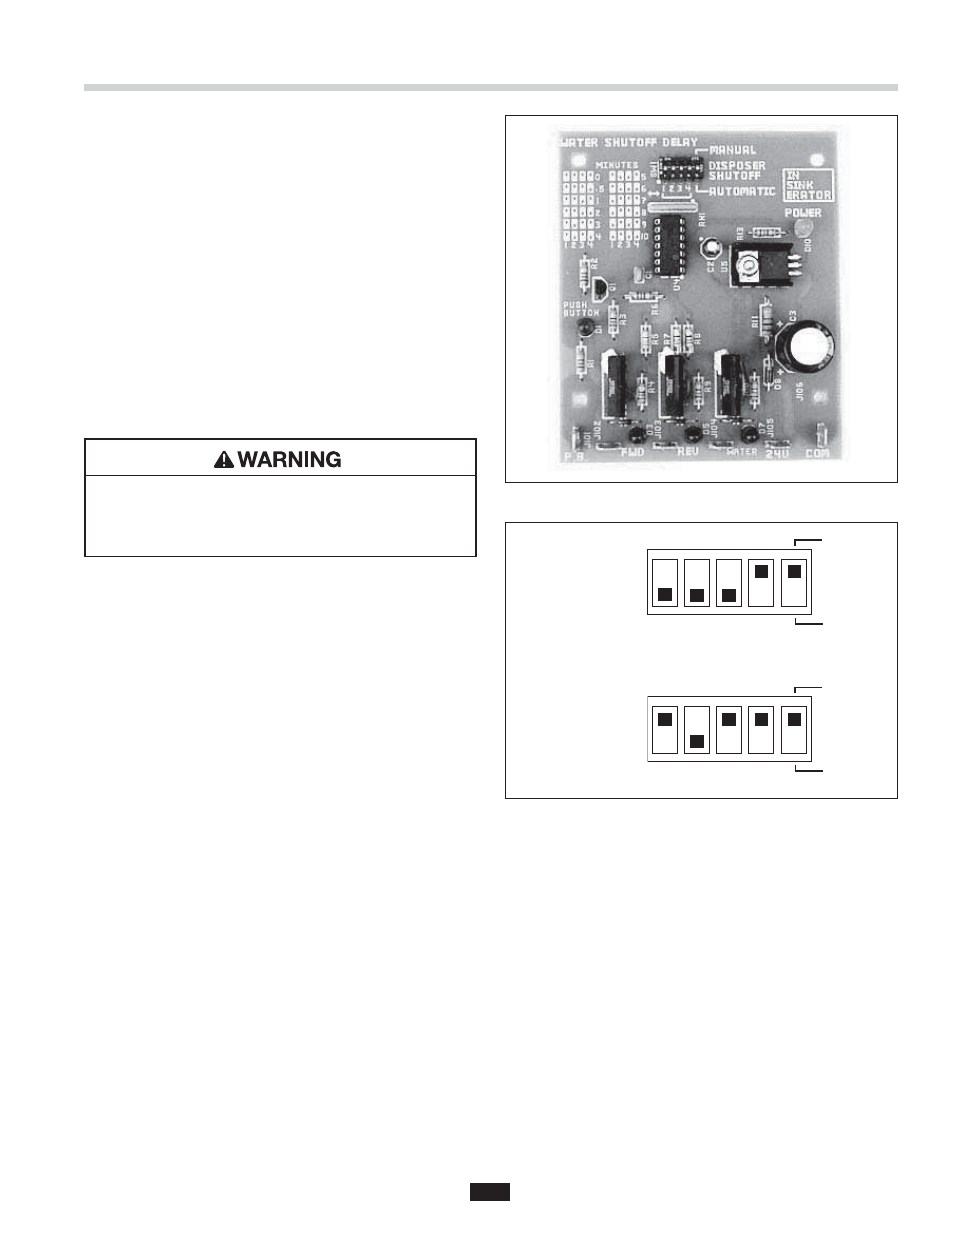
WATER SHUTOFF DELAY ADJUSTMENT
This water shutoff delay is adjustable from 30 seconds
to 10 minutes (see Figure 23). Set water shutoff delay
for at least 2 minutes on trough systems.
PERSONAL INJURY
To adjust the water shutoff delay, disconnect the
electrical power to the control panel and open the
control center door.
Locate the water shutoff delay at the top of the printed
circuit board in the WX-101A (see Figure 22). Set the dip
switches for the desired water shut off delay. Use the
guide printed on the circuit board to set minutes of
delay (also see Figure 23). The dip switches should be
moved to match the fi lled in areas of the guide.
NOTE: Line disconnect should not be turned off
between usage.
AUTOMATIC TIMED DISPOSER SHUTOFF
This water saving feature allows the system to run for
10 minutes before it automatically shuts off and must
be manually restarted.
NOTE: This feature is set in the manual position at
the factory. To activate the automatic timed system
shutoff, disconnect the electric power to the control
center, then open the control center door. Locate the
Dip Switch Module at the top of the circuit board (see
Figure 22). Move the #5 dip switch from MANUAL to
AUTOMATIC. The system now automatically shuts off
10 minutes after it starts.
30 Second Delay:
Dip Switches 1, 2,
3, pushed down,
Switch 4 pushed
up.
10 Minute Delay:
Dip Switches 1,
3, 4 pushed up
position, Switch 2
pushed down
2
3
4
1
MANUAL
AUTOMATIC
2
3
4
1
MANUAL
AUTOMATIC
Figure 22.
Figure 23. Time Delay Setting Examples
Operating Instructions