Paloma PH2-20 Direct Vent User Manual
Page 35
35
The content on this page is intended for use by qualified
installation/service personnel ONLY.
WARNING: Improper adjustment, altera-
tion, service or maintenance can cause prop-
erty damage, personal injury, or death.
Minimum Temperature Adjustment by the
Main Remote Control (UMC-117, USC1-117
and USC2-117)
Required adjustment for 85°F (29°C) water
temperature setting.
Follow the instruction below if it is determined that a
setting of 85°F (29°C) is required.
Turn on the remote control. Turn off the gas and
water shutoff valves.
Press the Down arrow temperature adjustment but-
ton on the remote control for several times and set
the temperature at 100°F (38°C).
Press the Down button on remote control 3 times
within 5 seconds. The display of the remote con-
trol will show “85”.
Turn on the gas and water shut off valves.
Check and ensure safe operation and performance
of the water heater.
NOTICE: The maximum fl ow rate at 85°F (29°C) is
1.3 gpm (5.0 l/m).
High Altitude DIP Switch Adjustment
For High Altitude Installation above 3,280
Feet (1,000m):
When the water heater is installed above 3,280 feet
(1,000m), the adjustment of DIP switch is required for
high altitude installation.
Without adjusting the DIP switch, the water heater
may not function properly.
NOTICE: If the water heater is installed less than
3,280 feet (1,000m), no action is required.
How to adjust the DIP switch on the PCB for high
altitude installation:
Check the altitude (above sea level) where the
water heater is installed.
If the altitude is more than 3,280 feet (1,000m),
the adjustment of DIP switch is required.
Turn off the gas shut off valve and water shutoff
valve.
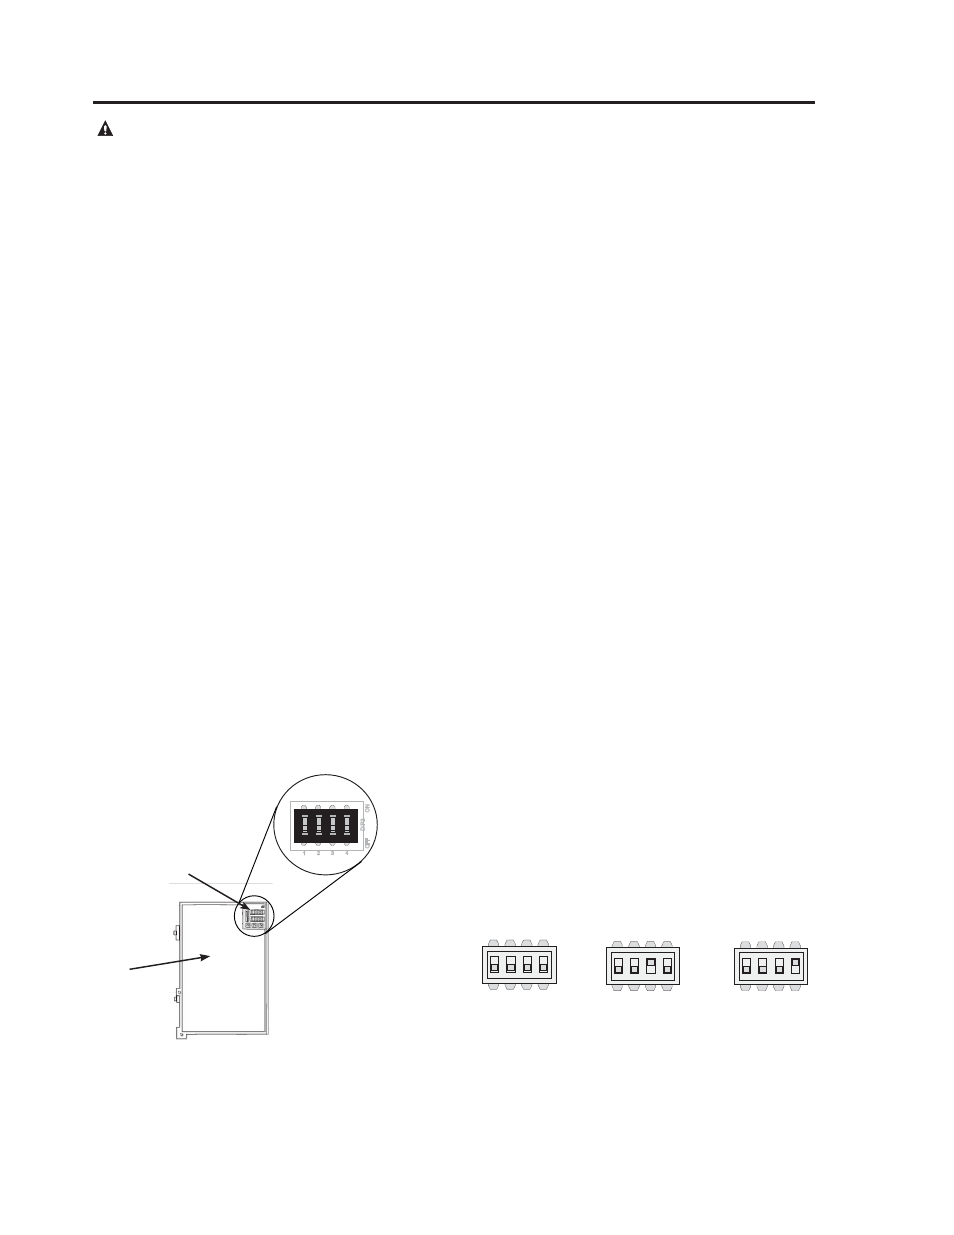
Remove the front cover.
Find the two DIP switches located at the top right
hand side of the PCB. The switch labeled "DIP 2"
is the bottom switch.
Change the DIP switch #3 setting of DIP 2 to
“ON” position if the water heater is installed
above 3,280 feet (1,000m) below 6,560 feet
(2,000m). See the diagram below. DO NOT alter
any other DIP Switch.
Change the DIP switch #4 setting of DIP 2 to
“ON” position if the water heater is installed
above 6,560 feet (2,000m) below 9,840 feet
(3,000m). See the diagram below. DO NOT alter
any other DIP Switch.
NOTICE: Manifold pressure will be reduced by
this adjustement.
Attach the unit’s front cover.
Turn on the gas shutoff valve and water shutoff
valve.
Check and ensure safe operation and performance
of the water heater.
Location of DIP Switches on PC Board.
Dip switch adjustment
3,280 feet (1,000m)
thru
6,560 feet (2,000m)
ON
1
2
3
4
As set from factory
ON
1
2
3
4
ON
1
2
3
4
Dip switch adjustment
6,560 feet (2,000m)
thru
9,840 feet (3,000m)
ON
1
2
3
4
DIP2
ON
OFF
1
2
3
4
DIP
Switches
PCB