Receiver installation and connections, Receiver controls and functions – Relacart Electronics UR-222S User Manual
Page 4
1
2
3
4
5
6
7
Receiver Installation and Connections
Installation:
1.For better operation the receiver should be at least 3ft. ( 1m) above the ground and at least 3ft. away from
a wall or metal surface to minimize reflections.
2.Attached a pair of UHF antennas to the antenna input jacks, the antenna are normally positioned in the
shape of a “V” ( both 4 5°from vertical) for best reception.
3.Keep antennas away from noise sources such as computer, digital equipment, motors, automobiles and
neon lights, as well as away from large metal objects.
4.Keep open space between the receiver and transmitter for better reception.
5.The transmitter should be at least 3ft. from the receiver.
Connections:
1.The switching power supply is designed to operate properly from any AC power source 100-240V, 50/60Hz
without user adjustment. Simply connect the receiver to a standard AC power outlet, using only an IEC-type
input cordset approved for the country use. Power to the unit is controlled by the front panel power switch.
2.There are two audio outputs on the rear panel: an XLR microphone output and a 1/4” ( 6.3mm) phone jack
instrument output. The two isolated audio outputs permit simultaneous feeds to two different inputs. Use the
appropriate shielded audio cable for connections between the receiver and the input( s) of the mixer or other
equipment.
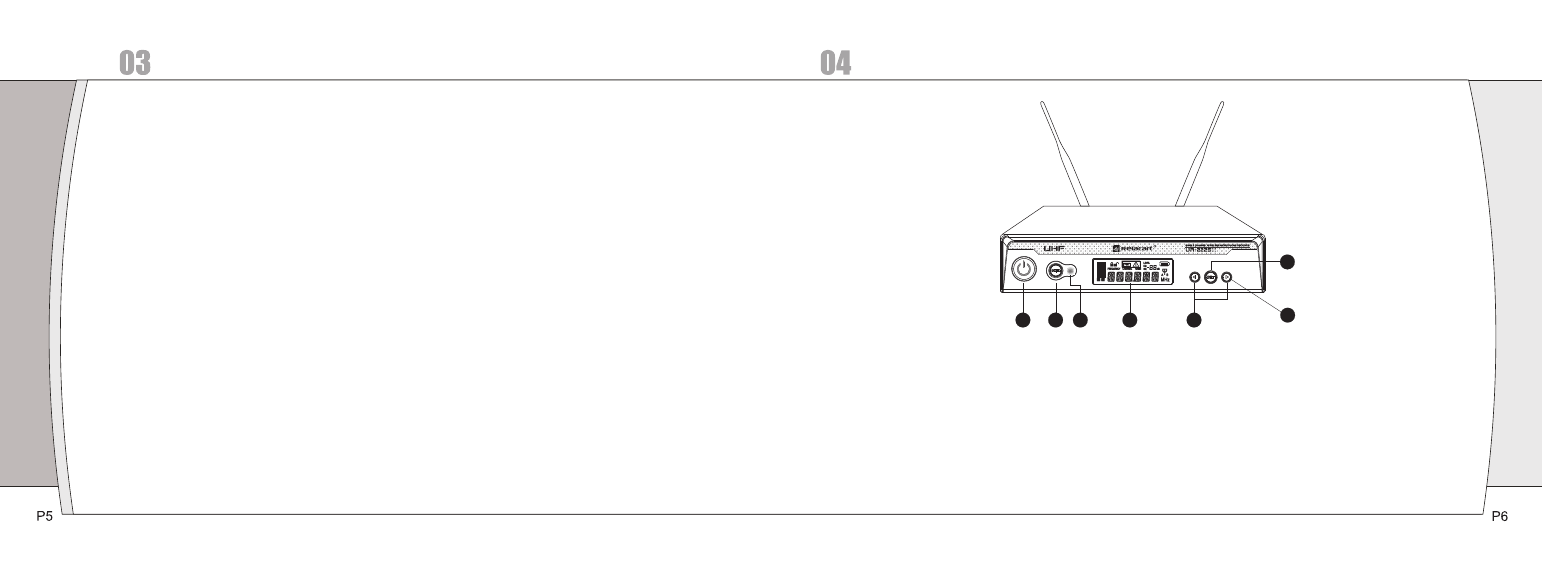
Receiver Controls and functions
UR-222S Receiver Front Panel
1.Power Switch:Press power switch in 3 seconds and the receiver readouts will light.
2.Infrared Data Transfer Button (SYNC): Press this button to transmit the channel data from receiver to transmitter.
3.Infrared Data Transfer Window (iR): Transmit channel data from the receiver to the transmitter, so that they are in
the same frequency.
4.LCD screen shows working channel or frequency, RF/AF, diversity strengths; transmitter battery level, mute and
operation menu.
5.UP / DOWN Buttons:
A, Press Up or Down arrow button, in conjunction with the Set button, to step through menus, select operating
frequency and edit receiver function choices.
B, Press Up or Down arrow button 3 seconds and the receiver will auto- scan and lock on to an open,
interference-free frequency.
6.SET Button: Use in conjunction with the Up / Down arrow buttons to step through menus, choose operating
frequency and select receiver function options.