System setup – Relacart Electronics UR-222S User Manual
Page 8
1
2
3
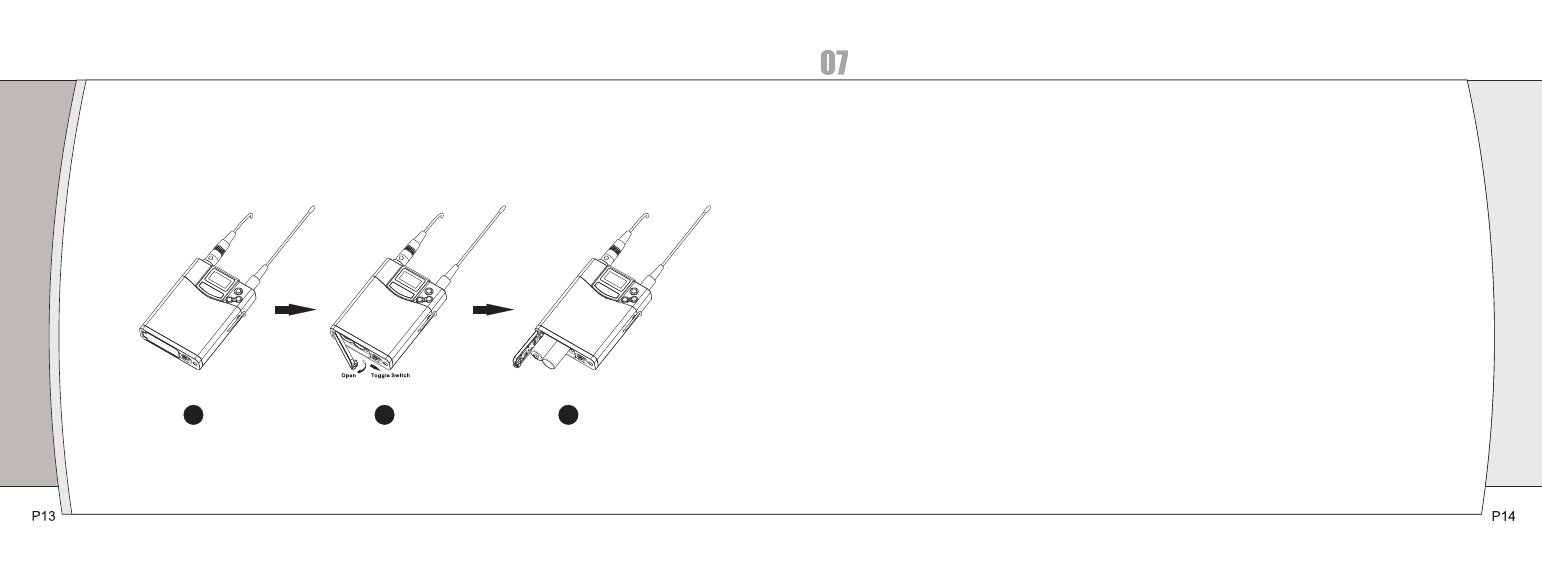
Body-pack Transmitter Battery Installation:
System Setup
Receiver Setup:
1
. Make sure the transmitter is off before turning on the receiver.
2
. Press the power switch on the receiver, LCD backlight will turn bright, and the normal display will be in 1-2
seconds. If the screen shows more than two signals, which means that there is a frequency interference from
outside, please change the other operating frequency.
3
. Change the operating frequency by manual or by auto-scan mold
a) set the operating frequency by manual: press
◄/►
to change the frequency, after the selected frequency
fleshes 4 times, the receiver will enter the selected frequency and show it on the LCD screen.
b) AFS Auto Frequency Scanning: long press
◄/►
or 3 seconds, the receiver will auto scan about 30 seconds and
lock on to an interference-free frequency.
4
. Enter the main menu: long press SET button 3 seconds to enter the main menu. Press
◄/►
button to select the
following menu: DISPLAY(frequency or channel display), GROUP(frequency group from 01-10), LEVEL(electronic
volume adjustment: -06
~18dB), SQUELCH(squelch level control), LOCK(lock operation) and PILOT(pilot switch).
(1) DISPLY(frequency or channel display): Selecting “DISPLAY”, then touch SET Button to enter edit mode, touch
◄
arrow button, “FREQUENCY” flashes, if stopping on “FREQUENCY”, the LCD will display the RF frequency;
touch
►
arrow button, “CHANNLE” flashes, if stopping on “CHANNEL”, the LCD will display the operational channel.
Press SET Button to confirm the desired choice, then LCD return to its previously displayed contents. Finally press
“SET” to confirm.
(2) GROUP(group display 01-10): select GROUP, then press SET to enter the edit mode, press
◄/►
button to select
any group of 01-10, Finally press SET to confirm.
(3) LEVEL (electrical level adjustment -06-18dB): select LEVEL, then press SET to enter the edit mode, press
◄/►
button, the adjustable electronic volume(-06
~18dB). Finally press SET to confirm.
(4) SQELCH(squelch level control): Selecting “SQELCH”, then touch SET Button to enter edit mode, the small data
flashes to indicate edit, touch
◄/►
button to scroll through the available choice for the function. The squelch level
is adjustable in ten 5dB steps, providing a 50dB range. Press SET Button to confirm the desired choice, then LCD
return to its previously displayed contents. Finally press “SET” to confirm.
(Receiver squelch threshold is factory preset. When the transmitter too far away from the reception range or
receiver does not receive enough transmit power, you can adjust by yourself. Note that unless absolutely necessary,
please do not adjust the squelch threshold, if adjusted too low will produce excessive noise, system operation will
not stable. )
(5) LOCK(lock operation): Selecting “LOCK”, then touch SET Button to enter edit mode, touch
◄
arrow button, it
displays “ON”, if stopping on “ON”, the system enters lock mode, the user can not use any button for any control;
touch
►
arrow button, it displays “OFF”, if stopping on “OFF”, the user can do any control by any button. Press SET
Button to confirm the desired choice, then LCD return to its previously displayed contents. Finally press “SET” to confirm.
(LOCK ON)status, long press SET button 3 seconds, press
◄/►
button to select LOCK, then press
►
, the screen
freshes OFF, finally press SET to confirm, the lock status is released.
(6) PILOT(pilot switch): select PILOT, then press SET to enter edit mode, press
◄/►
button, can select ON or OFF
(on or off pilot). Finally press SET to confirm.