Plastic floor assembly - sport runabouts – Sea Eagle Transom Sport Boats (2009 and earlier) User Manual
Page 4
4
Plastic Floor Assembly - Sport
Runabouts
The Sport Runabouts feature Interlocking Polyethylene Floorboard
System gives you an unmatched combination of high strength,
maintenance free durability, good grip and light weight. Following is a
table that shows which floorboard each boat uses:
9.2 SR
10.6 SR
12.6 SR
14 SR
FB-1 FB-1
FB-1
FB-1
FB-2 FB-2
FB-2
FB-2
FB-4
FB-3 Short
FB-3
FB-3
FB-4 FB-4
FB-3 Short
FB-4
FB-1 Bow Floorboard
SR boats: Locate the FB-1 and FB-2 floorboards as well as the Uplift
Connector Bars (see diagram below) FB-1 and FB-2 join at a slight up
angle. The Uplift Connector Bars keep the two floorboards at this
angle.
Slide FB-1 and FB-2 together as shown above. Hook the Uplift
Connector Bar into the FB-2 floorboard, and use moderate pressure
on the FB-1 to pull it into position so that the Uplift Connector Bar will
hold both boards snugly together.
Repeat with the other Uplift Connector Bar. Slide the assembled
boards into the bow of the boat so that the keel valve can be reached
through the hole in the FB-2 floorboard. Hint: you might want to use
the valve adapter and the hose of the A-41 pump to center the valve
in the hole of the FB-2.
2) FB-4 Aft Floorboard
The FB-4 is the rearmost floorboard which has a smooth rear edge
and interlocking grooves on the front edge. Place the FB-4 at the rear
of the hull and slide under the transom lip. Sit in the hull and force the
FB-4 under the transom lip with your feet.
The above diagram displays the FB-1, FB-2 and FB-4 installed in the
12.6 SR.
3) FB-3
Please note, FB-3 comes in two sizes: short (FB-3S) & long (FB-3).
For the 12.6 SR, locate the long FB-3 floorboard. For the 10.6 SR and
14 SR, locate the short FB-3S
Warning: Please do not proceed to the next step with bare feet,
and keep your fin gers and toes out of the way so that you don't
get pinched.
10.6 SR Insert FB-3S so it meshes with FB-4 at the stern of the boat
and over laps FB-2. Lift the ends of FB-2 and FB-3S and con nect the
floorboards forming an inverted "V". Step down on the joint. The
boards will snap into place.
12.6 SR: Insert large FB-3 so it meshes with FB-4 at the stern of the
boat and over laps FB-2. Lift the ends of FB-2 and FB-3 and con nect
the floorboards forming an inverted "V". Step down on the joint. The
boards will snap into place.
14 SR: Insert FB-3 so it meshes with FB-4 at the stern of the boat.
Locate the FB-3S and insert it so it meshes with the FB-3 and over -
laps FB-2. Lift the ends of FB-2 and FB-3S and con nect the
floorboards forming an inverted "V". Step down on the joint. The
boards will snap into place.
4) Stringers
HINT: Since the uplift connector bars angle floorboard
1 & 2 upward, it is very helpful to place an object
under the bow such as a box or a bucket to prop it up.
This makes insertion of stringers far easier because
the floorboards will be on the same plane.
All Sea Eagle Sport Runabouts except the 9.2SR have two side
stringers on each side for a total of 4. The 9.2SR has only one side
stringer for a total of 2. These sturdy aluminum parts serve to
strengthen the structure of the boat and keep the floorboards tight.
Make sure the keel (on the 9.2 SR and larger) is slightly inflated, then
insert the smaller of the two side stringers first at the bow of the boat.
Use a rolling motion to put the stringers in place.
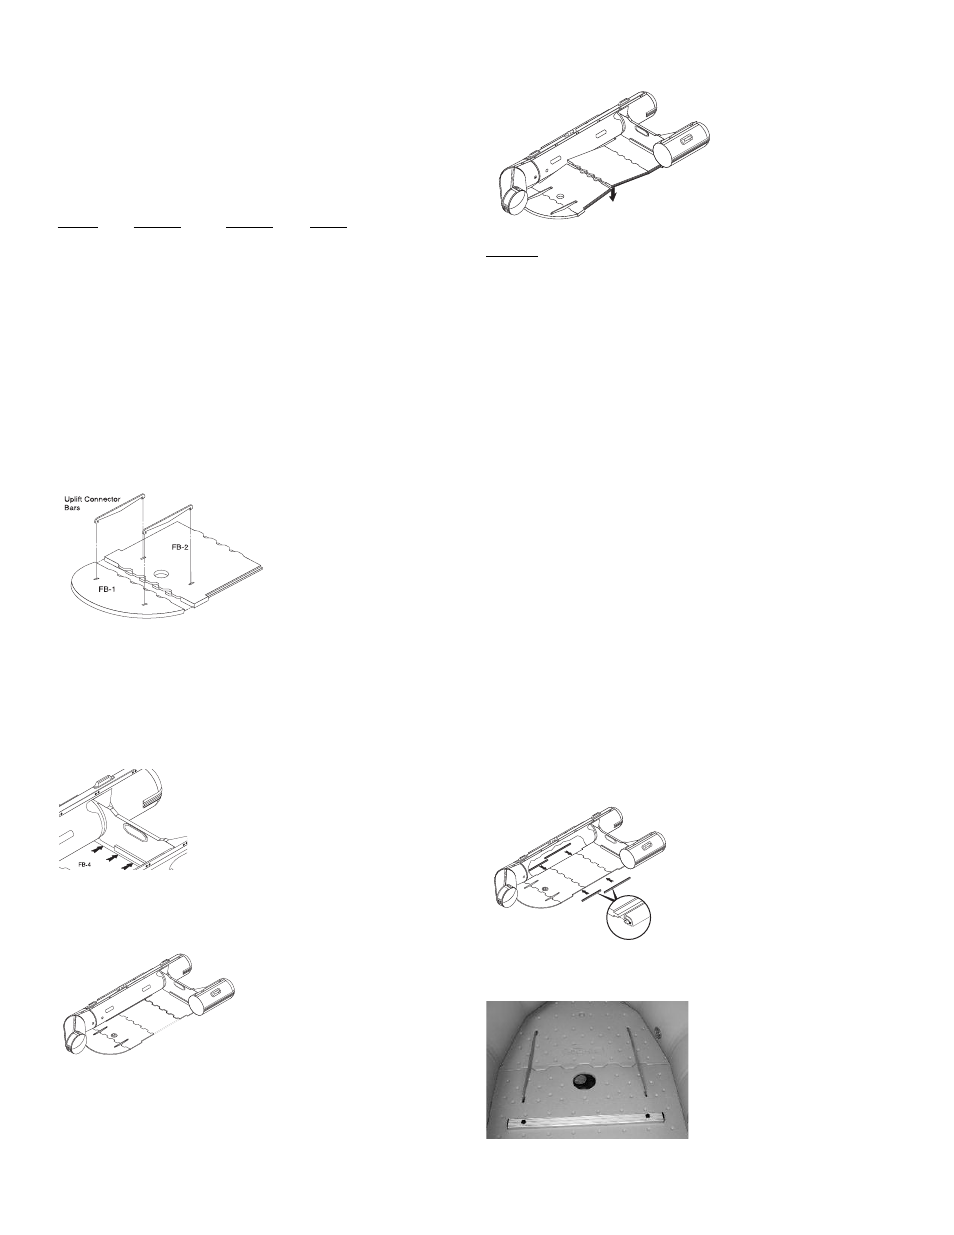
5) Floorboard Reinforcement Kit (standard with 14 SR & optional
with 9.2 SR, 10.6 SR & 12.6 SR)
This set of 3 aluminum
crossbars provides additional
strength for FB2 and FB4
floorboards. The crossbar on
FB-2 allows the user to inflate
the keel at a higher pressure
and improves motoring
performance of the boat. To
install, simply bolt the long
aluminum crossbar on FB-2 floorboard using the knurled nuts included
in the reinforcement kit as shown while the keel is deflated.