Motor installation, State and local reg is tra tion – Sea Eagle Transom Sport Boats (2009 and earlier) User Manual
Page 6
6
To attach the Aluminum Bench
Seat, feed the fabric beads on
the pontoons through the nylon
slotted
fittings
under
the
Aluminum Bench Seat on both
sides as shown. While you do
this please make sure that the
boat is inflated about 50% just to
get the boat fabric out of the way.
Slide the seat over fabric beads
so that it is towards the center.
Now you may
inflate the boat
fully. Attached
Aluminum Bench
Seat looks like this.
Seat Bag (Optional)
The Sea Eagle Seat Bag fits
neatly under the WS2505
aluminum seat. Peel off the
velcro flap on top of the bag and
wrap around the WS2505 seat.
Secure the velcro flap on the
other side of the WS2505 so
that the bag rests on the floor
below the WS2505 seat.
Bow Bag (Optional)
Your Sea Eagle Bow Bag
attaches to the rope lacing or
grommets on our transom boats.
Comes with a convenient velcro
flap and wide zipper.
Deluxe Sportboat Seat
(Optional)
Unzip the zippers on the side of
the seat to reveal the one way
valves. This seat should be
inflated so that the chamber can
be pushed in about 3/4” with
moderate effort. It is not
designed to hold the same air
pressure as the hull chambers. (This wouldn’t be too comfortable either!)
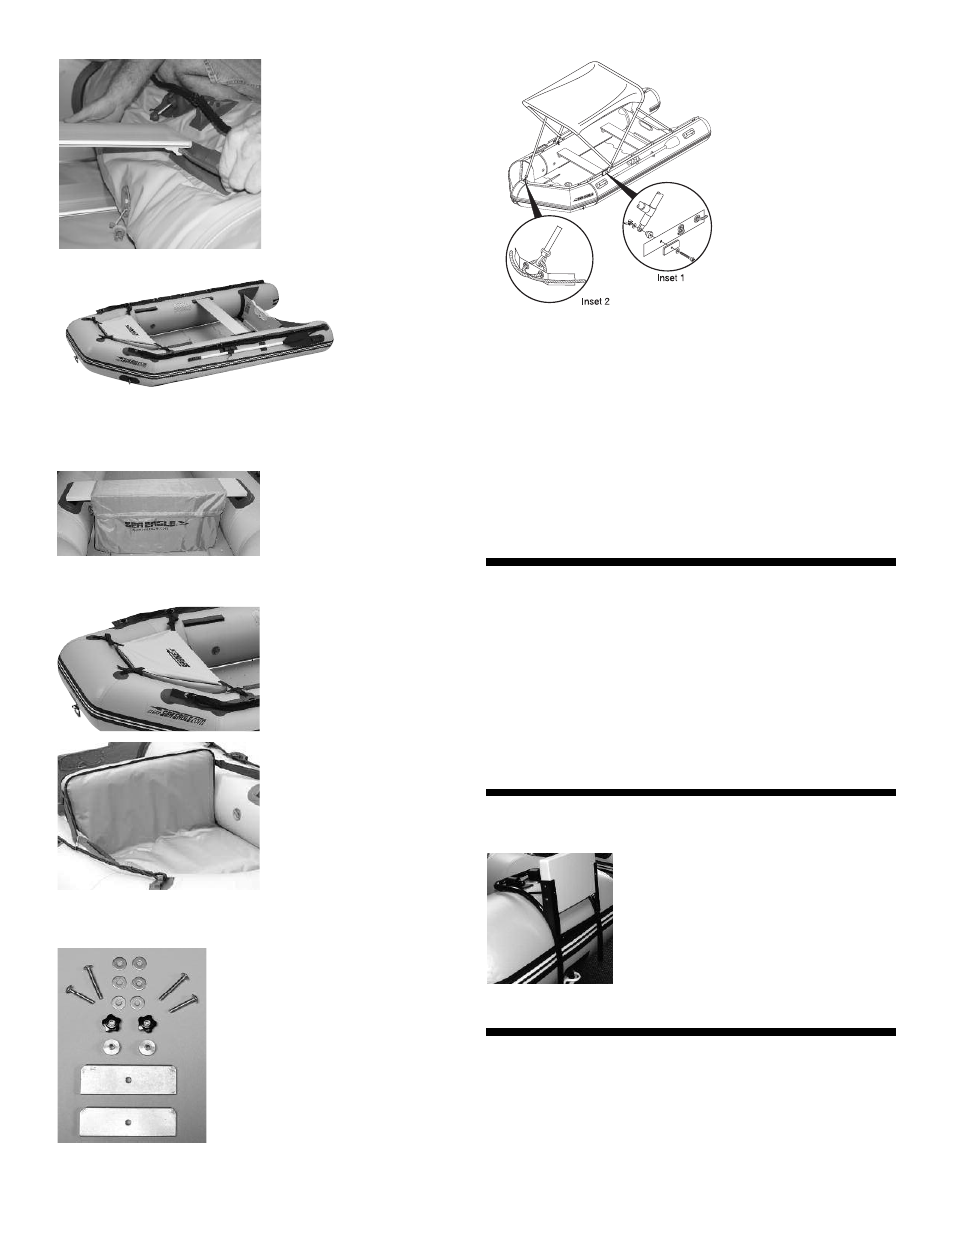
Sea Eagle Sun/Rain Canopy (Optional)
All the parts shown at left are included
with your hardware bag. The longer
screws are used for our motormount
boats and are not needed.
1) Insert aluminum v-brace rods so that
aluminum tubing is all con nect ed as
shown in the diagram below.
2) Locate the hole in the material flange
on your boat. This will be between the
front carry handle and oarlock.
3) Place canopy rods
on the inside of the
blue material flange as
shown in inset 1 on
the right. Make sure
that the single nylon
strap on the canopy is
pointed to wards the
front and the two
straps are pointed
towards the back of
the boat.
4) Place aluminum
panel on the outside
of the material flange.
5) Thread one short
screw through one of the aluminum plates, put the brass insert into
the inside of the plastic tab at the end of bottom aluminum tubing.
Push the screw (now threaded through the aluminum plate) through
the hole in the material flange into the plastic tab with the insert in it as
shown. Tighten knurled nut to secure the canopy to the oarlock.
Repeat for other side.
6) Clip the front strap of the canopy to the rope lacing going through
the material flange at the bow of the boat. Some boat models do not
have a material flange in the bow. In that case, attach the front strap
to the bow lifting handle. Attach the two back straps to roping abeam
the transom.
7) Tighten straps so the canopy is level and tightly fitted.
Motor installation
Sea Eagle recommends short shaft (15”) outboard motors for our
transom boats. Longer shaft motors can be used on all of our boats,
but they will require a greater depth of water. Do not exceed the
maximum rated HP for your boat.
Read the instruction manual supplied by the outboard motor
manufacturer. All outboards are slightly different, and some require
special installation procedures. Below is a general outline:
• Set the motor on tilt and tilt the mounting bracket.
• Place the motor in the center of the transom.
• Screw the mounting brackets securely to the transom.
Bow Motormount for 8.10 YT, 9.2 SR &
10.6 SR (Optional)
With your boat fully inflated, place the bow
motormount on the bow of your boat.
Carefully trace around the black grommets
with a pen. Apply glue to the marked area of
the boat and to the bottom of the grommets.
Leave exposed to air for about 5 minutes or
until glue becomes tacky in appearance.
Carefully place the grommets on the hull
exactly as you have marked the hull. Apply a
weight and let dry for 12 hours before attaching motormount.
State and Local Reg is tra tion
Because your Transom Boat is used with a motor, you will be
required to register it. Your State Dept. of Mo tor Vehicles will assign a
reg is tra tion number that must be dis played near the bow of your boat.
Hint: instead of ap ply ing the reg is tra tion num bers di rect ly on the boat
where they may fall off or fade, apply them to a piece of wood or
plastic which you tie to the rope lacing on the boat. You will be re -
quired to pro vide the cer tif i cate of origin (MSO), which will be included