Lindhaus CH pro 38 eco FORCE User Manual
Page 6
1
2
3
4
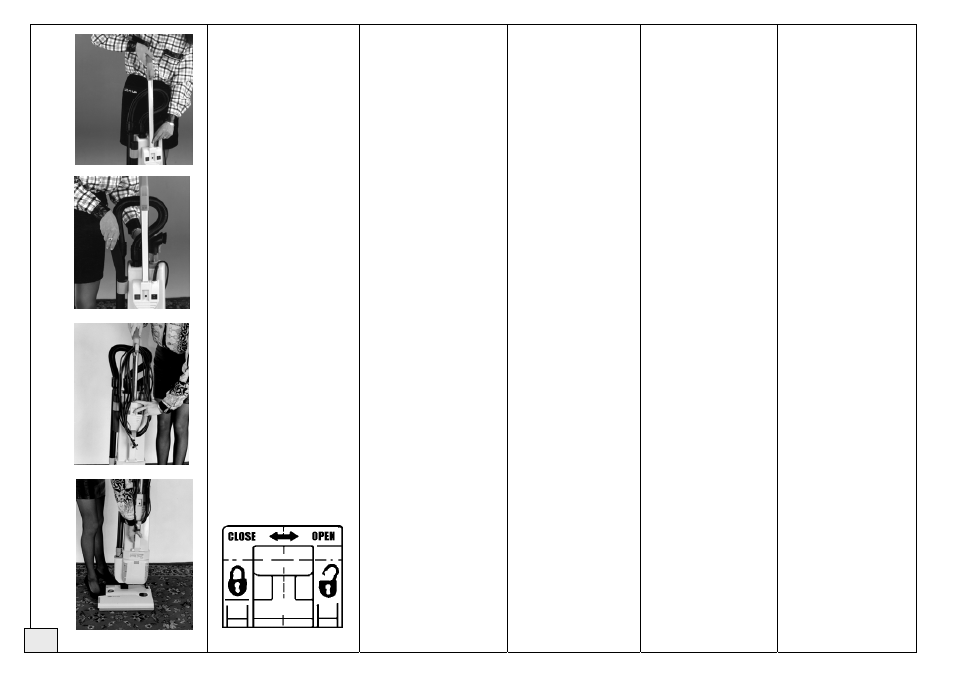
ASSEMBLY INSTRUCTIONS
Insert the chrome handle into the hole
in the top of the switch housing. Push
down until the button snaps into the
proper position.
Insert the one end of the vacuum hose
into the top of the vacuum body and the
other into the extension wand provided.
Insert the wand into the hole and clip
on the right side of the machine. Snap
the hose into the clip below the handle
as shown.
Wind the electrical cord around the
cord hook on the handle and the swing
out cord hook on the front of the
machine. To release the cord, push the
buttons between the switch and bag full
light and push the handle down. Slide
the handle back into the locked position
before using the machine.
Install the bag housing on the brush
housing and slide the lock to the left as
shown and screw the enclosed safety
screw.
ISTRUZIONI PER LA MESSA IN
FUNZIONE
Inserire il tubo cromato nell’apposita
sede e premere fino a quando il
pulsante scatta nell’apposita sede.
Inserire i tubi e gli accessori nelle
apposite sedi e clip di sostegno.
Avvolgere il cavo tra i ganci
avvolgicavo superiore e inferiore
situati nel retro della macchina. Per
sganciare il cavo dagli appositi
agganci premere i pulsanti e spingere
l’impugnatura verso il basso.
Riportare l’impugnatura in posizione
di blocco prima di usare la macchina.
Inserire il corpo aspirante nello snodo
e leva di supporto e spostate il gancio
di bloccaggio in posizione “close” e
avvitare la vite di sicurezza in
dotazione.
MONTAGE
Die verchromte Führungsstange
in die Öffnung des Sauggeräts
einsetzen und hinunterdrücken bis
der Arretierknopf einschnappt.
Saugschlauch in die zwei dafür
vorgesehenen Öffnungen stecken
und in den Halterungen am
Handgriff und an der Seitenwand
befestigen.
Netzkabel vom Kabelhaken
nehmen und an der Steckdose
anschliessen. Das aufgewickelte
Netzkabel kann schnell vom
Haken gelöst werden, indem die
Arretierknöpfe gedrückt werden
und die Führungsstange nach
unten geschoben wird, bis der
Knopf einrastet.
Den Saugkörper auf das
Bürstengehäuse setzen und die
Verriegelung nach links in
Position “close” schieben und die
beigelegte Sicherheitsschraube
anschrauben.
MONTAGE
Introduire le tube chromé dans son
logement le pousser vers le bas
jusqu’à ce que le bouton de
blocage s’encastre.
Introduire les tubes d’aspiration et
les accessoires dans leurs
logements en utilisant les clips de
soutien.
Enrouler le câble d’alimentation
autour des crochets derrière
l’appareil. Pour décrocher le câble,
il suffit d’appuyer sur le bouton et
pousser la poignée vers le bas.
Remettre la poignée en position de
blocage avant d’utiliser l’appareil.
Introduire le corps aspirant dans le
raccordement et le levier de
support et mettre le crochet
blocage en position «close» et
visser la vis de securité en
dotation.
INSTRUCCIONES PARA EL
MONTAJE
Introduzca el tubo
cromado dentro
del hueco que está encima del
interruptor. Empuje hacia abajo
hasta que el botón encaje en el
hueco que está entre el interruptor y
el indicador de bolsa llena.
Introduzca una extremidad del tubo
flexible en su lugar encima del
cuerpo aspirante y otra en el tubo
telescópico. Fijar el tubo con los
ganchos adecuados al lado derecho
de la máquina y debajo de la
empuñadura.
Enrolle el cable alrededor del
gancho superior e inferior. Para
soltar el cable, pulse el botón que
está situado entre el interruptor y el
indicador de bolsa llena. Poner la
empuñadura en posición de
bloqueo, antes de usar la máquina.
Conectar la aspiradora al cepillo
eléctrico y mover el gancho de
bloqueo en posición “close” y
atornillar el tornillo de seguridad en
dotatión.
6