Marshall Electronics MXL Genesis SE User Manual
Page 3
Switches
The Genesis-SE features switches
for both bass roll-off and a -10dB
pad. The bass roll-off is set to 6dB
per octave at 150 Hz. This can
reduce proximity effect if required.
Proximity effect is the change of
frequency response as the recorded
source is brought closer to the
microphone. With vocals, this usually
manifests itself as an increase in
low frequency content as one gets
closer to the microphone. The
-10dB pad effectively reduces
possible overloading of the
microphones internal circuitry at
high SPLs.
Power Requirements
IMPORTANT -This unit requires
the use of the dedicated power
supply included in the package. This
supply is switchable between 115
volts and 230 volts AC. In North
America the microphone ships
in the 115 volts AC position and
in the 230 Volts AC position for
export. However, you always want to
ensure that the power supply
voltage is correctly set for your local
voltage as permanent damage to the
microphone and/or power supply may
occur if the incorrect voltage setting
is selected. Every MXL
®
microphone
has been thoroughly checked before
shipping; so if you hear no sound,
check that the power supply is
switched on.
Caution
Do not “hot plug” the mic. Always
ensure that the power supply is off
when plugging and unplugging the
included seven-pin cable from the
microphone to avoid damaging the
microphone and power supply.
Care
Dust and foreign material can
degrade the performance of a
microphone over time so always
store the unit in its case. It is
highly recommended to use the
specially designed Genesis-SE pop
fi lter when recording vocals.
Features
Accessories
Continued on page 3
2
Pop Filter
The Genesis-SE comes with a
custom 24k gold-plated pop fi lter
which should be used anytime the
microphone is being used to
record vocals. The pop fi lter not
only eliminates plosives (those
“popping Ps”), it helps collect
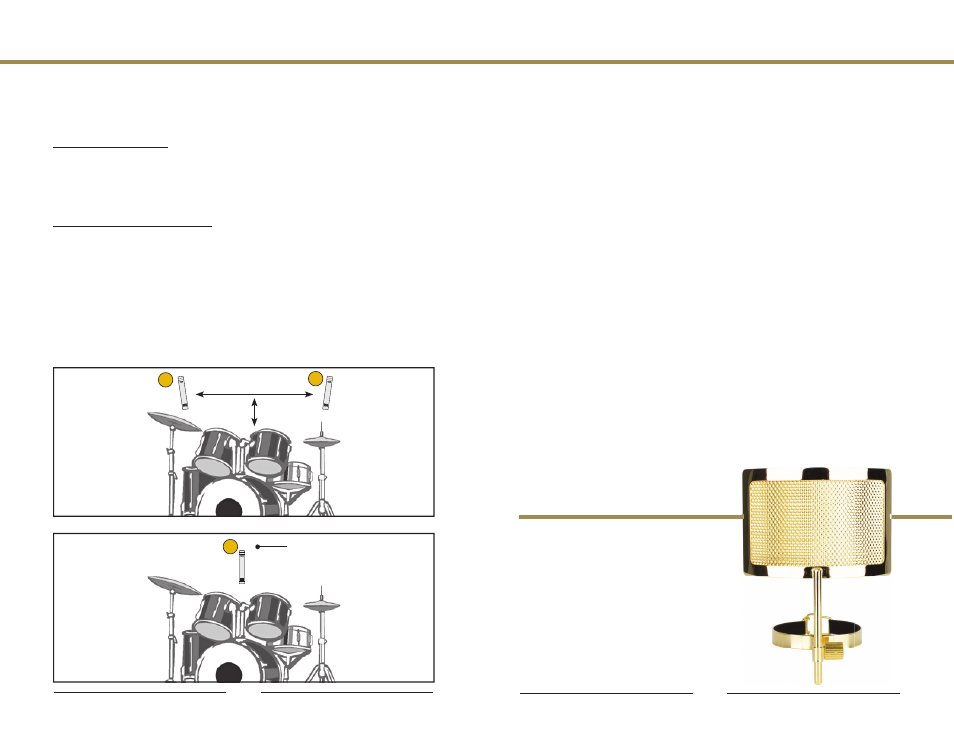
Recording a Drum Set
Like the piano, capturing the drums can be quite a challenge, if for no other
reason than the fact that you must be very careful to avoid positioning the
microphone(s) where they could be hit! Ideally you’ll want a minimum of two
microphones for this job, though a single microphone can be employed.
Stereo Overhead Pair: Position the two microphones approximately 16 - 20
inches above the performer’s head - separated laterally by roughly 2 - 3 feet
and placed 5 – 6 feet out in front of the drum kit. Adjust the two microphone’s
Pan position so that you achieve a good stereo spread, though generally not
hard left and right. (see Fig. 5A)
Single Overhead Microphone: Position the microphone approximately 16
- 20 inches above the performer’s head - centered in front of the drum set,
and placed 5 - 6 feet out in front. The microphone’s Pan position should be
centered for mono drums. (see Fig. 5B)
For best results, record the drums in as acoustically “dead” a room as you
can. If the room is live, the sharp attack transients of the drum kit will only
become that much more diffi cult to capture if the room has hard, refl ective
surfaces - resulting in a muddy sound without any real defi nition. Further, you
should always record the drums dry and add signal processing after the fact.
9
2
1
1
Fig. 5A
2-3 Ft. apart
16-20” above performers head
Front View
Fig. 5B
16-20” above performers
head
Front View