Marshall Electronics MXL Genesis SE User Manual
Page 5
Recording the Piano
The piano is one of the most challenging instruments to record, and many
problems stem from the quality and maintenance of the instrument itself.
You’ll obtain the best results by using an instrument that has just been tuned
and is in good mechanical condition.
The piano is generally recorded using close miking technique. Ideally, you’ll want
a minimum of two microphones. Usually, the microphone capturing the higher
strings is assigned to the left channel and the microphone capturing the lower strings
is assigned to the right channel in the final stereo mix, though the stereo spread
generally is not hard left and right. While a single microphone can be used,
the lower and upper extremities of the instrument will likely be compromised.
Grand Piano: For the upper strings, position the microphone approximately 8
inches from the piano hammers (to reduce mechanical noise) and 8 - 11 inches
above the strings, with the Pan position set to left of center. For the lower strings,
position the microphone toward the far end (away from the keyboard) roughly
6 - 12 inches from the end and 8 - 11 inches above the strings, with the Pan
position set to right of center. Position the piano’s lid at full stick. (see Fig. 4A)
If you are using a single microphone, position the microphone approximately
8 inches from the piano hammers (to reduce mechanical noise) and 8 - 11
inches above the strings - centered over the piano’s mid point. Pan position
should be centered and the piano’s lid should be at full stick.
Upright Piano: With an upright piano, the two microphones are generally
placed either just over the top of the piano with the top open, or you
can remove the piano’s front panel beneath the keyboard and place the
microphones below.
7
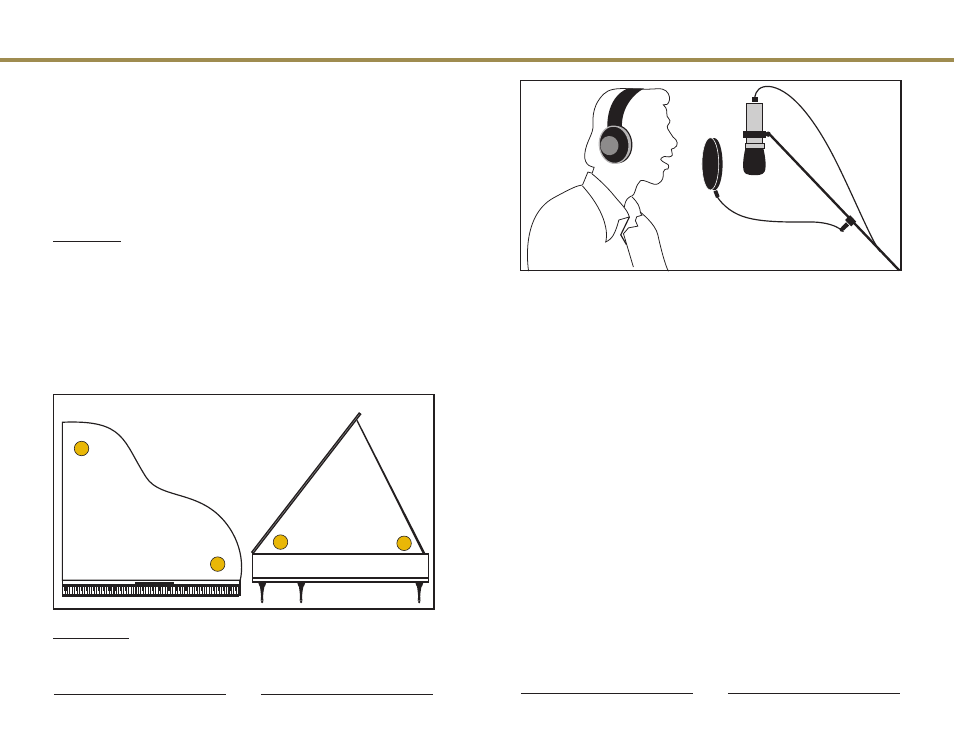
Recording Vocals and Dialog
Ideally, you want to record vocals in a relatively “dead” room. If you clap your
hands and get an echo effect, you should consider adding some carpet,
blankets, drapes, or other sound absorbing materials. On that note, make
every effort to avoid getting too close to the room’s walls. These hard,
reflective surfaces can easily complicate the recording process. Move your
mic setup toward the room’s center.
Generally, you should position the vocalist roughly 6 - 8 inches away from
the microphone. Getting too close to the microphone tends to increase bass
response and can create problems with plosive sounds - those
popping Ps, Bs, Ds, and Ts (more on this in a moment). Getting too far
away makes the microphone more subject to picking up room ambience -
a sound that creates the effect of the vocalist being in a bowl. While
vocalists may need to move about in order to hit those high notes, make
every effort to maintain a constant distance from the microphone, as this
will provide the greatest tonal balance. (see Fig. 1) For the most part, the
microphone’s axis (or center line) should aim toward the nose and mouth
to obtain the fullest sound. It’s not a bad idea, however, to experiment
angling the microphone slightly away from dead center so as to help minimize
plosives. Further, you should always place a “pop” filter between the vocalist
and the microphone, with the pop filter positioned 3 - 4 inches in front of the
microphone. This will greatly increase your ability to achieve the most natural
sounding recordings with minimal interference from plosive sounds. Fixing
plosives with audio editing software often creates more of a problem than the
plosive itself. Use of a pop filter will also protect your microphone’s sensitive
capsule - keeping it free from moisture caused by saliva projecting from the
performer’s mouth, and breath condensation. Remember… Good
microphone technique, proper positioning, and use of a pop filter can make
all the difference between a so-so vocal recording and a great one.
Fig. 1
4
Fig. 4A
Top View
or a single mic here
*
2
Front View
or a single mic here
*
2
1
1