Marshall Electronics MXL Genesis SE User Manual
Page 6
Recording an Amplified (Electric) Guitar
6
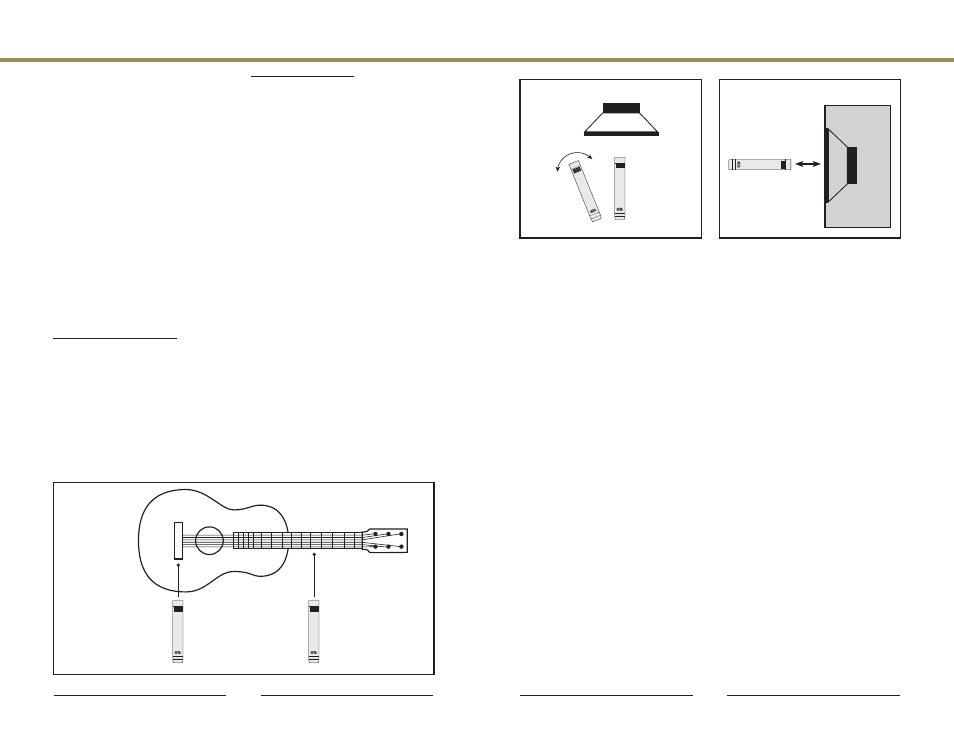
Mic is aimed
directly at center
of loudspeaker
Top View
Fig. 3
Mic is positioned
4” from grill
Side View
4”
While the electric guitar can certainly
be recorded directly, there are times
when there is simply no substitute for
the sound of a real amplifier. Guitar
amps have particular gain stages
that facilitate the popular “crunch”
guitar sound. While digital modeling and
processing systems certainly have
their place, they may not have the
same level of realism as the sound
from an amplifier. A small guitar
amp can be just as effective for this
application as a stack, because you
don’t necessarily need to “crank” the
volume. Instead, you want to increase
the amp’s initial gain to achieve the
desired amount of overdrive.
Typically, a guitar amp is close miked
to achieve the highest direct sound.
Placing the microphone roughly 4
inches from the grill, aimed directly
at the center of the loudspeaker will
produce the most “edge” to your
sound. By angling the microphone
slightly off axis and towards the wall,
you can add more “room sound.”
Experimentation is a key factor in
achieving the sound you are looking
for. (see Fig. 3)
Placement of the amp is another
important factor. If the amplifier sits
on a carpeted floor, you are more
likely to reduce the amount of
brightness in the sound. Similarly,
elevating the amplifier off the floor may
result in a loss of low end. If you’re
looking for a big reverberant tone,
placing the amp and microphone
in the bathroom is another popular
technique. The hard tiles and other
reflective surfaces can do wonders
for a dull sound. In this case, move
the microphone back a few feet from
the loudspeaker and crank it up!
Recording Acoustic Guitar
While it may seem obvious, your best
results for capturing the acoustic
guitar (or any similar stringed
instrument for that matter) begin with
a properly tuned instrument and
strings that, while not old, aren’t so
new so as to create tuning issues
due to stretching.
There are two optimum points for
microphone positioning - either near
the bridge or by the twelfth fret.
While it may seem natural to place
the microphone in front of the
instrument’s sound hole, doing so
usually increases low frequency
response to the point of making the
instrument sound “boomy.”
Twelfth Fret Placement: Placing the
microphone roughly 2 - 4 inches from
the twelfth fret and aimed directly at
the strings will generally produce a
warm, full bodied sound with good
tonal balance. Using this technique,
the sound hole’s contribution will be
moderated since the microphone is
not pointed directly at it.
Bridge Placement: Similarly, you
can position the microphone so it is
3 - 6 inches from the guitar’s
bridge. This will generally produce a
somewhat brighter tonal quality. You
should also be prepared to experiment
positioning the microphone slightly
off-axis should you find yourself
capturing too much low frequency
response from the guitar’s sound
hole.
The acoustical characteristics
of your room will also have a
pronounced effect on your results.
A “live” room will produce an
overall “brighter” guitar sound, while
a “damped” room will produce more
of a mellow tone. If you have two
microphones, you may wish to
experiment using one in close
proximity to the guitar as previously
described, with the second
microphone on a stand a few
feet away to capture the room’s
ambience. Blending the two sources
can produce excellent results.
5
Fig. 2
Bridge Placement
12th Fret Placement