Marshall electronics, M-lynx-702w / menu settings, Menu settings – Marshall Electronics M-LYNX-702W User Manual
Page 4
6
Marshall Electronics
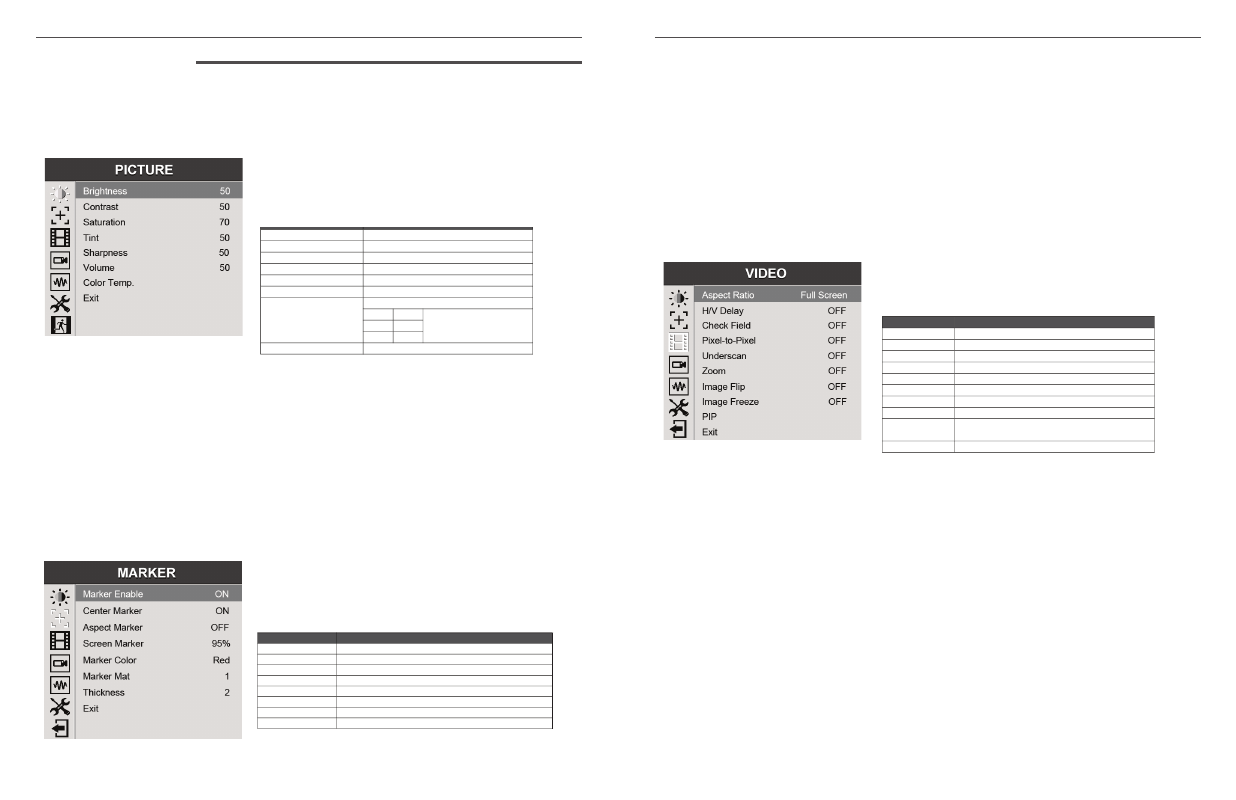
Brightness – used to establish the correct black level in the picture
Contrast – establishes the range of dark to light areas in the picture
Saturation – sets the amount of color information in the picture.
Tint – this function is designed to remove color errors in composite analog (NTSC, PAL) signals. A better
choice for component and digital signals is to use Color Temp / User to establish the correct color tones
Sharpness – adds synthetic “detail” to the image. HD images should require very little added sharpness
Volume – controls the Headphone volume
Color Temp – this setting provides three different presets for white balance approximating different
common color “temperatures”. More precise white balance may be obtained by selecting the User setting
and adjusting Red, Green or Blue highlights as desired.
Marker Enable – this is the master control to turn all markers on or off.
Center Marker – places a “+” mark in the exact center of the display. (Useful for checking camera or
graphics positioning.)
Aspect Marker – places borders on screen representing various typical video and cinema aspect ratios.
This does not change the displayed aspect ratio. That setting is in the Video menu.
Screen Marker – places a border around the edge of the screen to be used as a guide during video
production.
Marker Color – the Center, Aspect and Screen marker colors can be changed.
Marker Mat – changes the background just behind the markers.
Thickness – sets the width of the markers. Adjust as desired for best visibility.
Aspect Ratio – allows changing the aspect ratio (shape) of the picture to match the incoming video.
Settings are available for various video and cinema styles.
H/V delay – shifts the picture vertically and horizontally to allow viewing the vertical and horizontal blanking
areas
Check Field – displays the picture in monochrome (black & white) or in individual primary colors. Useful for
color analysis and trouble shooting.
Pixel-to-Pixel – displays the incoming video with a 1:1 pixel match. This provides the clearest resolution
but usually changes the size of the image. This turns of up/down “scaling”. For example: a video input that
has fewer pixels than the LCD display will appear to shrink while a video input that has more pixels will
appear to expand. In either case, the image is shown in it’s “true” resolution.
Underscan – shrinks the image slightly to allow viewing the edges.
Zoom – expands the picture digitally. It is normal for picture quality to degrade as the picture is expanded.
Image Flip – the picture can be reversed top to bottom, left to right or both. This can be a useful tool when
viewing images shot through mirrors or from cameras mounted upside-down.
Image Freeze – holds the current picture on screen.
PIP – Picture-in-Picture functions consist of two images on the screen at the same time. One image must
be from a digital source (HDMI, SDI) and the other image must be from an analog source (YPbPr, Video).
1. PICTURE
This page provides controls for typical picture
adjustments.
Short Cut: Most of these selections are also
directly available from the front panel by turning the Menu
knob without pressing it first.
3. VIDEO
This page provides controls for picture size, position and
related functions including image flip, image freeze and
Picture-In-Picture (PIP).
2. MARKER
This page offers controls for setting various on-screen
markers.
Press MENU knob on the monitor and function menus will pop-up on the screen. Rotate left or
right to select an option. Then press the knob again to open the selection. When an arrow pointer
appears in the menu, turn the Menu knob again to access the item or to confirm a selection.
7
M-LYNX-702W / Menu Settings
2. MENU SETTINGS
Brightness – used to establish the correct black level in the picture
Contrast – establishes the range of dark to light areas in the picture
Saturation – sets the amount of color information in the picture.
Tint – this function is designed to remove color errors in composite
analog (NTSC, PAL) signals. A better choice for component and digital
signals is to use Color Temp / User to establish the correct color tones
Sharpness – adds synthetic “detail” to the image. HD images should
require very little added sharpness
Volume – controls the Headphone volume
Color Temp – this setting provides three different presets for white
balance approximating different common color “temperatures”. More
precise white balance may be obtained by selecting the User setting and
adjusting Red, Green or Blue highlights as desired.
2.
MARKER
This page offers controls for setting various on-screen markers.
9
ITEMS
OPTIONS
Marker Enable
ON / OFF
Center Marker
ON / OFF
Aspect Marker
OFF/ 16:9 / 4:3 / 14:9 / 13:9 / 15:9 / 1.85:1 / 2.35:1
Screen Marker
OFF / 95% / 93% / 90% / 88% / 85% / 80%
Marker Color
Red / Green / Blue / White / Black
Marker Mat
OFF / 1 – 6
Thickness
1 – 7
Exit
ITEMS
OPTIONS
Brightness
0 - 100
Contrast
0 - 100
Saturation
0 – 100
Tint
0 – 100
Sharpness
0 – 100
Volume
0 – 100
Color Temp
6500ºK/7300 ºK/9300 ºK/User
Red
0-255
When User is selected,
Red, Green and Blue
adjustments are available
Green
0-255
Blue
0-255
Exit
ITEMS
OPTIONS
Aspect Ratio
Full screen / 4:3 / 16:9 / 1.85:1 / 2.35:1
H/V delay
OFF / H&V / H / V
Check Field
OFF/ Mono / Red / Green / Blue
Pixel-to-Pixel
ON / OFF
Underscan
ON / OFF
Zoom
OFF / Ч2 / Ч4 / Ч6 / Ч8
Image Flip
OFF / H&V / H / V
Image Freeze
ON / OFF
PIP
Small, Medium, Large PIP (picture-in-picture).
PBP (picture-by-picture)
Exit