Marshall electronics, M-lynx-702w / specifications – Marshall Electronics M-LYNX-702W User Manual
Page 6
10
Marshall Electronics
Backlight – adjusts the brightness of the LCD backlight. This is different from the “Brightness” control.
Backlight is adjusted to compensate for room lighting without upsetting Contrast and Brightness
adjustments.
Reset – sets all menu items back to the way the unit ships from the factory.
OSD – adjusts the position of the on-screen display messages and menus. The amount of time menus
remain on screen can also be adjusted.
IP Config – opens a sub-menu where the monitor’s IP address can be set.
System – displays status messages only. There are no adjustments
ISP – works with the application on the enclosed CD to allow firmware updates
USER FUNCTION SHORT CUT (F1 – F4) MENU
USER FUNCTION SHORT CUT (F1 – F4) MENU
The monitor front panel has four special function keys marked F1 through F4.
These are pre-programmed as short cuts keys per this table:
FUNCTION KEY
STANDARD SHORT CUTS
F1
Peaking
F2
Waveform / Vector
F3
Audio Bars & Phase Scope
F4
Histogram
These function keys may be re-programmed at any time by first pressing the
function key for about three seconds. The function key menu will appear at the
right side of the screen. Simply rotate the Menu knob to the desired function
short cut and press the Menu knob to make the selection.
One of the following shortcuts may be programmed to each function key:
OPTIONAL SHORT CUTS
Screen Marker
Image Flip
Peaking
Aspect Marker
Zoom
False Color
Check Field
Pixel-to-Pixel
Exposure
Color Bars
Image Freeze
Histogram
Aspect Ratio
Underscan
Audio Meter
PIP
H/V Delay
Waveform
Please refer to the individual menu pages above for details about these
functions.
1. DC 12V Power adapter
2. CD with remote operation application
3. Operations Manual
11
M-LYNX-702W / Specifications
The monitor front panel has four special function keys marked F1 through F4.
These are pre-programmed as short cuts keys per this table:
These function keys may be re-programmed at any time by first pressing the function key for about
three seconds. The function key menu will appear at the right side of the screen. Simply rotate
the Menu knob to the desired function short cut and press the Menu knob to make the selection.
One of the following shortcuts may be programmed to each function key:
Please refer to the individual menu pages above for details about these functions.
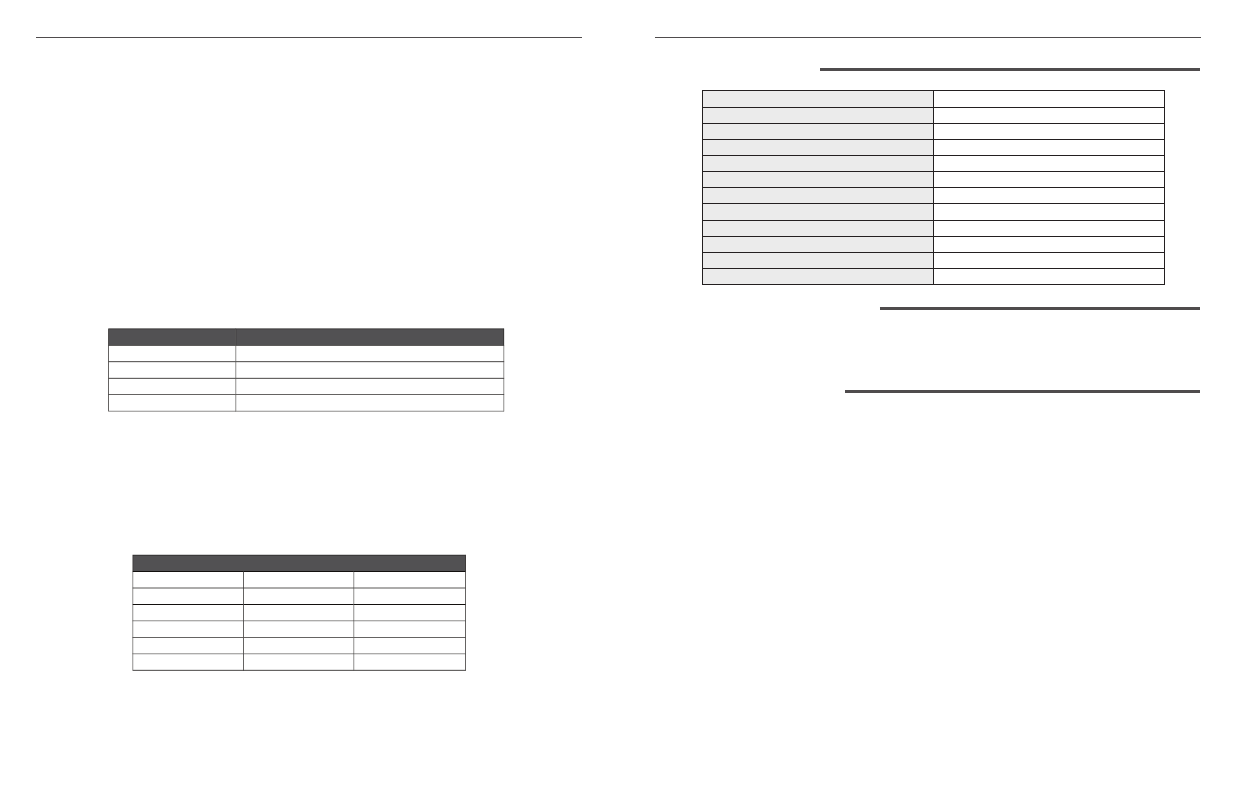
3. SPECIFICATIONS
4. INCLUDED ACCESSORIES
5. TROUBLESHOOTING
Panel Size
7 inch x 2
Panel Resolution
1280 × 800 pixels
Brightness
400 cd/m
2
Contrast
800: 1
Viewing Angle
178° / 178°(H/V)
Input Voltage
DC 12V
Input Signal
HDMI, SDI, YPbPr & Video
Power Consumption
≤24W
Operating Temperature
-20
0
C~60
0
C
Storage Temperature
-30
0
C~70
0
C
Dimension W/H/D
19” x 5” x 1” (482.5Ч132Ч25mm)
Weight
5.8lbs (2.65Kg)
1. Power on but no picture:
Check whether the cables are correctly connected. Also, please use the standard power adapter
coming with the product package or other power supply with the correct voltage and pin
configuration.
2. Only black-and-white display:
Check whether the color saturation and brightness are properly set.
If using YPbPr connections, be sure three cables are connected properly
Access the Video menu and make sure Check Field is Off
3. Wrong or abnormal colors:
Check whether the cables are correctly connected. Broken or loose pins of the cables may cause
a bad connection. If using YPbPr connections, check that the source device is set for Component
(YUV) not RGB. Access the CAMERA AUX & AUDIO menu page and check that the False Color
mode is OFF.
4. Picture is “stuck” on screen:
Access the Video menu page and check that IMAGE FREEZE is off.
5. Other problems:
The monitor can be reset to Factory original settings. This is sometimes useful to eliminate the
possibility that an improperly set menu item is interfering with the operation. To reset the monitor,
access the “SETTING” menu page, press the Menu knob then rotate left or right to select “Reset”.
Press the knob once then rotate the knob to cause the unit to reset.