Single unit configuration – Rose Electronics UltraMatrix Remote 2 User Manual
Page 14
8
ULTRAMATRIX REMOTE 2 INSTALLATION AND OPERATIONS MANUAL
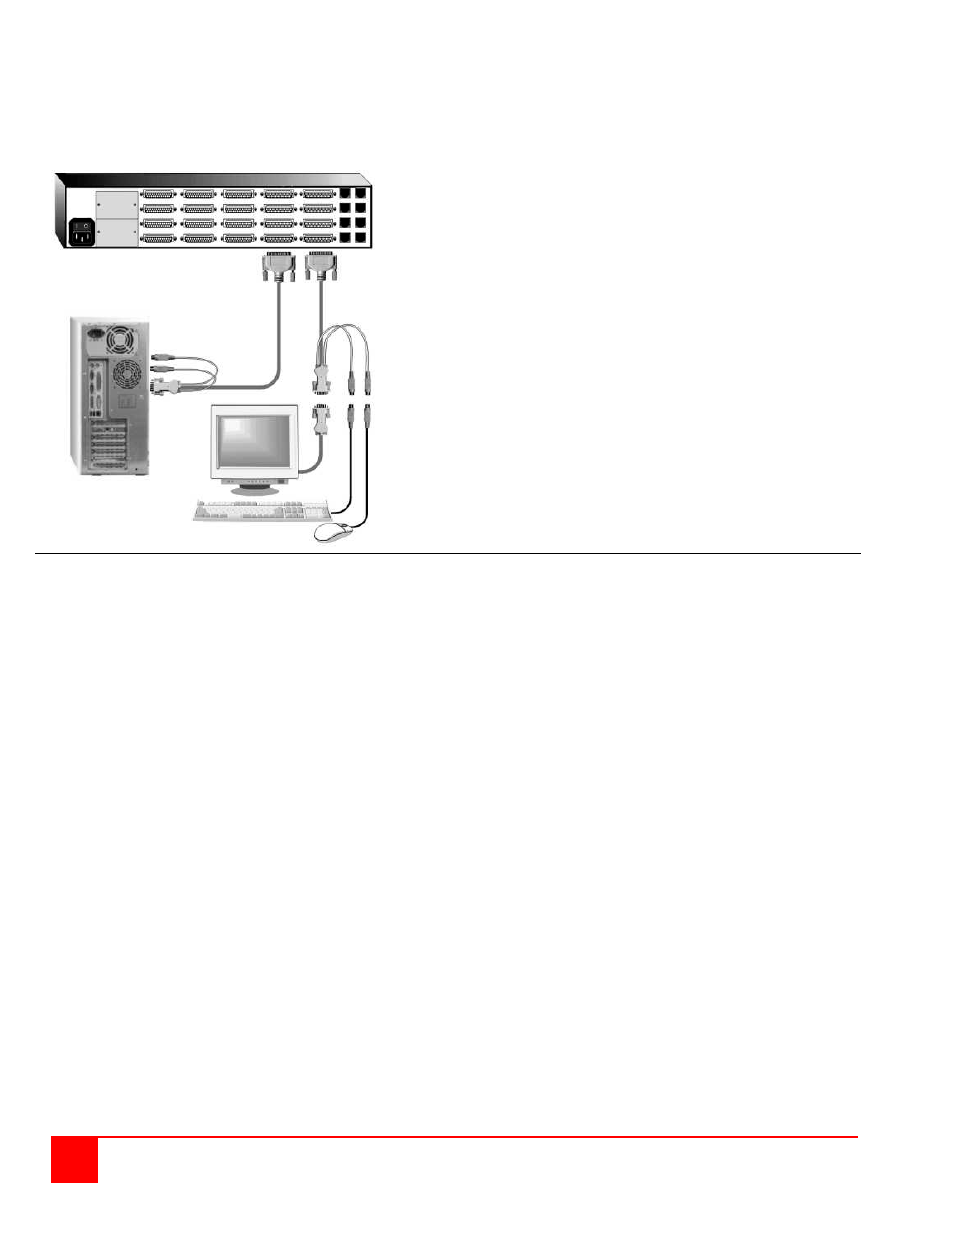
Single Unit Configuration
Perform the below steps for all computers that will be connected. It is recommended that all computers be powered
off. When a computer is connected and then booted, the UltraMatrix Remote 2 will automatically determine the
keyboard and mouse types used for that computer and no pre-configuration is needed.
Connect a KVM station to the KVM #1 port using the
KVM adapter cable.
Connect all computers to their assigned CPU port using
the appropriate CPU adapter cable.
(Computer and UltraMatrix Remote 2 power should be
OFF)
If removing power from a computer is not practical, pre-
configure the UltraMatrix Remote 2 to define that CPU
port’s keyboard and mouse types. This procedure
should only be done if the CPUs keyboard and mouse
can be disconnected and re-connected without affecting
the interface.
The default keyboard type is PC mode 2, and the default
mouse type is PS/2. If the computer being connected,
with power applied, uses a PC2 keyboard and PS/2
mouse, no pre-configuration is needed. If not, pre-
configure the keyboard and mouse types for that CPU
port before connecting the computer (steps 4a-4f).
Following are a few items to consider prior to installing or configuring the UltraMatrix Remote 2:
Identify the computers that do not use a PC2 type keyboard and a PS/2 mouse (default settings). Before
connecting these computers to a CPU port, the CPU port should be pre-configured to change the default keyboard
(PC mode 2) and mouse (PS/2) types to the correct types.
Each computer can be assigned a unique computer name. Names like staff, marketing, and finance that make it
easy to identify and connect to.
The default computer names are Computer x (x = 1 – 1,000)
The KVM stations can also be assigned a unique KVM name.
The default KVM names are KVM x (x = 1 – 4)
Access to the system set-up and configuration can be limited by assigning a configuration password.
Access to the computers can be limited by assigning each user a unique user ID and password and configuring
the switch module to require a login.
The configuration of the System, Computers, KVM stations, Users, Profiles, and Groups are defined in the menu
section.
Perform the following installation steps for each computer that will be connected to the UltraMatrix remote 2.
Sequentially connect the computers starting with computer #1.
STEPS: (Refer to the troubleshooting section for help if needed)
1. Connect all KVM stations to the KVM switches DB25F, KVM connectors using the appropriate KVM adapter
cables.
2. Turn on all KVM stations video monitors and the UltraMatrix remote 2.
3. Switch KVM station #1 to the CPU port being configured (starting with CPU port #1). This is done by pressing and
releasing the left control [Ctrl] key and within 2 seconds, type in the CPU port # being configured (starting with port
1) and press [Enter]. A connection dialog box will display showing the connection status.
4. Pre-configure the CPU port, if needed, as outlined in steps 4a-f if the computer being connected does not use a
PC2 type keyboard or a PS/2 mouse (defaults). Pre-configure the CPU port before connecting the computer. If the
computer uses a PC2 type keyboard and PS/2 mouse, connect it to the corresponding CPU port and skip
procedure 4a-f. No pre-configuration is needed.