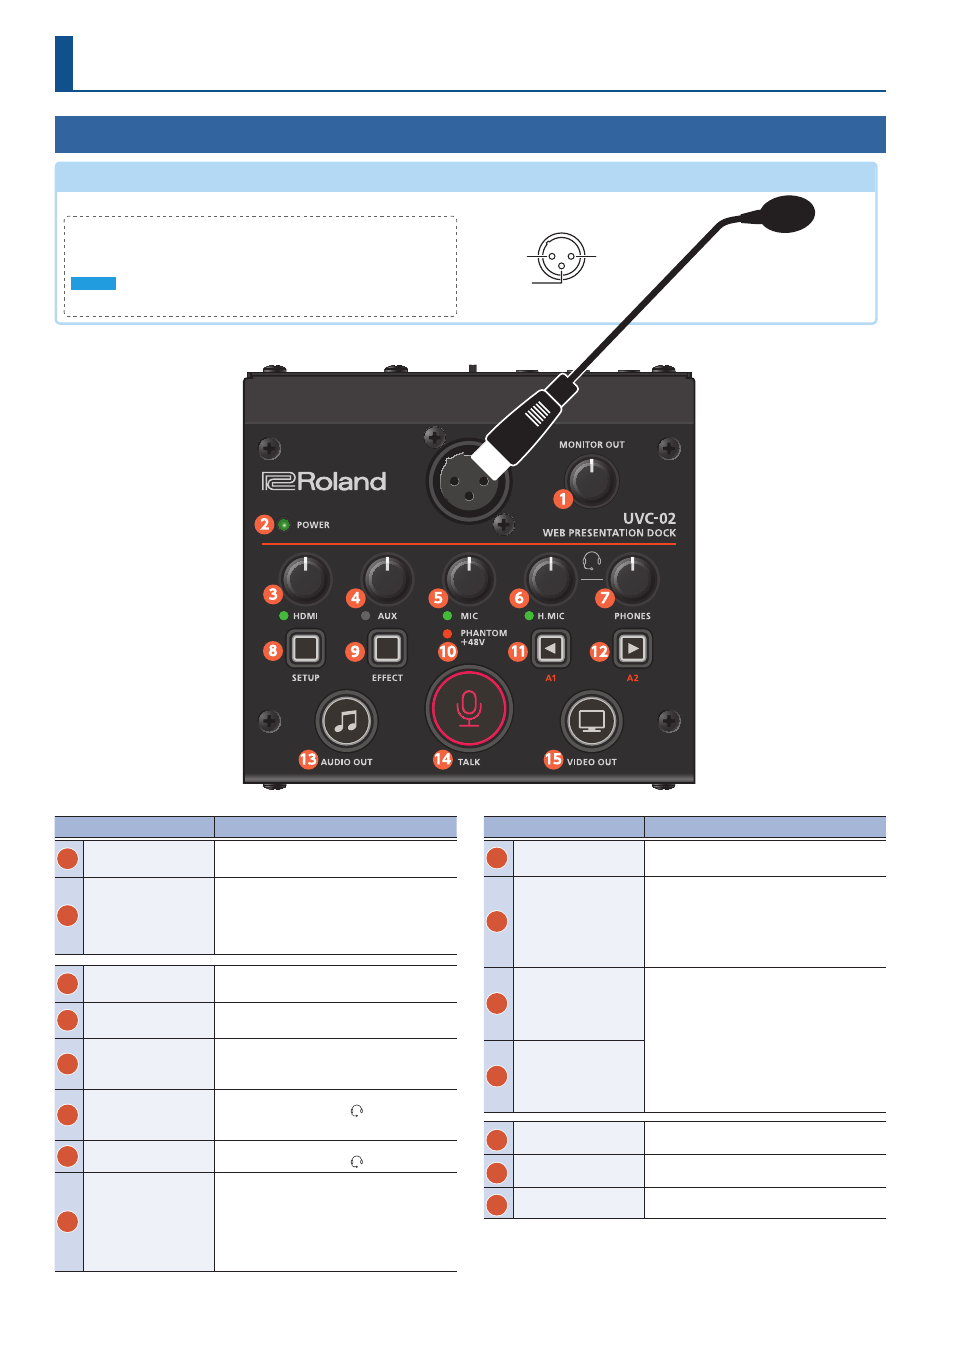
Panel descriptions, Top panel, Mic connector – Roland Web Presentation Dock User Manual
Page 2
2
Panel Descriptions
Top Panel
Name
Explanation
1
[MONITOR OUT] knob
Adjusts the output level of the MONITOR OUT
jack.
2
POWER indicator
When the UVC-02 is on, the indicator lights up
green.
* When a USB 2.0 cable is connected or in other
situations where the UVC-02 cannot operate
properly, the indicator blinks red.
3
[HDMI] knob
Adjusts the input level of the HDMI IN connector.
The HDMI indicator lights when audio is input.
4
[AUX] knob
Adjusts the input level of the AUX IN jack.
The AUX indicator lights when audio is input.
5
[MIC] knob
Adjusts the input level of the mic connected to
the MIC connector.
The MIC indicator lights when audio is input.
6
[H.MIC] knob
Adjusts the input level of the headset mic
connected to the HEADSET ( ) jack.
The H.MIC indicator lights when audio is input.
7
[PHONES] knob
Adjusts the output level to a headset mic
connected to the HEADSET ( ) jack.
8
[SETUP] button
When UVC-02 Setup Tool is installed on a computer
that connects to the UVC-02, this button shows or
hides UVC-02 Setup Tool.
* You can use UVC-02 Setup Tool to configure the
various settings.
Name
Explanation
9
[EFFECT] button
Turns the effects on/off.
* Use UVC-02 Setup Tool to configure the effects.
10
PHANTOM +48V
indicator
This indicator lights when the [PHANTOM +48V]
switch located on the rear panel is on.
* Even when you switch the [PHANTOM +48V]
switch on, the indicator doesn’t light up when a
USB 2.0 cable is connected or in other situations
where the UVC-02 cannot operate properly.
11
[A1] button
You can assign functions to this button like voice
change, as well as apply reverb and play sound
effects.
* You can configure the button’s settings using
the UVC-02 Setup Tool.
* The button assignments are as follows by
factory default.
A1: Voice change
A2: Sound effects
12
[A2] button
13
[AUDIO OUT] button
When this button is lit, the audio signals from
HDMI and AUX are output.
14
[TALK] button
When this button is lit, the audio signals from the
mic and headset mic are output.
15
[VIDEO OUT] button
When this button is lit, the video signal is output.
MIC connector
(XLR)
Use this connector for audio input. Either a dynamic or a condenser mic can be used.
Phantom Power Settings
The MIC connector can supply phantom power (+48 V). This should be switched on for
condenser mics that require phantom power. You can turn phantom power on/off using the
switch [PHANTOM +48V] on the rear panel (p. 3).
NOTE
Be sure to turn phantom power off if it’s not necessary. Dynamic mics may malfunction when
supplied with phantom power.
1: GND
2: HOT
3: COLD
1: GND
2: HOT
3: COLD
TIP: HOT
RING: COLD
SLEEVE: GND
Pin assignment