Configuring the settings (uvc-02 setup tool), About your new uvc-02 setup tool, Setup tool screen – Roland Web Presentation Dock User Manual
Page 7: Switching the functions of the [a1] [a2] buttons
7
Configuring the Settings (UVC-02 Setup Tool)
About Your New UVC-02 Setup Tool
Use the “UVC-02 Setup Tool” application running on a computer
connected via USB to configure the settings of the UVC-02. This
application lets you change the button functions, make various
settings and back up or restore the settings.
You can download the “UVC-02 Setup Tool” from the UVC-02 product
page.
https://roland cm/uvc-02/
5
Once you connect your computer on which the application is
installed to the UVC-02 by using the included USB cable,
UVC-02 Setup Tool starts up automatically.
5
You may see an onscreen message like the one shown below if
the system program of the UVC-02 is old. If this happens, click the
[UPDATE] button to update the system program of the UVC-02.
5
You can also press the [SETUP] button on the UVC-02 to close or
open the screen.
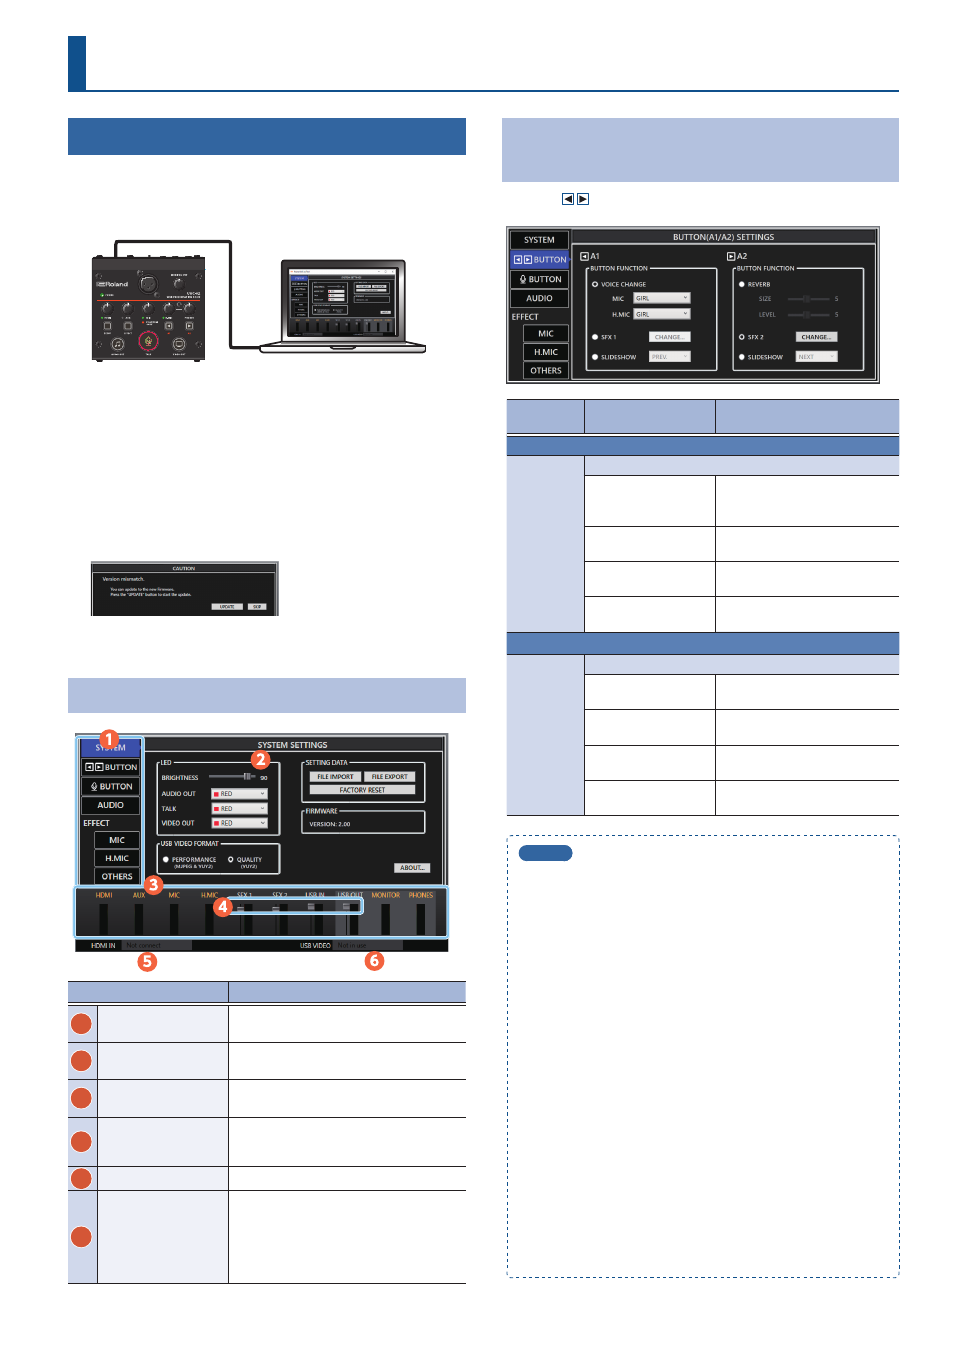
Setup Tool Screen
Name
Explanation
1
Page switcher tabs
Click on and select these tabs with your
mouse to switch between pages.
2
Settings screen
Shows the settings for each page.
3
Input/output level
meters
The level meters for each input/output.
4
Input/output sliders
Drag these sliders with your mouse to
adjust the levels for SFX1, SFX2, USB IN
and USB OUT.
5
HDMI IN
Shows the input video format.
6
USB VIDEO
“Active” is shown if the UVC-02 is being
used as a camera device by an application
on your computer.
* In the case of a format that is not supported
by this unit, it will be displayed in red. Check
the format.
Switching the Functions of the [A1] [A2]
Buttons
Click the [
BUTTON] tab to switch the page.
Menu
Value (bold text:
default value)
Explanation
A1
MODE
This selects the function assigned to the [A1] button.
VOICE CHANGE
You can select different types of
voice change for the MIC and for
the H.MIC.
SFX1
The button makes a sound effect
when pressed.
SLIDESHOW PREV.
Goes back one slide on your
computer.
SLIDESHOW NEXT
Goes forward one slide on your
computer.
A2
MODE
This specifies the function assigned to the [A2] button.
REVERB
Lets you adjust the reverb size
and level.
SFX2
The button makes a sound effect
when pressed.
SLIDESHOW PREV.
Goes back one slide on your
computer.
SLIDESHOW NEXT
Goes forward one slide on your
computer.
MEMO
You can freely assign WAV files on your computer for the SFX1 and
SFX2 sounds.
1
Click the [CHANGE] button for A1 and A2 respectively.
2
Click the [FILE OPEN] button.
The file selection dialog box opens.
3
Select the WAV file you want to assign.
This sets the name of the WAV file you selected.
Click the [PREVIEW] button to preview the WAV file you set.
Click the [PRESET 1] and [PRESET 2] buttons to set the default sound
effects.
4
Click the [CHANGE SOUND] button.
The WAV files you selected are uploaded to the UVC-02.
5
Press the [A1]/ [A2] buttons on the UVC-02 to check
whether the sounds are playing.
Assignable WAV file formats
5
Sample rate: 44.1 kHz/48 kHz
5
Bit depth: 16 bits
5
Maximum Time: 5 sec.