DJI Ronin 4D 4-Axis Cinema Camera 8K Combo Kit User Manual
Page 8
EN
©
2021 DJI OSMO All Rights Reserved.
7
DJI Ronin 4D
Quick Start Guide
8. USB-C Port
Use to connect an external storage card or to connect to a
computer to activate the device or update firmware.
9. Storage Card Compartment
Use to insert an CFexpress2.0 Type B card or DJI PROSSD 1TB
card.
10. C1, C2 Buttons
Press the C1 button to recenter the gimbal. Press the C2 button
to switch between follow and lock mode of the Z axis.
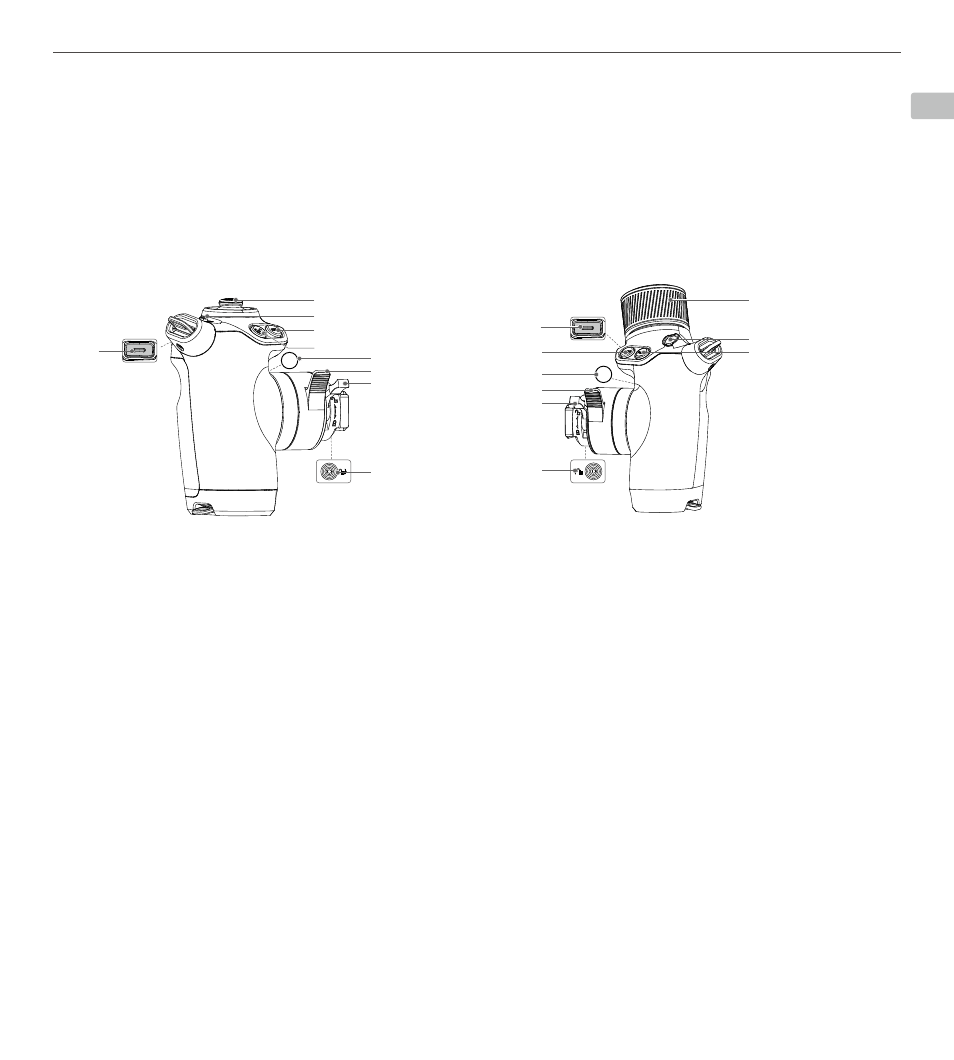
1. Joystick
Move the joystick left and right to pan the gimbal and up and
down to tilt the gimbal by default.
2. Joystick Lock
The gimbal will not respond to joystick operations when the
joystick lock is in the locked position.
3. Exposure Assist Button
Press to enable or disable the exposure display.
4. ActiveTrack Button
Press and hold for 1 second to enter or exit ActiveTrack. Press to
confirm the subject after entering ActiveTrack.
5. M Button
Press and hold to enter Sport mode. Release to exit Sport mode.
6. Hand Grip Angle Adjustment Lever
Press and hold the lever to adjust the angle of the handle grip.
The hand grip will lock in place once the lever is released. Do not
adjust the left and right hand grips simultaneously.
7. Hand Grip Lock Lever
Used to lock the hand grip in place.
8. Safety Lock
Release the safety lock before detaching the hand grip.
9. Trigger
Press twice to center the subject in the center of the camera view
after enabling ActiveTrack. Press twice to recenter the gimbal
Left Hand
Grip
11. Display Port
Used to connect the high-bright main monitor.
12. Audio Port
Includes a 3.5mm microphone port and a headphone port.
13. HDMI Port
Used for HDMI output.
14. DC-IN Port
Has an input voltage of 12-30 V.
Right Hand Grip
1. Dial
Turn to adjust focus or aperture and to scroll through options on
the high-bright main monitor.
2. Record Button
Press once to start or stop recording.
3. Focus Peak Button
Press once to enable or disable focus peak by default.
4. Safety Lock
Release the safety lock before detaching the hand grip.
5. Hand Grip Lock Lever
Used to lock the hand grip in place.
6. Hand Grip Angle Adjustment Lever
Press and hold the lever to adjust the angle of the hand grip.
The hand grip will lock in place once the lever is released. Do not
adjust the left and right hand grips simultaneously.
7. Focus Button
Press once to switch between manual focus and auto focus.
8. Mode Button
Press once to switch the function of the dial.
9. Trigger
Press twice to enable or disable the Z axis. Press and hold to
enter lock mode when Z axis is enabled.
1
1
2
3
4
5
6
7
8
9
2
8
9
7
6
3
4
5
M
AF