Installation guide, Mounting the hide-away unit, Mounting the speaker – Panasonic CQ-VD7200U User Manual
Page 33
69
CQ-VD7200U
60
E
N
G
L
I
S
H
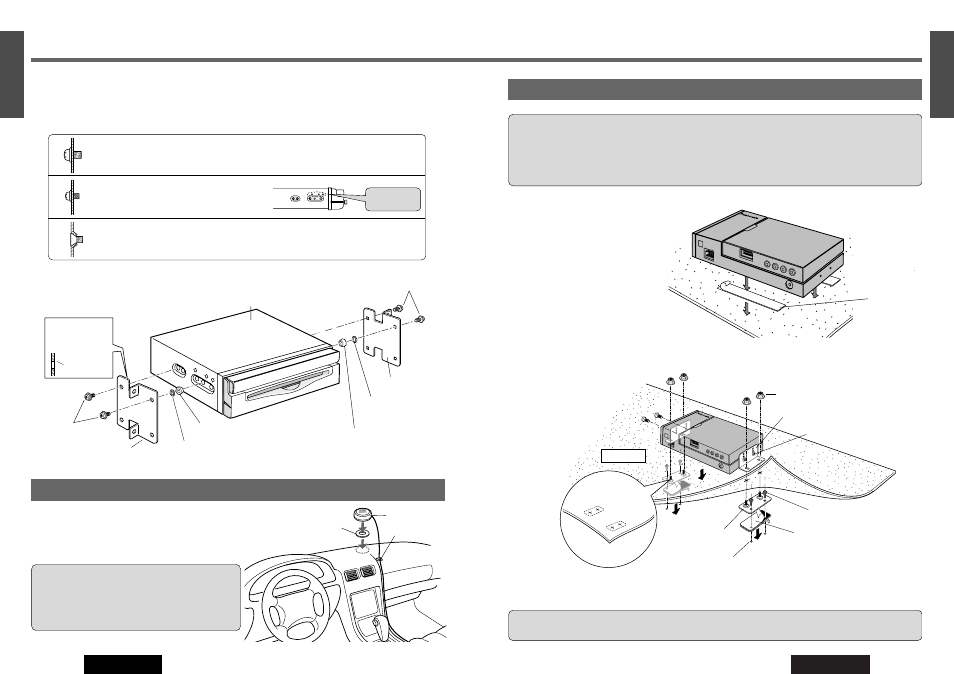
Attach the seal side of the Velcro Tape @3
to the hide-away unit, then mount the unit
on the carpet.
Note: Some carpet materials may not be
suitable for this mounting method. In this
case, please contact your nearest
Panasonic Servicenter for installation.
❑ Unit installation by using the Mounting Brackets @0 and the Base Brackets @1.
@3 Velcro Tape
!9 Hex. Nut (M5)
Carpet
@0 Mounting Bracket
!7 Binding-Head Screw
(M5 x 8 mm)
!8 Tapping Screw (ø 6 x 20 mm)
@2 Double-Faced Adhesive Tape
Drill for 4.8 mm diameter holes to the chassis.
* Put the tape and the base bracket together with each hole of the tape and
bracket connected so that the screw goes in at two positions.
@1 Base Bracket
Let the bolts of
the base bracket
pass the carpet.
Make cuts by
using cutter.
Note: Apply an anticorrosive to the holes and tapping screws.
❑ Mount the unit on the car carpet by using Velcro Tape @3.
Mounting the Hide-away Unit
Cautions:
¡Never mount the unit in any of the following locations to avoid damage due to overheating;
1. Near the heater port.
2. Places like the dashboard or rear deck, where it may be exposed to direct sunlight.
¡Do not mount the unit near the door, where it could be exposed to rain.
¡Do not separate the hide-away unit.
Caution: You run the risk of interfering with the mounting or causing damage by drilling into the gas tank, a wiring
harness, or other component.
68
CQ-VD7200U
59
E
N
G
L
I
S
H
Before mounting the speaker, wipe water, dust and oil stains
off from the place where the speaker should be mounted to
enhance adhesive strength.
Mounting the Speaker
Speaker
!5 Double-Faced
Adhesive Tape
!6 Clamp
Installation Guide
(continued)
Use the supplied Spacer !3 if mounting hole of your car is shaped like below.
Display Unit
!3 Spacer
!4 Double-Faced Adhesive Tape
!0 Binding-Head Screw
(M5 x 6 mm)
Bracket
Mounting Hole
of a Bracket
(in section)
Existing Bracket (L)
(Bracket originally attached to the car)
!4 Double-Faced
Adhesive Tape
Existing Bracket (R)
!0 Binding-Head Screw
(M5 x 6 mm)
!3 Spacer
❏ Installation Procedures (When not using Mounting Collar w)
Use the brackets supplied with your car when mounting this unit. The bracket shape and mounting method vary with car
manufacturers, car types and manufacturing year. Please consult your nearest dealer or installer.
Select mounting screws according to the hole positions and hole shape of the bracket.
!1 Flat-Head Screw (M5 x 6 mm)
4 pieces
!2 Binding-Head Screw (M4 x 3 mm)
4 pieces
!0 Binding-Head Screw (M5 x 6 mm)
2 pieces
Recycle the Binding-Head Screws that fixed the transportation brackets for two more
positions.
When using these
mounting holes
Cautions:
¡Do not install the speaker in a location which obstructs
operation of the air bag or other safety equipment.
¡Do not leave a credit card or other magnetic cards near
the speaker to avoid damaging the cards.