Operation – Ryobi RP4200 User Manual
Page 9
9
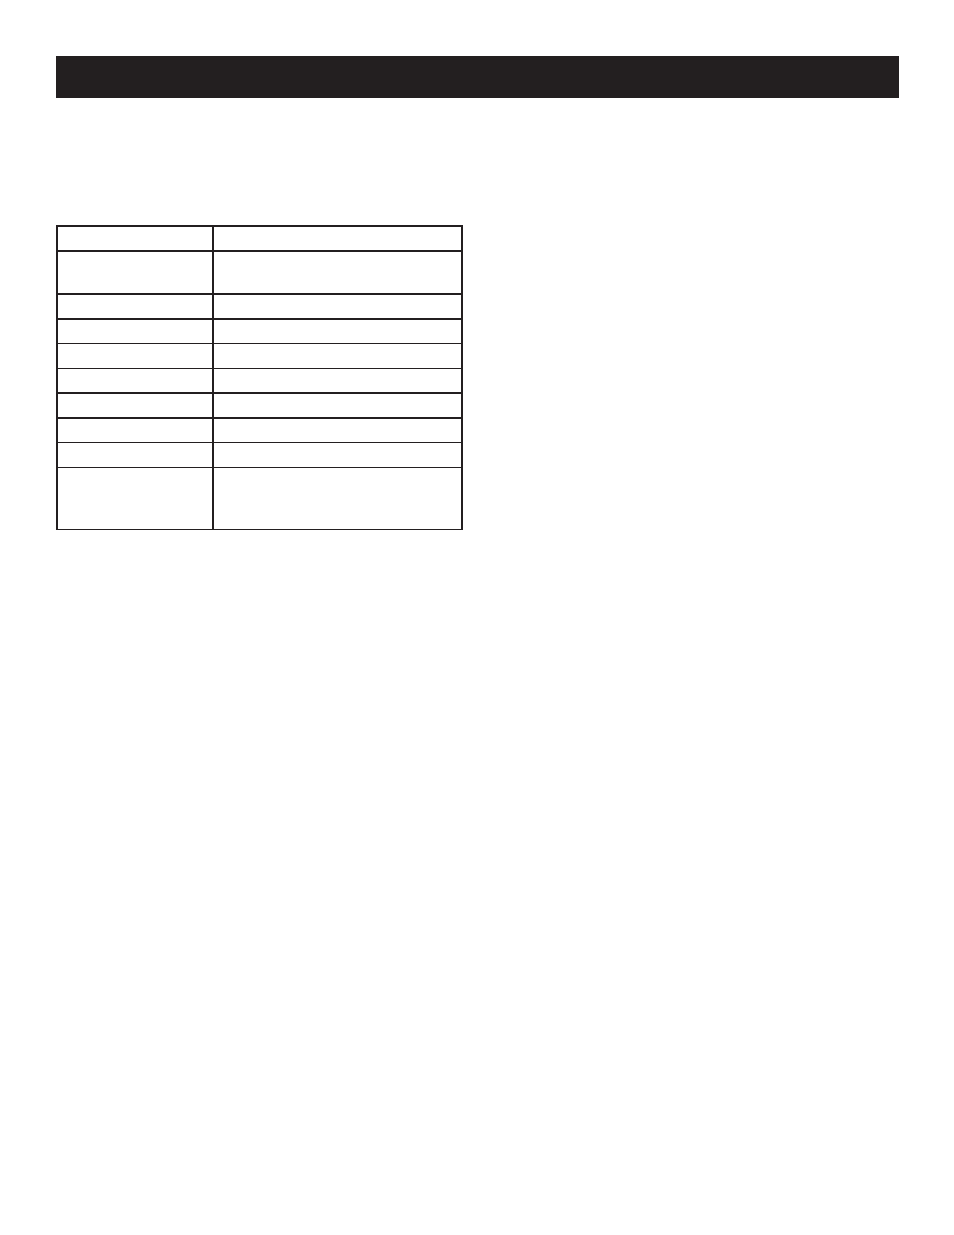
BASIC OPERATION SETTINGS
Some of the camera’s basic operations are factory-set
to defaults that can be changed depending on operator
preference. These settings can be changed in the utilities
menu.
Utility
Settings
Date/Time Display
Month/Day/Year, Hour/ Minute
or, Month/Day/Year
Set Date
Date and Time
Language
English, French, Spanish
Key Sound
On, Off
Memory
Internal, SD Card
Format Memory
Internal, SD Card, Cancel
LCD Time Out
15 sec, 30 sec, Never
Auto Power Off
60 sec, 120 sec, Never
Factory Reset
Restores all utilities
to factory defaults
Cancel
To change these utilities:
Turn the camera on.
Press the
menu button.
Using the right navigation key, select the third icon on the
top bar ( wrench icon ).
Use the navigation keys to scroll through the menus and
select the item(s) you wish to change.
Press the
OK button.
Use the navigation keys to select your preferences, and
press
OK to confirm each new setting.
To return to Camera Mode, press
menu.
ZOOM, MACRO, FLASH, AND TIME/DATE
STAMP
See Figure 1, page 11.
Zoom
To zoom in or out, press the
ZOOM button.
Use the (
+) key to zoom in and the ( - ) key to zoom out.
When zooming in, a bar at the bottom of the LCD will
indicate
W (wide) or T (tele).
When the optical zoom factor reaches its maximum value,
it will pause. Continuing to depress the button will switch
to digital zoom.
Press
OK to continue using digital zoom.
Macro Button
For very close range shots (approximately 11 in to 16 in.),
press the
Macro button.
The
Macro icon will appear on the LCD.
To resume normal operation, press the
Macro button.
Flash Modes
Press the
FLASH button to change flash modes. You
OPERATION
can choose Automatic flash mode, On, Off, or Red-Eye
Reduction.
Time and Date Stamp
Press the down arrow (navigation key) to add a time and
date stamp to your photos.
NOTE: This feature works only in Camera mode.
RAPID SHOT, SELF-TIMER, AND TIME-LAPSE
MODE
See Figure 1, page 11.
Rapid Shot
Rapid Shot mode takes three photos in rapid succession
and is good for action or motion shots.
In Camera mode, press the
UP arrow once. The rapid
shot icon will appear in the top center of the LCD screen.
Press the shutter button slightly to focus.
Fully depress the shutter button and while moving the
camera to follow your subject.
Release the shutter button.
After a pause, the LCD will display the first of three
shots. You can view the shots by pressing PLAY and the
navigation keys.
Self-timer Mode (Single shot)
Self-timer mode takes a single picture and is timed in
seconds. To use the self-timer, you should set the camera
on a stable surface. For best results, use a tripod with the
tripod mount on the bottom of the camera.
Frame the desired shot on the LCD screen.
In Camera mode, press the
UP arrow three times. The
clock icon will show the seconds timer.
Press and hold the
OK button for one second to pull up
the time selection menu. Select 2 seconds, 5 seconds,
or 10 seconds. Press
OK.
Fully depress the shutter button.
The camera will take a picture at the selected time interval.
The shot will appear on the LCD screen.
Time-Lapse Mode
Time-lapse mode takes a photo every 5 minutes, 15 minutes,
or 1 photo per hour.
For best results, use a tripod with the tripod mount on the
bottom of the camera.
Frame the desired shot on the LCD screen.
In Camera mode, press the
UP arrow three times. The
clock icon will show the minutes timer.
Press and hold the
OK button for one second to pull up
the time selection menu. Select 5 minutes, 15 minutes,
or 1 hour. Press
OK.
Fully depress the shutter button.
The camera will continue to take a picture at the selected
time interval.
NOTE: The shutter will click with each shot the camera
takes.