Nexen LSCC-44 923632 User Manual
Page 9
9
FORM NO. L-21099-G-1209
rePaIr KIT
The repair kit replaces bearings and O-Rings.
nOTe
See Table 3 and Figure 3 for correct tools.
1. Remove the Retaining Ring (Item 14) from the Hub
(Item 1) at the Air Chamber end of the unit.
2. Set the unit on the two pieces of I-beam with the unit
sitting on the I-beams.
3. Using an Arbor Press, align the proper diameter
shaft with the Hub and apply pressure with the Arbor
Press.
nOTe
Support the pilot end of the unit as the Hub is
pressed out to prevent the unit from falling to the
floor.
4. Remove the Friction Facings (Item 4) and Friction
Plates (Item 5) along with Springs from the drive
pins.
nOTe
Take care not to lose any springs as they are not
provided in this kit.
refer to Figures 5 & 6.
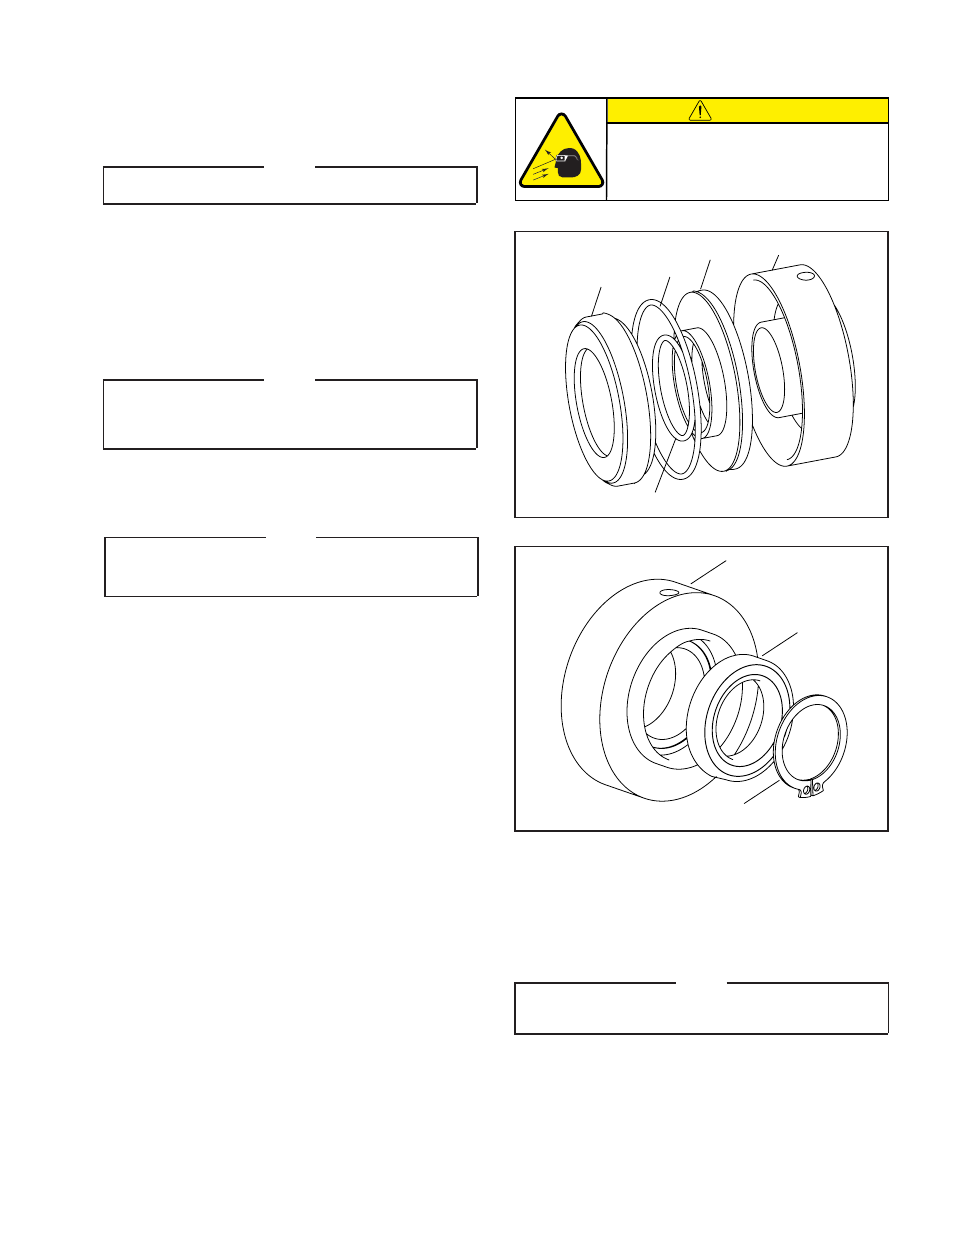
5. Carefully and Slowly apply air to the Air Chamber (Item
3) while rocking the bearing and piston combination.
The Piston (Item 11) and Bearing (Item 10) should now
be separated from Air Chamber (Item 3) housing.
6. Remove Bearing (Item 10) from Piston (Item 11).
7. Clean the new Bearing (Item 10) and Piston (Item 11)
surface and apply an adequate amount of Loctite
®
680
to evenly coat the outer race of the new bearing.
8. Press the new Bearing (Item 10) onto the Piston.
9. Press the Bearing (Item 6) out of the Air Chamber
(Item 3).
10. Clean the new Bearing (Item 6) and Air Chamber
(Item 3) surface and apply an adequate amount of
Loctite
®
680 to evenly coat the outer race of the new
bearing.
11. Install the new bearing (Item 6) into the Air Chamber
(Item 3), taking care to press on the OD of the bearing
to prevent Brinelling of the races.
12. Remove the O-Rings (Items 12 & 13) from the Piston
(Item 11) and clean the piston so it is free of any
contaminants.
13. Install new O-Rings (Items 12 & 13) and apply a
generous amount of lubrication to the O-Rings and
the Air Chamber wall it rides against.
Figure 5
10
12
13
11
3
CAUTION
Working with spring loaded or tension
loaded fasteners and devices can cause
injury. Wear safety glasses and take the
appropriate safety precautions.
MaInTenanCe (continued)
Figure 6
3
6
14
14. Remove Retaining Rings (Item 7 & 14) from the Pilot
(Item 2) end of the unit.
15. Remove the Hub (Item 1) from the Pilot (Item 2).
16. Using the proper fixtures, press the old bearing (Item
6) out of the Pilot (Item 2).
nOTe
Be sure to use a fixture that will support the Pilot
(Item 3), keeping the pins from being damaged.
17. Clean the new Bearing (Item 6) and Pilot (Item 2)
surface and apply an adequate amount of Loctite
®
680
to evenly coat the outer race of the new bearing.
18. Press new Bearing (Item 6) into Pilot (Item 2).
- LSCC-44 923567 LSCC-44 923595 LSCC-44 923631 LSCC-44 923619 LSCC-44 923569 LSCC-32 923605 LSCC-32 923583 LSCC-32 923582 LSCC-32 923603 LSCC-44 923586 LSCC-44 923556 LSCC-44 923568 LSCC-44 923563 LSCC-44 923585 LSCC-44 923587 LSCC-44 923581 LSCC-32 923566 LSCC-32 923607 LSCC-44 923555 LSCC-44 923557 LSCC-44 923562 LSCC-44 923554 LSCC-44 923550 LSCC-44 923620 LSCC-44 923621 LSCC-44 923590 LSCC-54 923604 LSCC-54 923615 LSCC-54 923588 LSCC-54 923576 LSCC-54 923617 LSCC-32 923564 LSCC-32 923565 LSCC-32 923553 LSCC-32 923622 LSCC-44 923628 LSCC-44 923551 LSCC-44 923552 LSCC-32 923559 LSCC-32 923560 LSCC-54 923577 LSCC-54 923578