Parts replacement: 4h – Nexen 4H35P 923512 User Manual
Page 9
9
FORM NO. L-20007-K-0913
PARTS REPLACEMENT: 4H
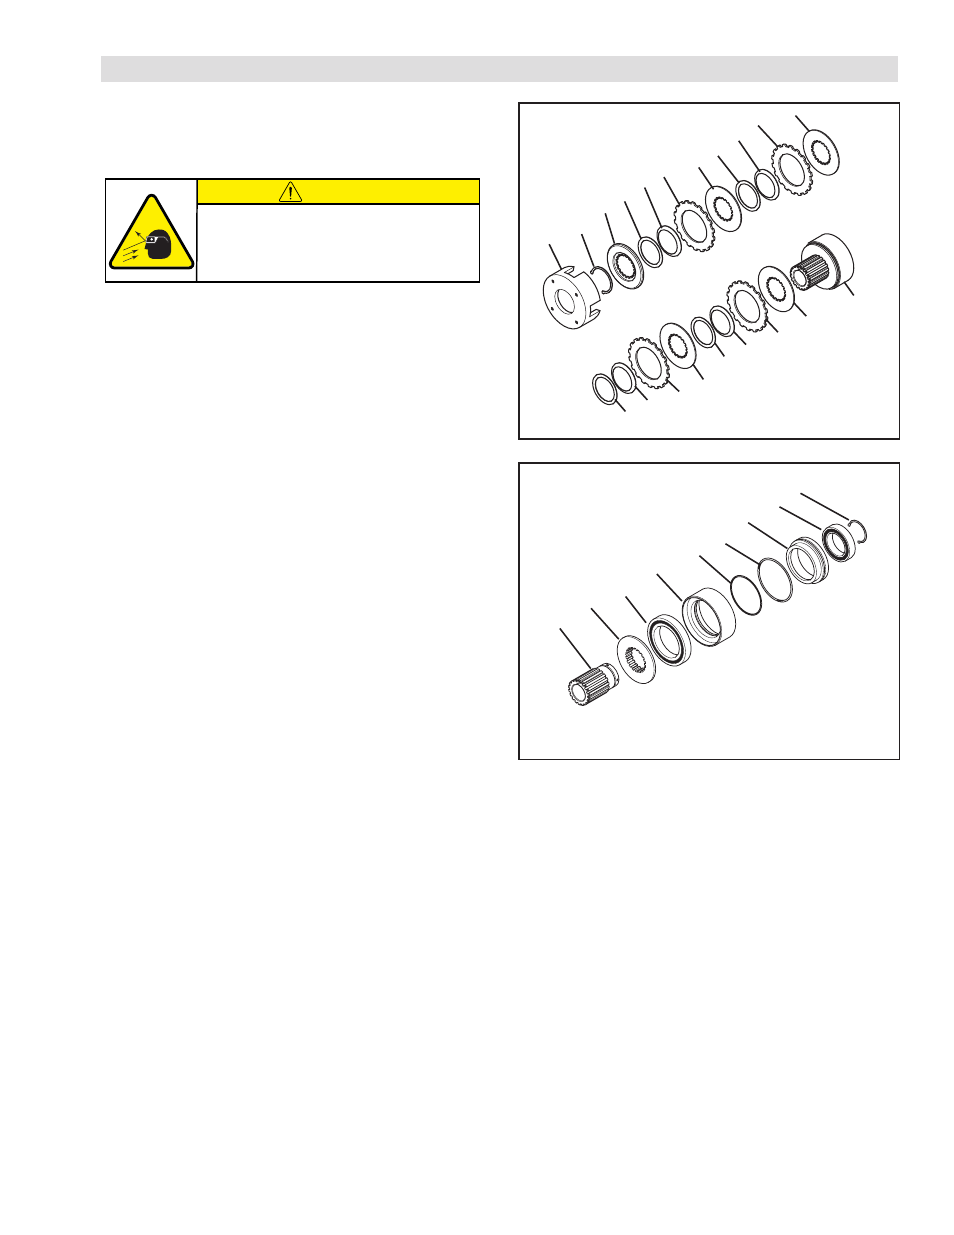
Refer to Figures 4 & 5.
1. Slide the Driving Shell (Item 17) off the Multiple Disc
Clutch.
2. Remove the Retaining Ring (Item 12) from the Hub
(Item 1).
3. Slide the End Flange (Item 8), Spring Back-Up Washers
(Item 9), Waved Springs (Item 7), Outer Plates (Item
5), and Inner Plates (Item 6) off the Hub (Item 1).
4. Remove the Retaining Ring (Item 13).
5. Press the Hub (Item 1) out of the Ball Bearing (Item
11) and Thrust Plate (Item 4).
6. Separate the Piston (Item 3) and Ball Bearing (Item
11) from the Cylinder (Item 2) and Ball Bearing (Item
10).
7. Remove and discard the old O-ring Seals (Items 14
and 15).
8. Press the Thrust Plate (Item 4) out of the Ball Bearing
(Item 10) and Cylinder (Item 2).
9. Press the old Ball Bearing (Item 11) out of the Piston
(Item 3).
10. Press the old Ball Bearing (Item 10) out of the Cylinder
(Item 2).
11. Clean the bearing bore of both the Piston (Item 3) and
Cylinder (Item 2) with fresh solvent, making sure all old
Loctite
®
residue is removed.
12. Apply an adequate amount of Loctite
®
680 to evenly
coat the outer race of the new Ball Bearings (Items 10
and 11).
13. Press the new Ball Bearing (Item 10) into the Cylinder
(Item 2) and the new Ball Bearing (Item 11) into the
Piston (Item 3).
14. Press the Thrust Plate (Item 4) into the Ball Bearing
(Item 10) and Cylinder (Item 2).
15. Coat the new O-ring Seals (Items 14 and 15) and the
O-Ring contact surfaces of the Piston (Item 3) and
Cylinder (Item 2) with a thin film of O-Ring lubricant;
then, install the new O-Ring Seals into the Cylinder
and Piston.
1
FIGURE 5
4
10
2
15
14
3
11
13
FIGURE 4
17
8
12
9
7
5
6
9
7
5
6
9
7
5
6
9
7
5
6
1
CAUTION
Working with spring loaded or tension
loaded fasteners and devices can cause
injury. Wear safety glasses and take the
appropriate safety precautions.
16. Slide the Piston (Item 3) into the Cylinder (Item 2).
17. Slide the Hub (Item 1) into the Cylinder (Item 2) and
Piston (Item 3).
18. Reinstall the Retaining Ring (Item 13).
19. Slide the new Spring Back-Up Washers (Item 9), Waved
Springs (Item 7), Outer Plates (Item 5), and Inner Plates
(Item 6) onto the Hub (Item 1).
20. Slide the End Flange (Item 8) onto the Hub (Item 1).
21. Reinstall the Retaining Ring (Item 12).
22. Slide the Driving Shell (Item 17) onto the Multiple Disc
Clutch.
- 4H35P 923511 4H35P 923500 4H35P 923501 4H40P 923601 4H40P 923611 4H40P 923600 4H40P 923613 4H40P 923612 4H40P 923614 4H70P 924012 4H70P 924013 4H70P 924002 4H70P 924000 4H70P 924014 4H70P 924004 4H70P 924001 4H45P 923702 4H45P 923712 4H45P 923700 4H45P 923701 4H45P 923713 4H50P 923809 4H50P 923801 4H50P 923803 4H50P 923812 4H50P 923800 4H50P 923804 4H50P 923802 4H50P 923813 4H60P 923902 4H60P 923900 4H30P 923412 4H30P 923400 4H30P 923413 4H30P 923401 4H35 917700 4H40 917800 4H70 918200 4H45 917900 4H50 918000 4H60 918100 4H60 918101 4H30 917600 4H30 918300 4H35 918400 4H40 918500 4H45 918600 4H70 918900 4H30P 919000 4H35P 919100 4H40P 919200 4H45P 919300 4H50P 919400 4H60P 919500 4H70P 919600 4H30 921100 4H30P 921100 4H35 921200 4H35P 921200 4H40 921300 4H40P 921300 4H45 921400 4H45P 921400 4H50 921500 4H50P 921500 4H60 921600 4H60P 921600 4H70 921700 4H70P 921700