Knox video chameleon256 routing switcher – Knox Video Chameleon256 Series User Manual
Page 16
Page 14
Page 11
KNOX VIDEO
Chameleon256 Routing Switcher
KNOX VIDEO
Chameleon256 Routing Switcher
How to Use the Queue Command:
Sometimes it is important to have a number of switches made all at the same
instant. It is possible using the keypad controller to queue a number of pattern
changes ahead of time, then to have them all executed at once. Push the QUEUE
button, then enter crosspoint changes as usual, selecting BOTH, VIDEO, or
AUDIO, and entering the output and input numbers followed by the ENTER key.
(Note that the display will show an E for a BOTH, an F for a VIDEO, and a G for an
AUDIO -- this denotes that the controller is in the Queue mode.) Each change will
be recorded at the routing switcher, but the changes will not take place until the
QUEUE button is pushed a second time, or if a change is made at the router’s front
panel controls.
Examples:
E18[ENTER],
F3208[ENTER],
G128064[ENTER]
How to Interrogate a Crosspoint Condition:
To determine the condition of a particular crosspoint, enter the Display Mode
by pushing the DISPLAY key. Then enter a one-, two-, or three-digit output
number, and push ENTER. The LCD display will show all the crosspoints two at a
time, beginning at that output number. Push the ENTER key to see more outputs;
the display will return to READY after a few seconds if no more ENTERs are
pushed. To repeat the last output queried, push the DISPLAY button followed by
the ENTER button.
To display the entire map just push the DISPLAY key and push ENTER. Push
key to advance through the crosspoints.
How to Use the Timed Pattern Recall Mode:
The controller can be programmed to recall the crosspoint patterns stored in
the router at timed intervals. To turn the timed mode on, push the STORE key, then
enter 90, then push ENTER. The display will read TIMED MODE ON. To turn timed
mode off, push STORE, then 91, then ENTER. The display will read TIMED MODE
OFF, then return to the READY prompt after a few seconds.
To set the time between patterns, push the STORE key, then enter 92. The
display will prompt you for a time interval from 1 to 999; enter a one-, two-, or three-digit
number and push ENTER. Each increment of time interval is about 1 second.
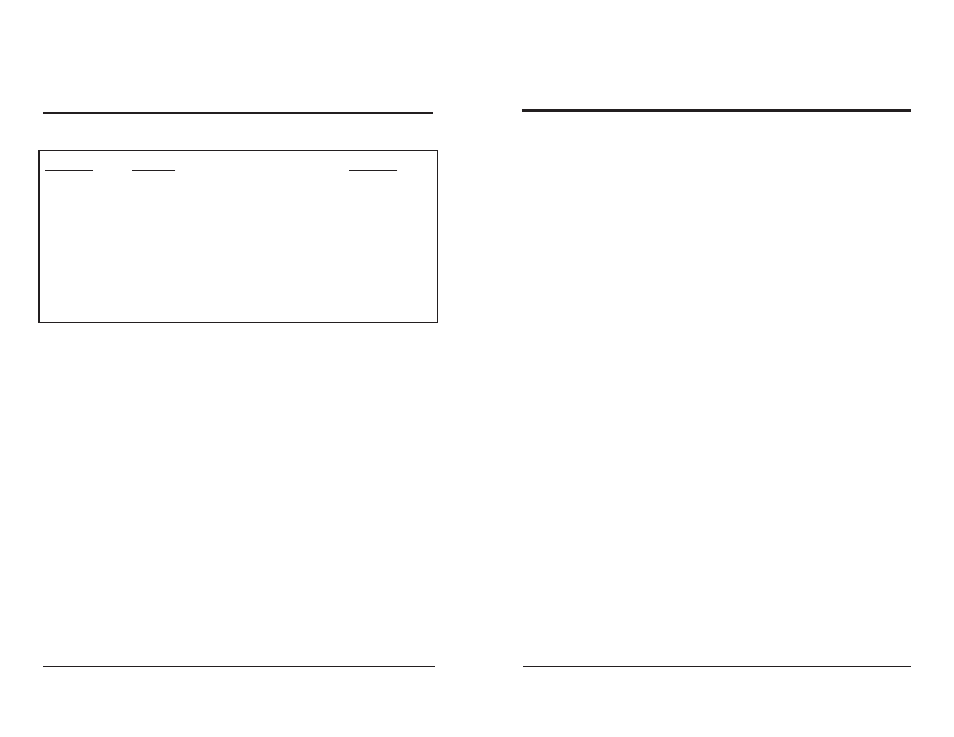
(table continued from previous page)
Command
Function
Argument
STORE95
Salvo Mode on/off
STORE96
Display current pattern
Enter to continue
STORE97
Interrogates for cards
Chameleons only
STORE98
Lock/unlock output
1-256
STORE99
Queue mode on/off
Mode
1=Full Function
Mode
2=Single Station
Mode
3=Strings
Mode
4=Recall Patterns
3.4 OPERATING FROM THE RS232 INPUT
A simple protocol allows all crosspoints to be set through the RS232 ports.
There are three independent RS232 inputs connectors (P1, P2, and P3) on the rear
of the Chameleon256 unit; each may be connected to an upstream terminal,
computer, or other software-driven RS232 device. If multiple Chameleon256
chassis are to be interconnected, the RS232 input should go to P1 or P2; P3 will be
used to daisy-chain the RS232 signal to P1 or P2 on the next chassis.
CAUTION! While each port is independent of the other, there is an aggregate
maximum data transfer rate that can be accommodated by the Chameleon256’s
CPU. Use caution in driving more than one port with heavy traffic at the same time.
A fourth RS232 port is available on the CPU card inside the Chameleon256. It
is reserved for use by the front panel controller, or for diagnostic use by service
personnel.
Note: You may use upper or lower case letters in any command.